The SOLIDWORKS Toolbox can be a powerful tool for working with assemblies. As discussed in previous blog posts, the Toolbox can be a valuable asset for automating the usage of standardized components in your designs. The standard Toolbox has a vast catalog of components like fasteners, washers, O-rings, and that helps standardize designs and eliminate the need to source CAD models for those types of components.
Be sure to check out our other blog posts on the Toolbox to get up to speed with its applications and benefits (and check out the resources at the end of the post for even more on SOLIDWORKS toolbox):
- Automating Fasteners and Components with the SOLIDWORKS Toolbox
- SOLIDWORKS Toolbox: How You Can Add Nuts and Bolts Quickly with Smart Fasteners
- How to Quickly and Easily Include Spur Gears in Your SOLIDWORKS Assemblies
You aren’t just stuck with the “stock” data in the Toolbox. You can also configure and manage the Toolbox to include new sizes, new components, or to use custom data like assigning specific Part Numbers, vendors, and procurement information for the Toolbox components you use in your assemblies.
In this blog post, we’ll look at what types of things you can customize in your Toolbox and how managing the Toolbox works.
Using Toolbox Administration
Through the Toolbox administration tool, you have the flexibility to customize the Toolbox to match your needs, including modifying the contents of the Toolbox itself. To access the Toolbox administration tool, click the “Configure Toolbox” button in the Task Pane or the “Configure” button in the Hole “Wizard/Toolbox” section of the System Options.

Through the Toolbox administration tool, you can customize and configure nearly anything about the Toolbox including:
- User permissions
- How components are used
- How new files and part numbers are created when Toolbox components are inserted into an assembly
- The types of fasteners users have access to
- Smart fastener settings
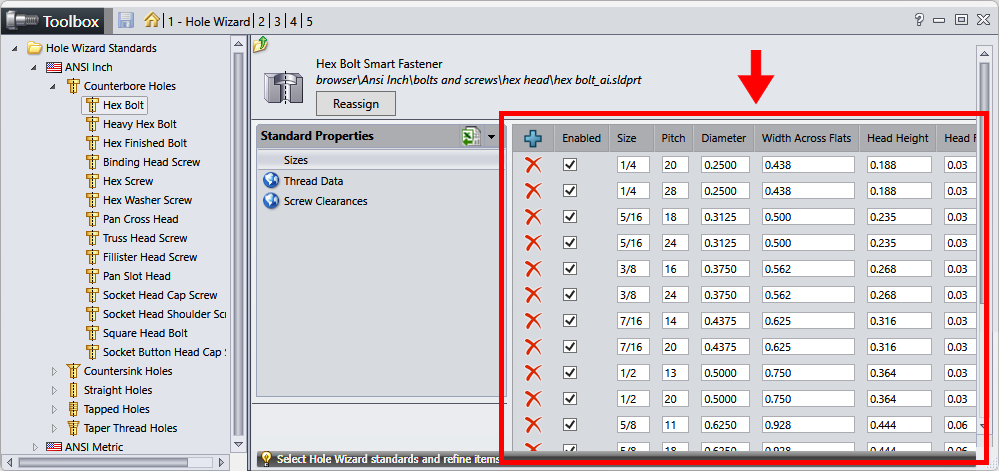
- Component-specific settings like dimensions and sizes
Customizing & Configuring Toolbox Data
The Toolbox lets you trim down and customize what lives in the Toolbox library to simplify the process of using Toolbox components in your assemblies.
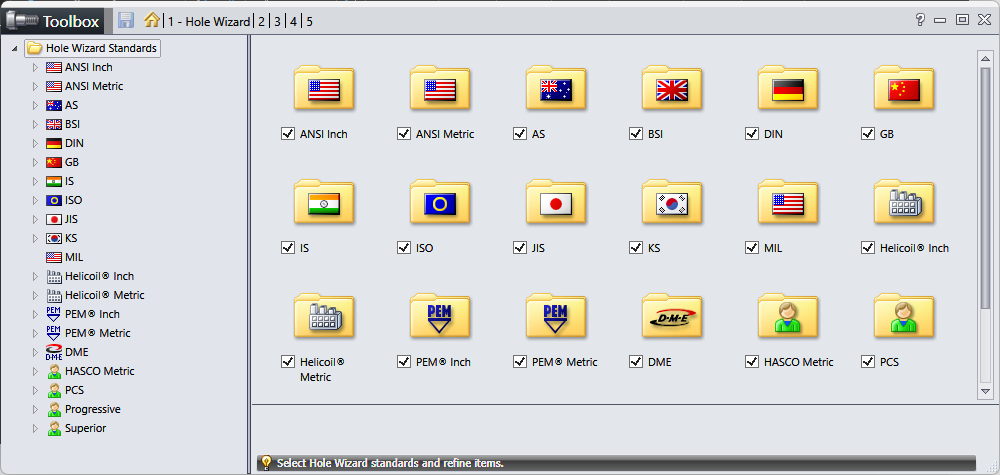
For both Hole Wizard data and Toolbox components, you can enable or disable specific components and component types directly in the Administration tool. For shared Toolbox configurations, you can control which specific components are available in specific designs for all users. This helps reduce room for error and ensures that designers and engineers are always pulling the correct components each and every time.
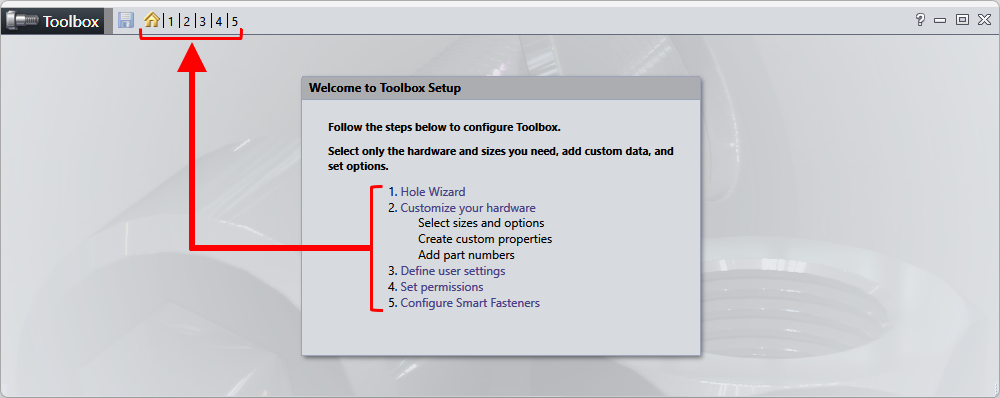
To navigate the options for customizing and configuring Toolbox data, use the numbered links at the top left of the Administration tool. These numbers correspond to the various options to set up and manage the Toolbox.
For example, if specific designs will only use ANSI metric fasteners, you can modify your Toolbox to only include fasteners for that standard. Or if there is a specific standard, fastener type, or size that should never be used in a design, you can simply toggle them off. And if you need to get access to those components or standards again in the future, you can just toggle them back on.

You can also customize the specific sizes and callouts for each of the Toolbox components as well. This gives you full flexibility to match the Toolbox to your specific needs.
The Hole Wizard data also lives in the SOLIDWORKS Toolbox. With the Toolbox administration tool, you can also customize Hole Wizard data related to specific fastener standards. If you have specific processes or custom sizing for Hole Wizard features that you need to fit your products, you can make those changes directly in the administration tool. This helps ensure consistency across designs and mitigates the need to make these types of changes manually in SOLIDWORKS.
SOLIDWORKS Toolbox: Adding Parts
You can also add additional versions of components to the Toolbox. If you need a component variation that the Toolbox does not list, simply add a new line via the Toolbox administration tool and enter the specifications. This includes things like:
- Fastener lengths
- Bearing IDs and ODs
- Thread data
- Gear modules
- Component finish
For example, an ISO 4017 M6 hex head screw is available in lengths from 12mm to 60mm in the stock Toolbox. Although not as commonly used, the ISO 4017 standard also specifies lengths outside of this range. So, if you need, let’s say, an ISO 4017 M6 bolt that’s 6mm in length for a design, all you need to do is add a new line in the Toolbox for that new length and you are all set to go.
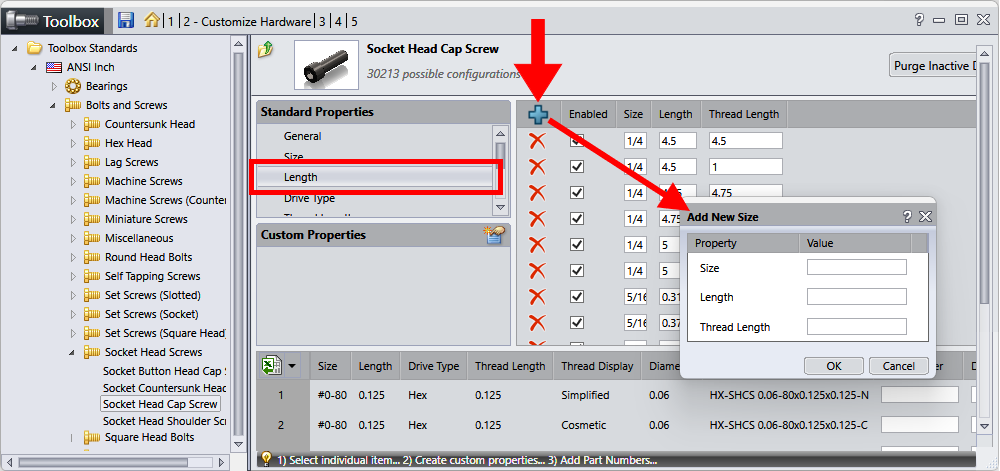
You can also add entirely new component sizes, if necessary. If the stock Toolbox doesn’t have the correct size of a specific component, such as a fastener, simply add it to the Toolbox via the Administration tool.

Custom parts can also be added to the Toolbox. However, you won’t have access to the same level of automation with those parts simply because they aren’t standardized components. In cases like this, it’s best practice to just add those custom parts to a new design library instead of to the Toolbox.
Note: Before making changes to specific data in the Toolbox administration tool it’s recommended that you back up your existing Toolbox installation. Make sure you understand the data being changed and how those changes affect both past and future usage of the components being changed.
Shared Toolbox Libraries
One of the most useful aspects of the Toolbox is the ability to configure and manage a single library for multiple users. If you have many engineers and designers who need the Toolbox, instead of installing and configuring it on every single machine, you can install it on a network drive or in a PDM vault.
This ensures that every engineer or designer within your company is using the same Toolbox parts without any overlap or need to redefine components. Once a particular fastener has been configured and assigned a part number, anyone else who needs that fastener will always be able to pull the correct CAD model from the common pool of part numbers thanks to the Toolbox.
As discussed in previous blog posts, you can assign Part Numbers to Toolbox components “in situ” as we use them in SOLIDWORKS.
But in the case of a shared Toolbox library, it can be helpful to assign those Part Numbers ahead of time to ensure that the correct Part Numbers are used every time. The Toolbox administration tool lets you assign part numbers for the families of Toolbox components you need all at once before anyone ever uses them SOLIDWORKS. You can also assign things like descriptions, materials, vendors, vendor part numbers, etc., as necessary, to fully establish the file properties you need for each component, for every user.
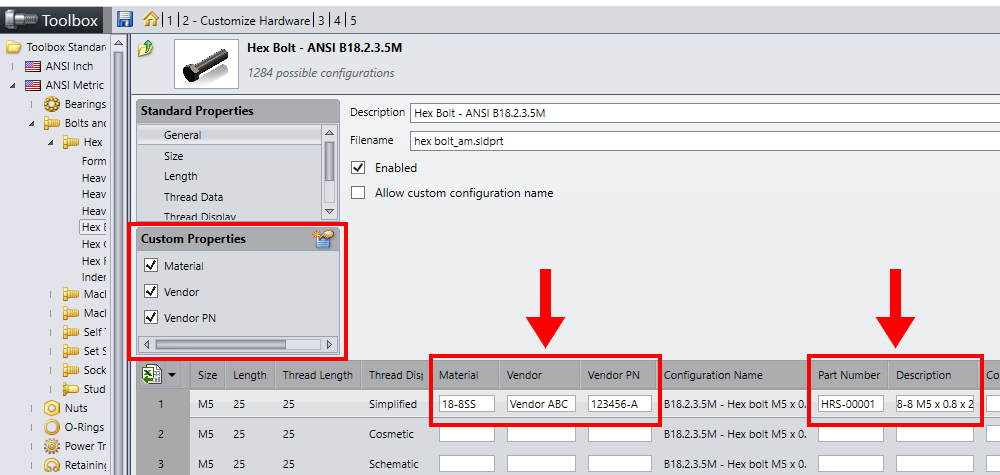
In doing so, all designers and engineers can grab the correct Toolbox components quickly and easily without having to spend valuable engineering time doing administrative tasks like assigning file properties.
Import & Export Features
When configuring and customizing the Toolbox, you can also take advantage of the Excel Import/Export functionality within the Administration tool. Here you can import and export data per component type which is a significant help when customizing the Toolbox.

Using the Excel export generates a formatted Excel sheet for the selected component type. You can then use this Excel sheet as a template to add things like additional sizes or customize the data for existing sizes.
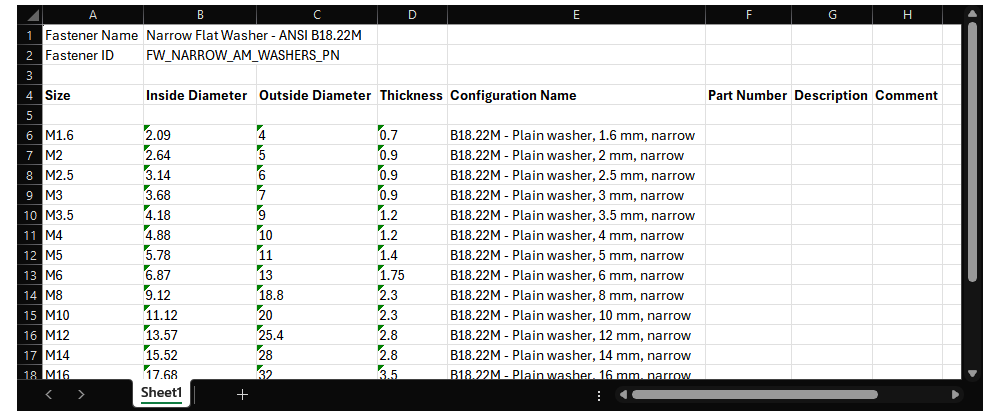
Here you can add things like Part Numbers, Descriptions, or custom property information like Vendor or Material. This allows you to specify data for multiple component sizes and variations using the tools in Excel. And once you’ve populated the data you need, you can re-import that data into the Toolbox via the Administration tool, allowing you to customize large batches of data all at once. This helps further streamline the process of configuring and managing your Toolbox to fit your specific applications.
More Info on SOLIDWORKS Toolbox
Configuring and managing your SOLIDWORKS Toolbox can add an additional level of efficiency and consistency when using standardized components. By being able to tailor the Toolbox to specific needs via the Toolbox administration tool, you can ensure that all users have access to all of the specific components and data they need. With the Toolbox administration tool, you can get the most out of the Toolbox to help bring efficiency to your assembly designs.
Further reading:
YouTube videos:
As always, if you have any questions or want to know more feel free to reach out! We are always happy to discuss how the suite of SOLIDWORKS software can address your engineering and design challenges to help improve your workflows and bring efficiency to your development process.