Have you ever struggled with placing fasteners in your SOLIDWORKS assemblies? If so, the subject of this blog post might be just what you’ve been looking for.
Here, we discuss a tool included with the SOLIDWORKS Toolbox designed to greatly improve the efficiency of our workflows when adding fasteners, such as screws, nuts, bolts, and washers, to a SOLIDWORKS assembly: Smart Fasteners.
We will dive into the functionality of Smart Fasteners, how to use them, and how they work with the rest of the Toolbox.
What Are Smart Fasteners?
If you’ve read our post on using the SOLIDWORKS Toolbox, you know how useful it can be. The Toolbox is second to none when it comes to using and automating standardized components like fasteners in our SOLIDWORKS assemblies.
And when we need fasteners specifically, additional tools, like Smart Fasteners, extend Toolbox automation.
Smart Fasteners are an assembly-level feature of the Toolbox that comes included with SOLIDWORKS Professional and Premium. With Smart Fasteners, we can automatically populate multiple holes in our assemblies with the correct fasteners in only a few clicks.
What Is the Hole Wizard Tool and Its Relation to Fasteners?
Before we get into the meat and potatoes of Smart Fasteners, we need to talk about a feature many of us are already very familiar with: the Hole Wizard tool.
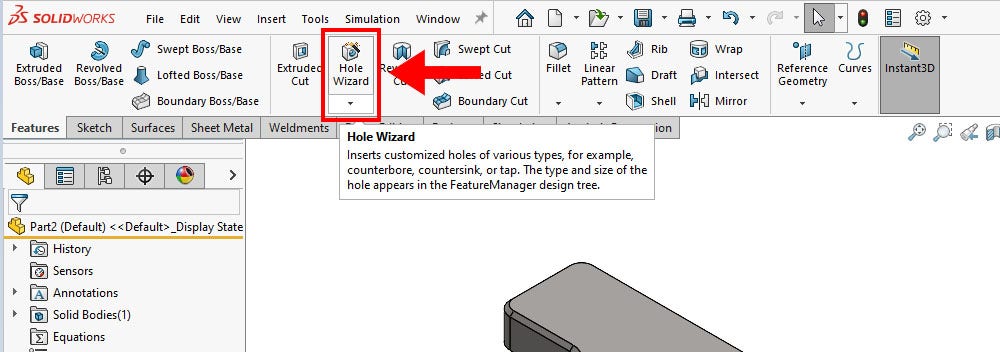
The Hole Wizard is a tool used to generate holes in our parts using various standards, configurations and sizes. It will typically be the tool of choice whenever we need a hole in our parts because of how robust the Hole Wizard’s functionality is.
What many users don’t know is that the information that defines Hole Wizard feature geometry is actually part of the SOLIDWORKS Toolbox.
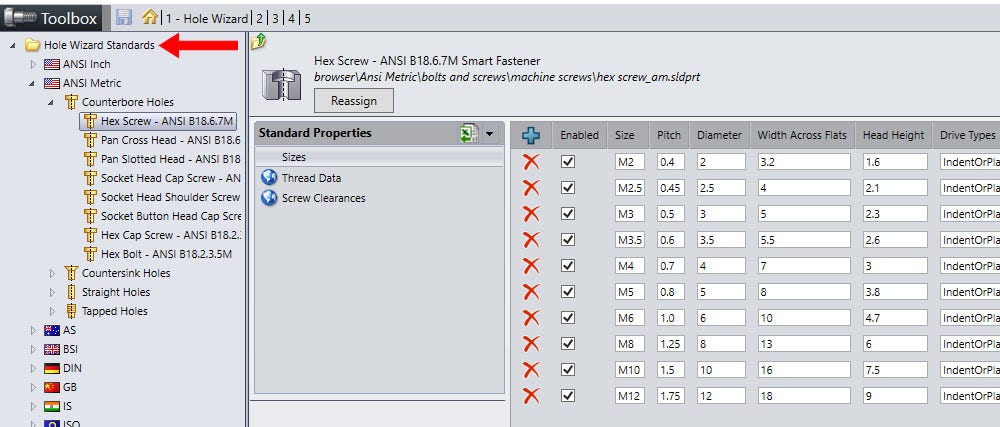
Information such as counterbore size, through hole clearance, thread pitch, and even the appropriate tap drill size for tapped holes are all stored in the Toolbox. It allows for some built-in intelligence between Hole Wizard features and Toolbox components.
As a result, when we create a hole using the Hole Wizard, SOLIDWORKS knows exactly which type of fastener should go into that hole, including holes that extend through multiple components.
This intelligence allows SOLIDWORKS to auto-size Toolbox fasteners when we drag and drop them into our assemblies. We discuss this and other functionality of the Toolbox in greater detail in our related blog post about managing and automating components with the SOLIDWORKS Toolbox.
Automatically Recognizing Holes with Smart Fasteners
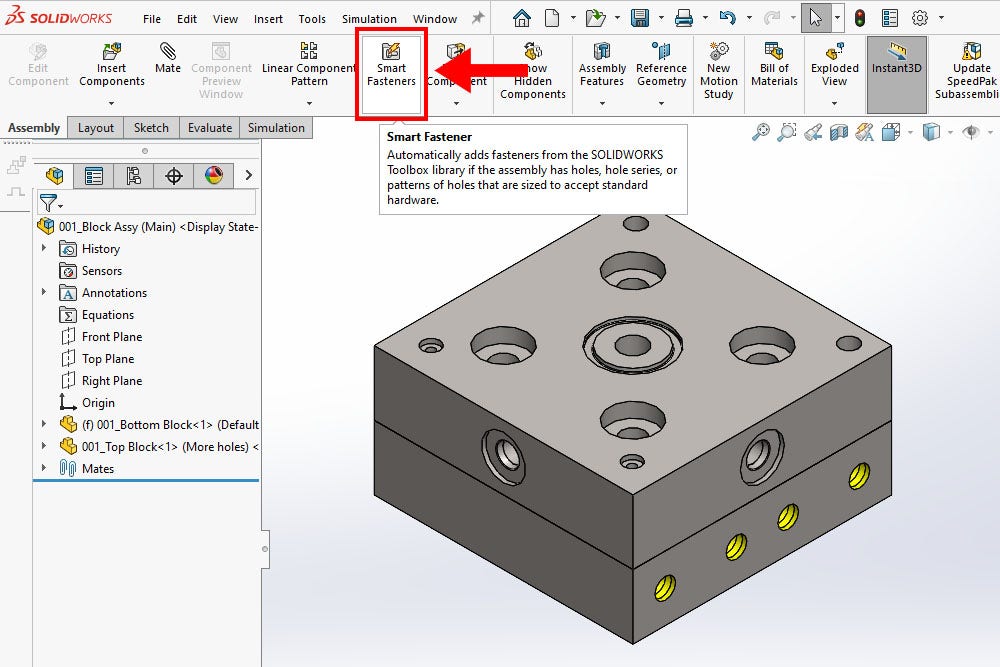
The Smart Fasteners command lives in the Assembly tab of the CommandManager. As the name implies, Smart Fasteners uses the intelligence of the Toolbox to populate our assemblies with the necessary fasteners.
Instead of dragging and dropping Toolbox components into our assemblies (like we typically would), the Smart Fasteners feature automatically recognizes holes to populate them with the correct fasteners.
We can populate individual holes, hole series, specific components or even an entire assembly with the correct fasteners using Smart Fasteners. The holes can be different sizes and depths, belong to different components, or even use different standards.
Regardless, the Smart Fasteners tool can pick up each applicable Hole Wizard feature in every component to associate the correct Toolbox fastener with it.
Mates are added automatically to define the position of each Toolbox fastener correctly. The Smart Fasteners tool can also pick up non-Hole Wizard holes, although they will always start with a default fastener type (as specified in the Toolbox settings).
We can even customize each set of fasteners and add components to each hardware stack, all within the Smart Fasteners tool itself.
How To Use Smart Fasteners in SOLIDWORKS Assemblies
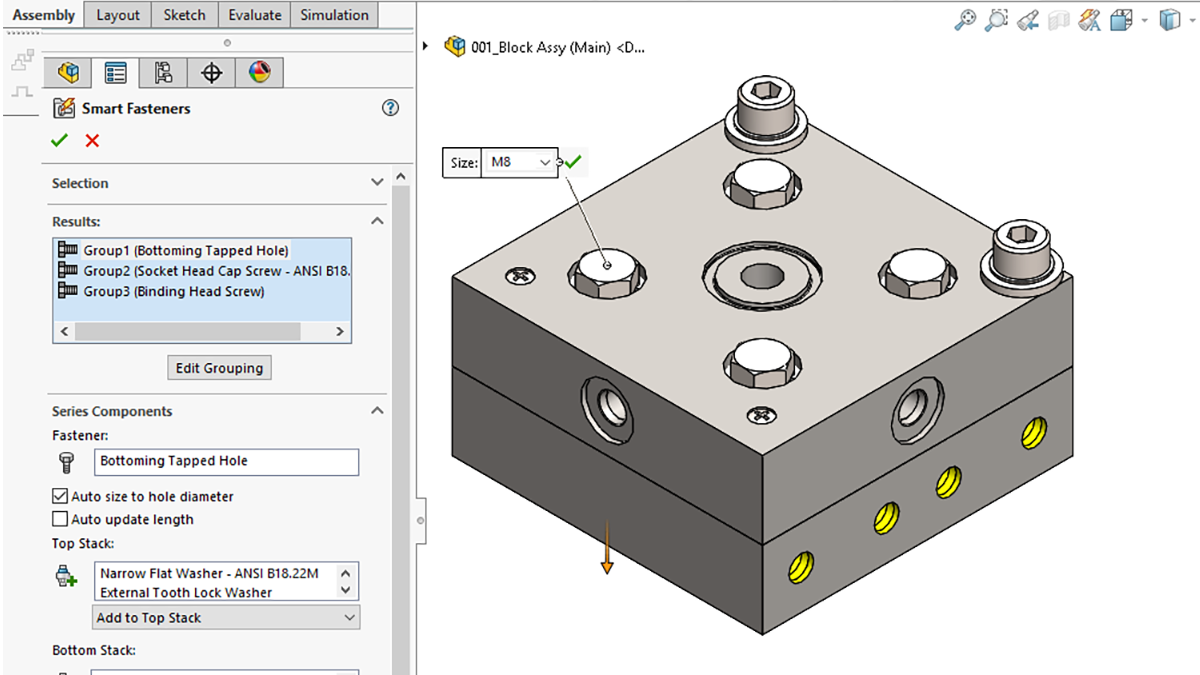
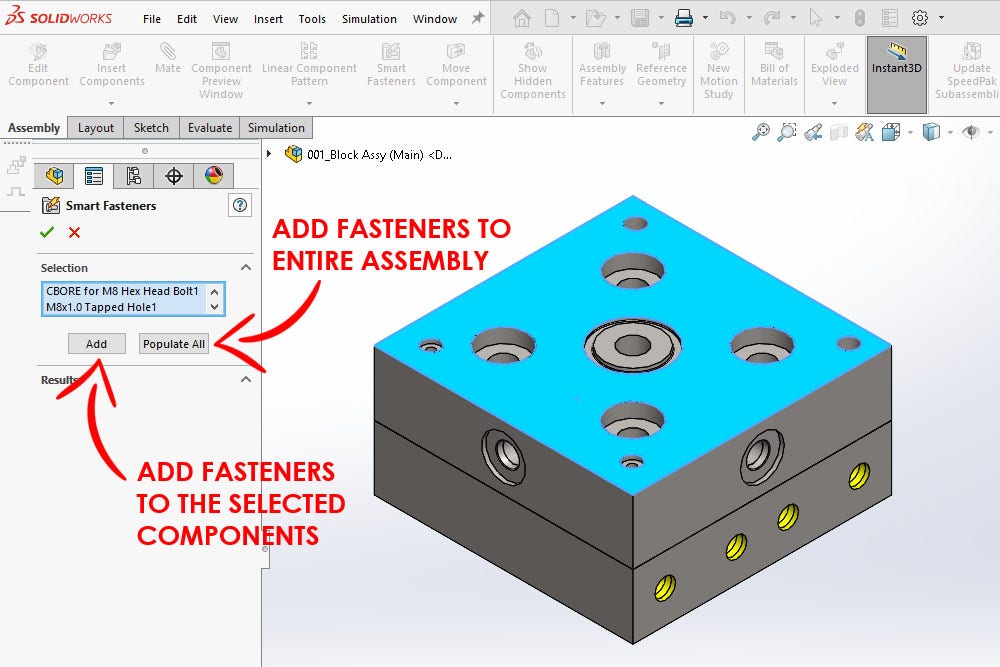
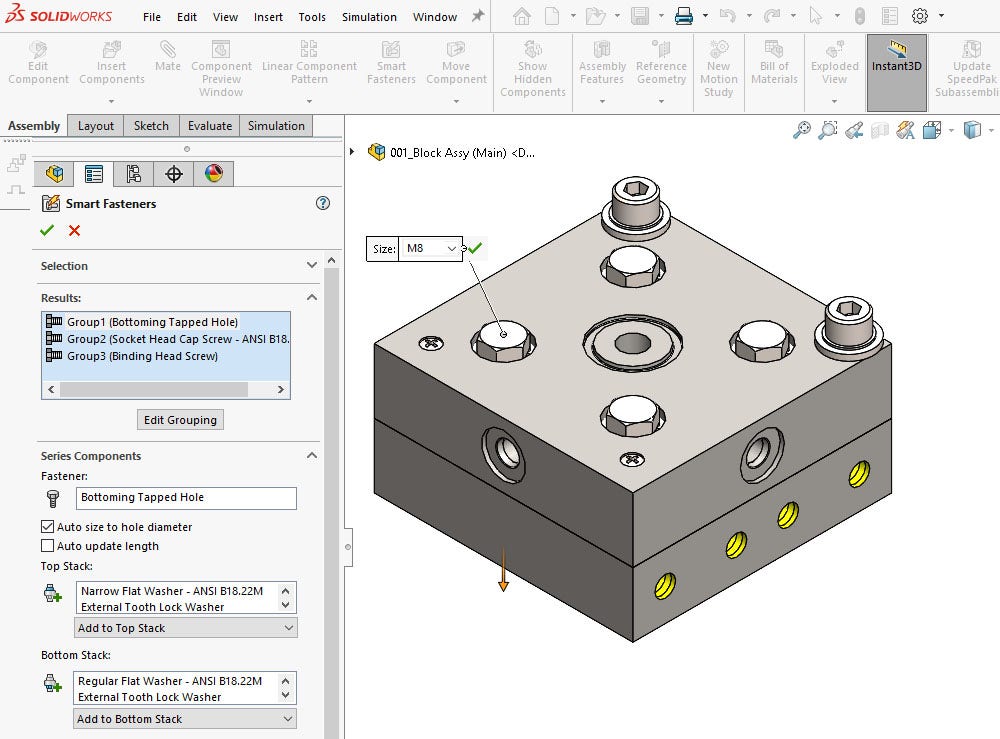
The first step is to click the Smart Fasteners tool in the Assembly tab of the CommandManager. After doing so, the PropertyManager for Smart Fasteners opens on the left side of the screen.
In the PropertyManager, we can select specific components, faces or individual Hole Wizard features that we want to populate with fasteners.
By selecting a face of a component in the graphics area, the Smart Fasteners tool will pick up any holes on that face. Similarly, selecting a component from the flyout, the FeatureManager design tree will pick up any holes that belong to that component.
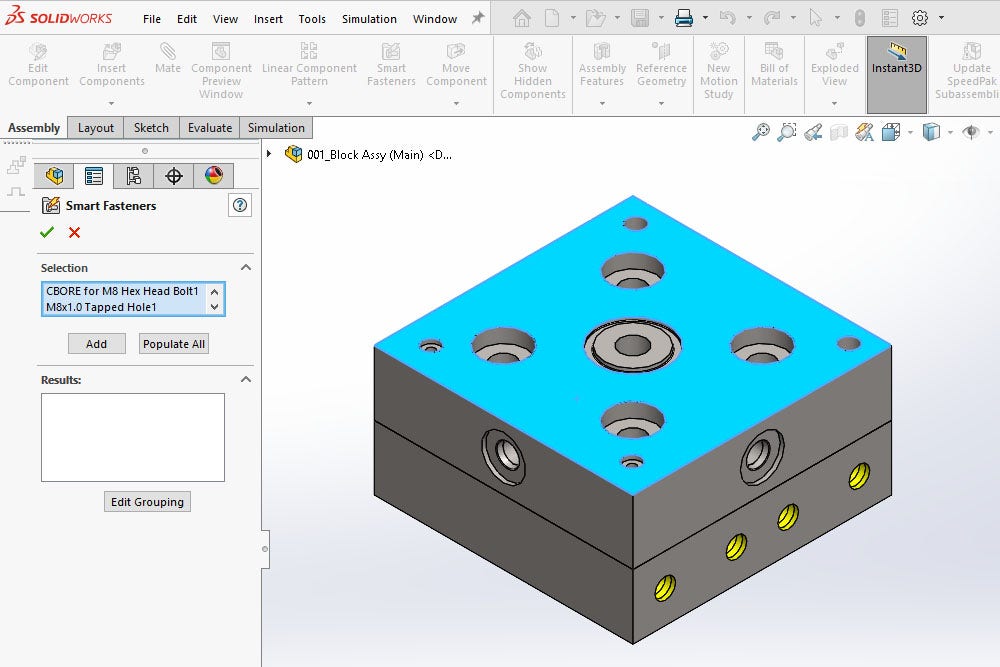
We can review which holes were picked up by the Smart Fasteners tool and remove any that we don’t want to populate with fasteners.
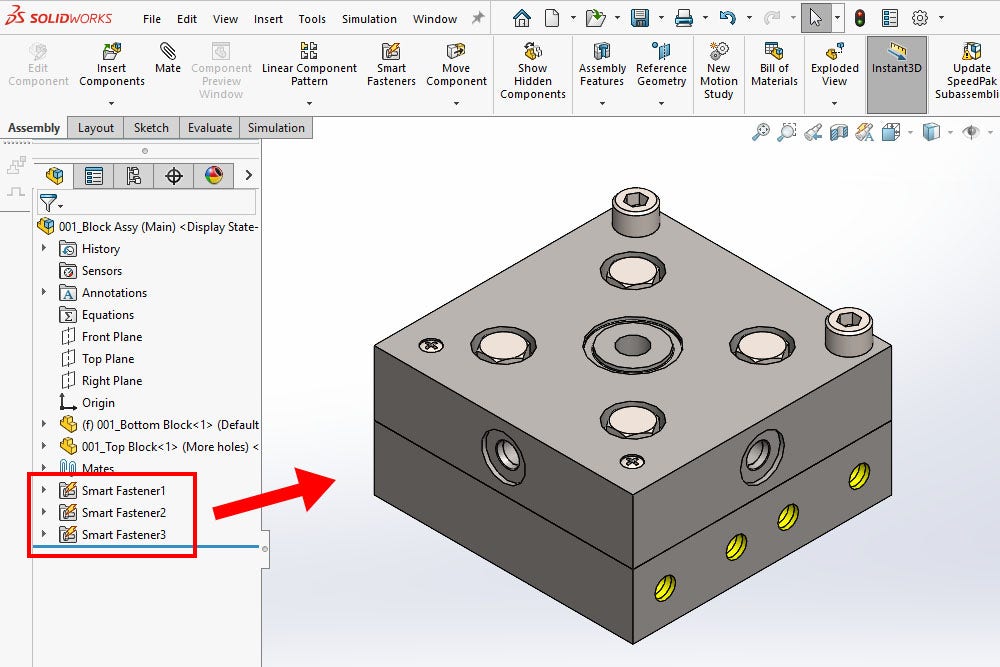
Once we’re satisfied with our selection, we can click the “Add” button to add Smart Fasteners to those holes. Alternatively, if we want to populate ALL the holes in our assembly with fasteners, we can click the “Populate All” button.
When we click the “Add” or “Populate All” button, SOLIDWORKS inserts the correct Toolbox fastener into each applicable hole. The models are loaded and auto-sized automatically, thanks to the intelligence of the Toolbox.
The fasteners are grouped by each set of holes in our assembly (this grouping can also be edited). The PropertyManager remains open so that we can further configure our Smart Fasteners.
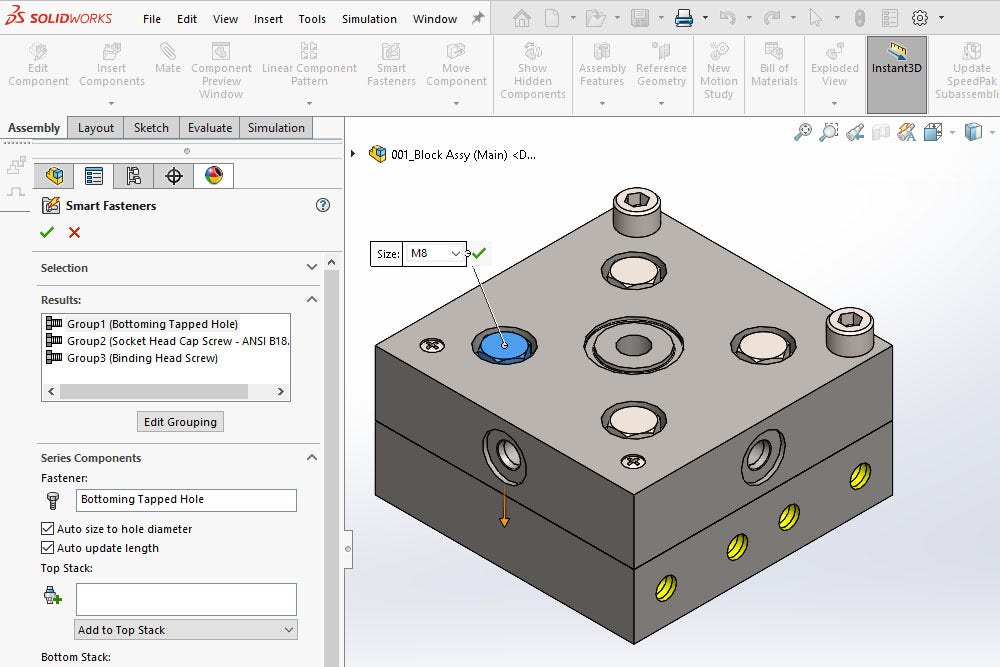
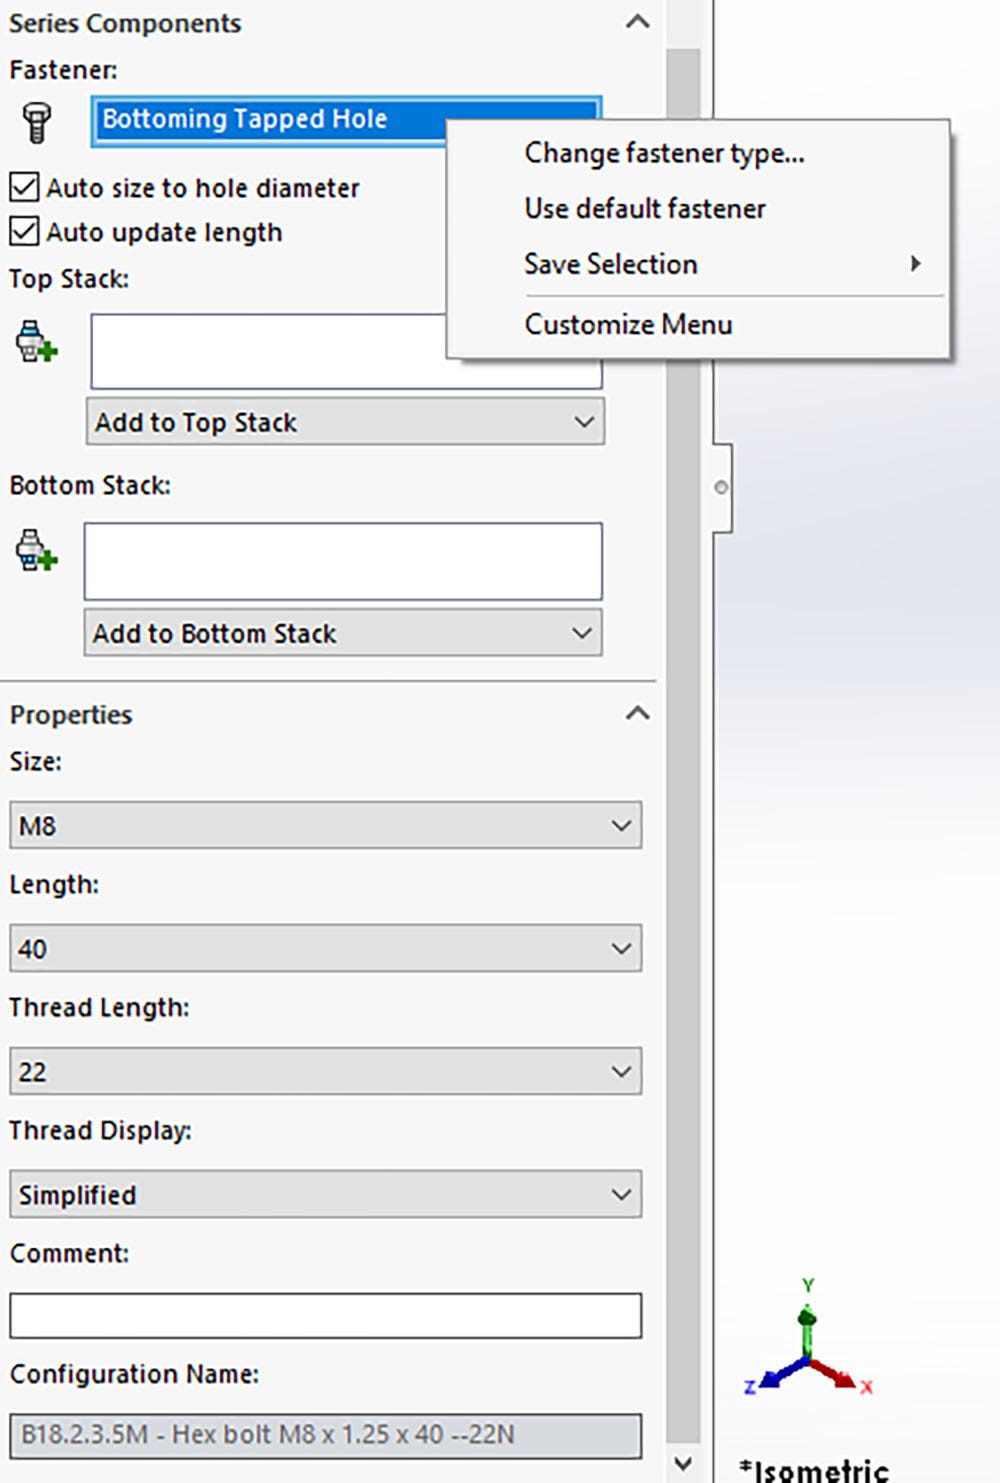
If the Smart Fastener tool didn’t select the exact configuration we needed, we could modify each group of fasteners as necessary. We can resize the fasteners, change the fastener type, modify the overall and threaded length, and select how we want the threads displayed.
Hint: to change the fastener type, right-click the series name in the “Fastener” field of the PropertyManager. The Smart Fasteners tool is typically good at selecting the correct fastener configurations, but it’s good practice to double-check the inserted components fit our designs.
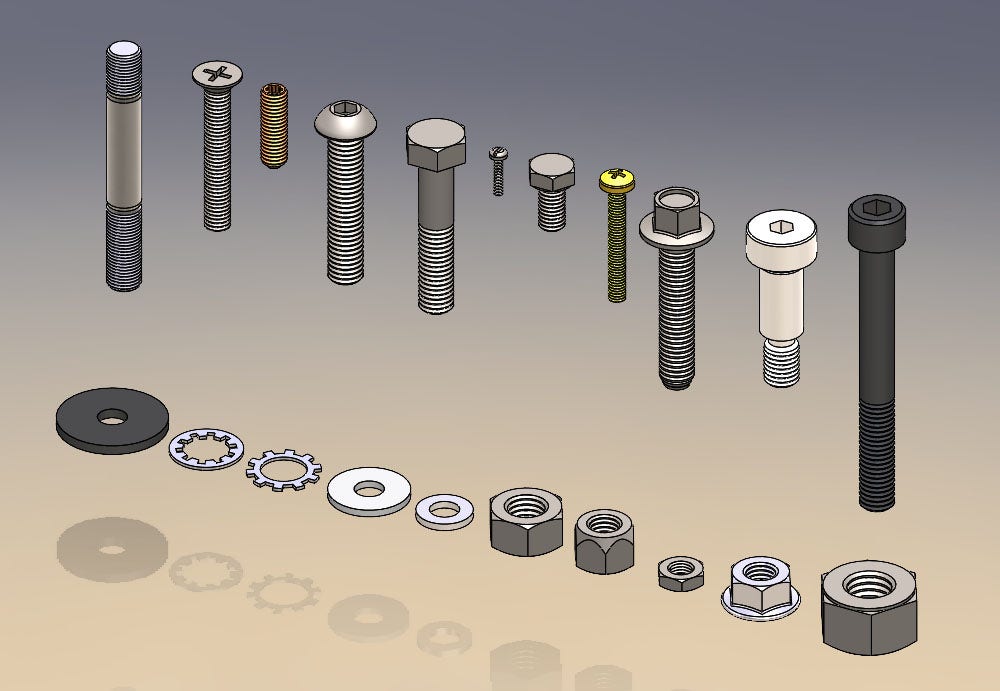
Adding Washers and Nuts with Fastener Stacks
My favorite part of the Smart Fasteners tool is the ability to automate the creation of fastener stacks. The stacks can be a huge timer saver when working on an assembly with many fasteners.
Typically, we would have to insert each bolt, screw, washer and nut manually. That includes manually adding the necessary mates to constrain each component fully.
But, with the Smart Fasteners tool, we can specify both the top and bottom fastener stack for an entire group of fasteners all at once.
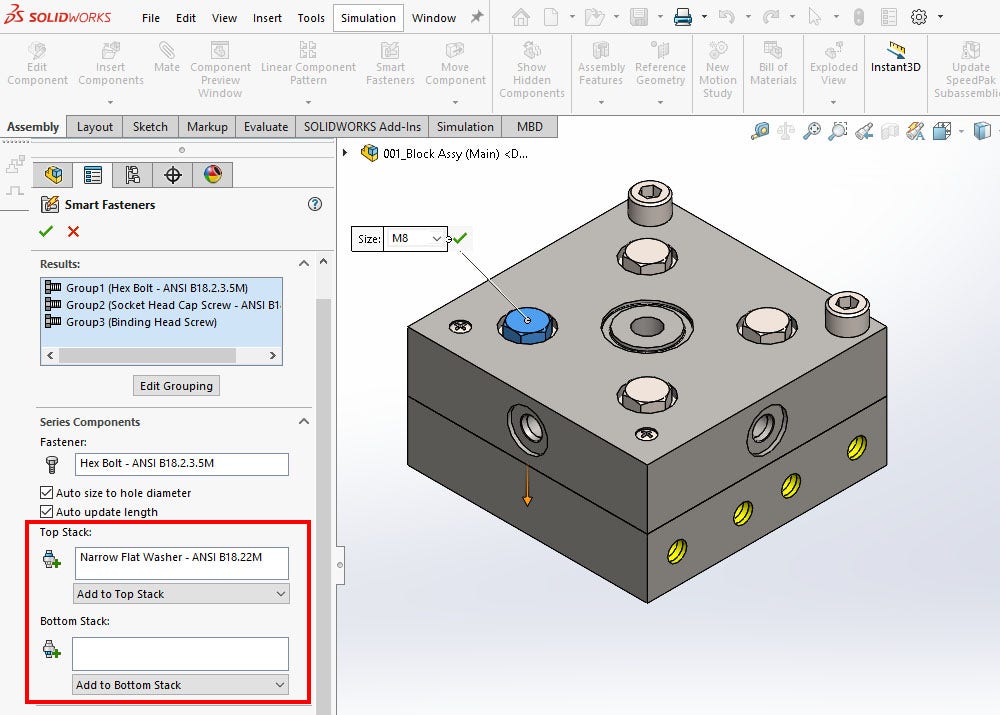
By clicking the “Add to Top Stack” or “Add to Bottom Stack” dropdowns in the PropertyManager, we can populate the “Top Stack” and “Bottom Stack” fields, respectively.
Note: if a specific fastener is in a blind hole, there will only be an option to add to the top stack for that fastener (as there is no “bottom” stack).
When we click one of the dropdowns, we can pull from the available Toolbox standards to add to each stack. We can add washers to the top stack and both washers and nuts to the bottom stack. The available component standards and types depend on the fastener we create the stack for.
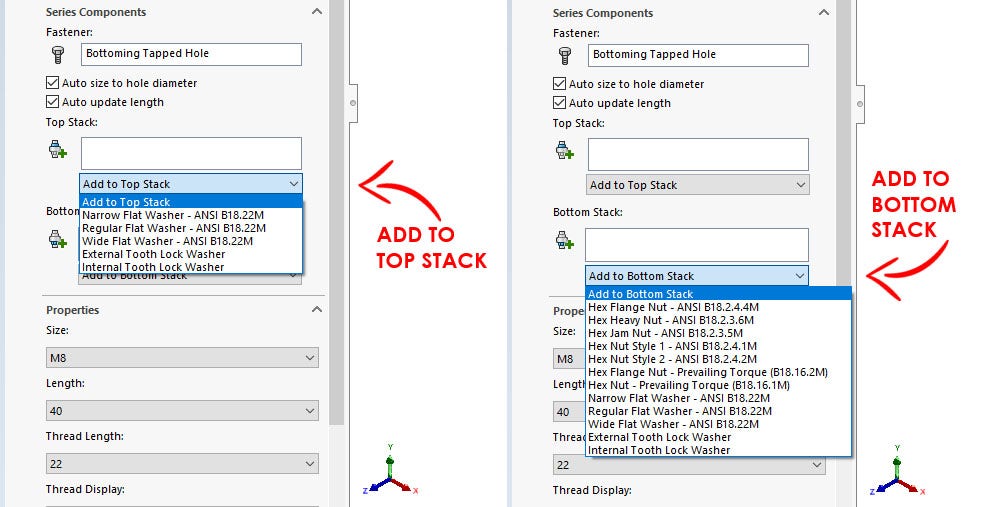
When we add a component to the stack, it is added to the stack list in the PropertyManager, and the component model is loaded from the Toolbox.
Once we have defined the proper top and bottom stacks for each group of fasteners, that stack is applied to every fastener in that group.
We can then hit “OK” (the green checkmark) in the PropertyManager to complete the command and add the Smart Fasteners to our assembly.
The Final Note About Smart Fasteners
And that’s all there is to it. We can add nearly all the screws, bolts, washers and nuts we need in our assemblies with just a handful of selections.
Smart Fasteners take a lot of the “grunt work” out of adding fasteners to our assemblies, both large and small. Compared to adding those same components manually, the SOLIDWORKS Toolbox and Smart Fasteners can be a huge time saver.

Learn More About the SOLIDWORKS Toolbox
The SOLIDWORKS Toolbox is a powerful tool that can help us manage, automate and control the usage of standardized components, like fasteners, in our designs.
In this blog post, we discussed Smart Fasteners, one of the automation tools available to us with the Toolbox. Smart Fasteners further extend the capabilities of the Toolbox to auto-populate our assemblies with the fasteners. It’s a tool I recommend adding to your own workflow, especially if fasteners are a key part of your designs.
To read more about the SOLIDWORKS Toolbox and its other functions, check out our other blog posts and videos.
Further reading:
- Managing and Automating Fasteners and Components with the SOLIDWORKS Toolbox
- How To Use the McMaster-Carr Add-in for SOLIDWORKS
- SOLIDWORKS: Difference Between Hole Wizard, Advanced Hole, and Hole Series
- SOLIDWORKS: Fixing Incorrectly Sized Toolbox Hardware
YouTube videos:
- SOLIDWORKS: Toolbox Your One-Stop Shop
- SOLIDWORKS Fixing Incorrectly Sized Toolbox Hardware
- Webinar – SOLIDWORKS PDM: Toolbox Customization and Utilization
As always, if you have any questions, contact us at Hawk Ridge Systems. We can also discuss how the suite of SOLIDWORKS software can help improve your workflows and designs.