SOLIDWORKS 2019 enhancements for data management have disrupted the market. Design challenges have evolved and SOLIDWORKS has too. SOLIDWORKS 2019 has streamlined your assembly process with fewer steps so that you can focus on your product design. In this webinar, we will highlight these new features to SOLIDWORKS PDM with a live demonstration that highlights its ease of use, flexibility, and robust capabilities.
Video Transcript
Introduction
First off, we’re gonna talk about the system requirements changes. Basically, for operating systems, you’ll want to look for SQL when you upgrade to 2019. And then we’ll follow with the list of enhancements that 2019 offers. There’s not a big shining feature this year like in 2018 with the branch and merge or the Revision Table Integration. But there’s a lot of enhancement and a lot of things that will accelerate your productivity. Web2 Redesign gives you guys access to your vault from anywhere, but the whole redesign is nice. It’s easier to get the file in, get the file out. Getting a third-party in your vault might be easier with this one.
In the workflow file shortcut menu for build material and the contains tab. There are a couple of changes and new permissions. There’s the conversion task that’s got some options for DXF and DWG. We’re gonna look at that. And then some integration with inspection and composer to complete more the whole SOLIDWORKS eco-system.
System Requirement Change
Let’s start with our system requirement change. There are four things to look for in those requirement changes. On the first table on the top, you can see that Windows 8.1 will not be supported in 2019. This doesn’t come as a surprise as Windows already announced, being at this year in 2018 that they were stopping the mainstream support for Windows 8.1 so SOLIDWORKS is basically retiring that operating system in 2019.
Another one on the lower table is Windows Server 2012. This one in SOLIDWORKS 2019 will be retired as well. If you look on the right side, I also put whats announced – end of life for 2019 SP5. The Windows Server 2012 R2 by SP5 will be retired. It’ll be fine during 2019 until SP5. And that’s the same thing for a SQL 2012 will be retiring or the support will end for SQL 2012.
Web2 Redesign
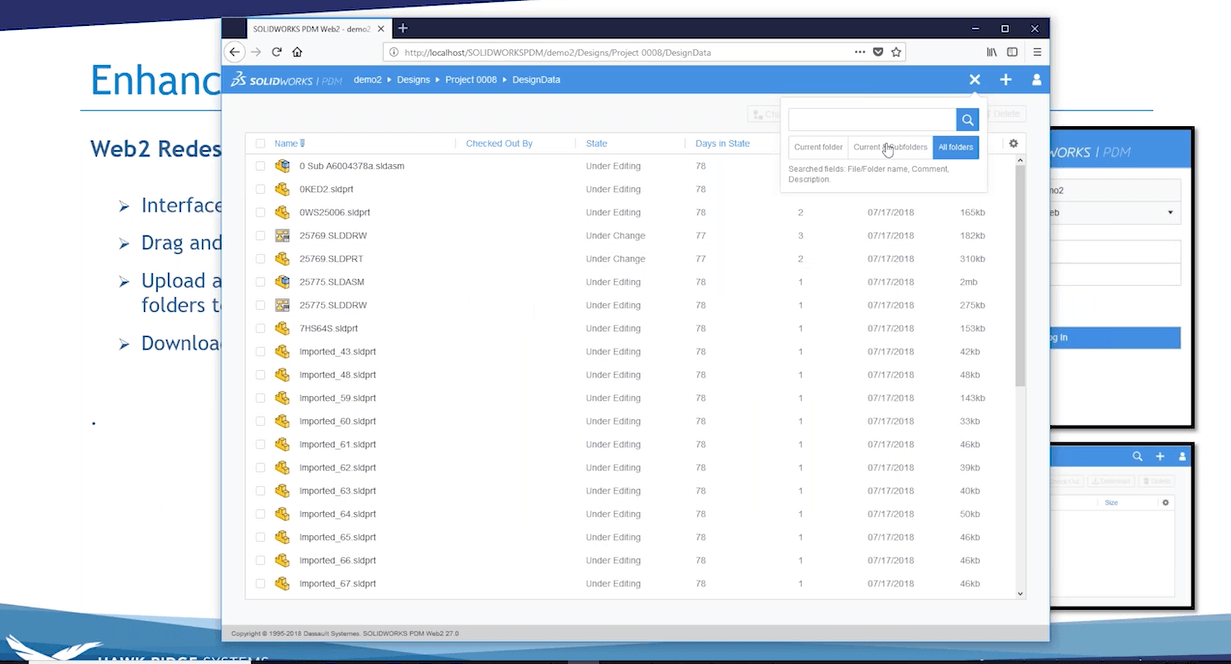
So that’s enough for the bad news. Let’s jump into the enhancement right away. The big one I think is the Web2 Redesign. There’s a new look. They’d be read it the interface and it’s pretty sleek. You can now drag and drop a file, upload folders, and download a file with reference. Basically, they went away from the one-one-one download or one upload file per file. You can now do a bulk upload, download, and that’s a big change. This is my interface. My log-in window for my Web2. Just getting log-in and we’ll take a look at the new look. The first thing I saw when I went to Web2 is how fast and how snappy it is to browse there. If you look at the browsing through folders, the folder with files, it’s pretty fast.
Download Here
Another thing that I like is the download here – the download now or download with references. If I click on download with references it will give me an idea of what I’m downloading. It’s got some options for getting the latest, and reference. You can include the drawing which will add to the list of your download and then you can download the whole thing, which is pretty nice. The other thing her is the drag and drop. So as you can see I can just drag and drop a file or if I go with a folder I can grab the whole folder and bring it in. That’s nice for bringing folder in and out, of web tools pretty fast. I’m not gonna drop that in because it’s gonna take a bit of time, we are like short on time. The last thing I’m gonna show on the web tool here is the search. I think it’s pretty nice and pretty convenient. You just have your search bar here. You can search the current folder. You can search all folders. I’m just gonna put that here.
Conditional Notification
It searches pretty fast to my vaults. I really like the new interface. I’m sure you guys will be able to take advantage of that. More enhancements include conditional notification, file shortcut menu, and advanced conversion option for DXF TWG. With the conditional notification before 2019, you’re a bit stuck with sending notifications or tailoring the notification to a certain user or to a certain type of file was limited. Now, with the conditional notification, you can leverage your metadata. You can leverage your variable, to say, I need to put only the approved by or something like that. You can also do the file batches as you would do in the workflow for a directing file. You can have a certain file path. You can have a certain extension for notifications so that’s quite nice.
File Shortcut Menu
The file shortcut menu, before 2019, you didn’t have any file option in the bomb, in the contains, in the where used. Now if you right click on a file you basically have those options check out or check in those kinds of things right from that window. And then the events conversion option for DXF DWG applies for sheet metal flat patterns. You have some conversion options and we can go look at that right away.
Add Conditional Notification
For the conditional notification, if I’m in my workflow you can see on the notification tab they added this add conditional notification here. Before you only had the folder notification now you can add a conditional notification. If I go in there to set up a notification it’s pretty straightforward. You have your recipient which you can just give groups or user, you have to put recipients in there.
And then in a notification condition looks like the transition condition. Basically, you have your variable or you have some pre-defined file path or revision take or just kind of things. If I look at approved by I can see this contain David L or something like that and that will send a notification only if it’s satisfied this condition. Another example that I created here is, if I wanna do for just specific file extensions.
If I just wanna be notified when my drawings are going to be submitted for approval, I can use my file path and use something like a value like this and that will do it. So that’s pretty nice. It gives you more control over your notifications.
Convert Task
The other thing that we talked about is the convert task. In the convert task here, under q conversion setting. If you choose DXF or DWG you now have under conversion options you have more options. You now have a sheet metal flat pattern. You can now export or convert your geometry your, bend line sketches, and bounding box. This is all so that you can select here. It is for DXF as well as DWG here.
If I look at my vault here and look at my build material as I was saying, now I can right-click and I can check out the same thing for contains. Before that you could only browse to or browse to at the new window, get to the file and then do the operation. This will save a lot of time because now you can say, “Okay, I need to check out this one and that one or do an open file operation,” right from this window.
Permissions
Let’s get back to our presentation here. So let’s talk about permissions. There’s been a data work done on comments. You can now edit the history comments. So if you’re not happy with the comment you left or if it’s wrong, you can edit it. You can also, as an admin decide if the comments are mandatory per state or are actually per transition. Before that, it was a global setting. Now, you can decide which transition would require something like that. There’s also something that has been done about selecting by default. If the drawing will go with the rest of the files when you do a transition.
If you transition a set of files, you can say, “I want, by default, my drawing to go with them, or not to be selected or by default not to be selected.”Finally, the mixed authentication is a big one. It tackles something that was just the global settings where you had to choose if you were gonna do an integration with your active directory or if you were gonna do PDM user. Now, you can do both. You can have a mix of both of them. Let’s go back to your admin tool. I’m gonna look at the mandatory comments.
What’s been done is, basically this line here has been added in the transition, must enter state change comment. If I didn’t put it in the submit for approval, and I did put it in the no approval are required, for example, here. The other thing is the settings. The setting of the drawing note that we can look, under group or user, you can go on your settings and under reference dialogue here, you have this line has been added. Do not select references that are defined right now.
If you check it, it won’t select the drawing when you do the transition and if you uncheck it, it will select all the drawings by default. So, that’s a default setting. And finally, I was talking about the mixed authentication, so if you create a new user, you can see that you have buttons here. You can list your Windows user, create a new Windows user or you can just do PDM user and you can do a combination of those. You have more options here for creating users.
If I go in history and look at their comments that I left on here, you can see that I can now edit, let’s say, “Done,” I can update my comment and it will basically update that comment in here. Let’s go in those CAD files here. If I take this top-level assembly, it changes state to submit for approval.
You can see that my drawings are not selected by default because I checked that box. If I change that setting, I can actually just go do it quickly, change that setting in the reference dialogue and now I should just by default in the change state, I’m gonna do no approval required. It actually grabs all my drawings by default, all selected and if I click okay, it won’t let me go through because I didn’t put a comment because I said it was mandatory for no approval required versus if I want to submit for approval that was required I can leave it without comment and it will go through.
PDM Integrations
We have two new integrations with SOLIDWORKS Inspection and SOLIDWORKS Composer. Let’s start with SOLIDWORKS Composer. If I open my file here that I have in my vault, I basically have all my vault functionality now in the tab that’s SOLIDWORKS PDM Tab. I can do my check-in from here. I can show the card. I can change my state and submit for approval. I can do all that stuff that I would be doing in Windows Explorer but now I can do it inside of Composer. It’s pretty convenient.
Predefined Cards
It’s the same thing for SOLIDWORKS Inspection. With Inspection, I have the add-in. But I also have good integration with the properties in the inspection. When you install the default let’s say you want the default installation with some predefined cards. If I look at those predefined cards, there is inspection here. And they come with those six boxes or edit box where the variables are all already populated. It basically uses a block call SWIPRG property to pull the properties from the extension IXPRG, which is the extension for the project file in inspection. What does it is up here I look at my data card here I have, by default those six properties defined.
If I look at my card, I have this right on my data card. So it’s the same thing with a custom property integration that you know previously with SOLIDWORKS. It will basically be a push and pull two-way conversation. But it’s really nice to get this done instead of Inspection and showing on your data card. So that’s for the general properties here at the project properties.
There’s also the custom properties in Inspection. You see I have the material here that task MA that is nowhere on this card. If I put let’s say an edit box here, and I decide to put. A material there’s another block that’s been created– let’s just go fast like this. There’s the material. There’s another block that’s been created that I can add to those attributes. The block is named SWI custom property. So I would have to put it in here SWI custom property just like this and am just going to put material and again, the extension would be for my IXPRG. So if I do that and I have my material here, save my data card then material here that I have should be once I save my file now should be integrated with my data card and it will be showing on my data card. You can not only integrate the project properties, those six that are kind of by default, but any properties that you have more customers in here you can also integrate them with your PDM.
Okay, so that’s pretty much what I had for you guys for SOLIDWORKS PDM. Like I said it’s a lot of little enhancement with lots of good stuff. There are also performance improvements in PDM for large assembly and browsing will be handled faster and better. So don’t hesitate to test it and you can always CONTACT US for more information on SOLIDWORKS PDM or any of the SOLIDWORKS 2019 Enhancements.


