
If you’ve worked with one CAD software while a client or supplier used another, you understand the difficulty of accurately transferring data. While perfectly seamless data transfer may not be possible, there are strategies to make it easier.
In this article, I’ll show you how to quickly and easily import CATIA V5 PMI (Product Manufacturing Information) data into SOLIDWORKS 3D CAD. This process facilitates smoother transitions between these two amazing tools, maintaining the efficiency of your design process.
In this article, you’ll learn:
- How to transfer 3D annotated PMI data from CATIA to SOLIDWORKS, which is a distinct process with unique use cases
- How easy it can be to view all the necessary PMI from CATIA in SOLIDWORKS
This provides SOLIDWORKS users with an efficient method to complete their work without worrying about updates or sending multiple documents such as CATIA Drawings.
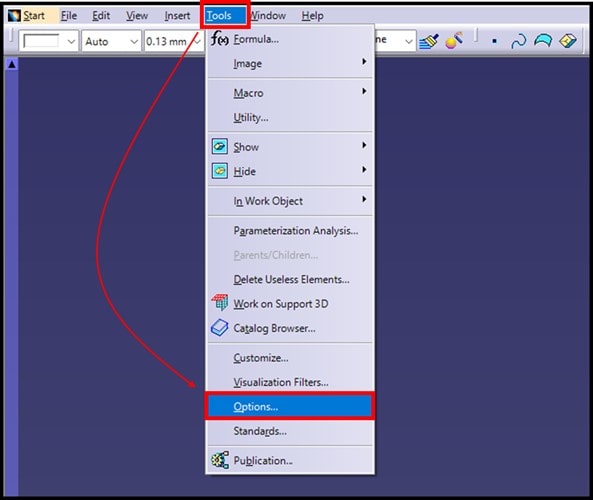
Step 1 — Change Settings in CATIA / V5 CATPart Setup
Let’s begin with the CATIA user’s workstation. The first thing a CATIA user needs to do is enable the ST1 (STEP Core Interface) license to export a CATPart as a STEP file.
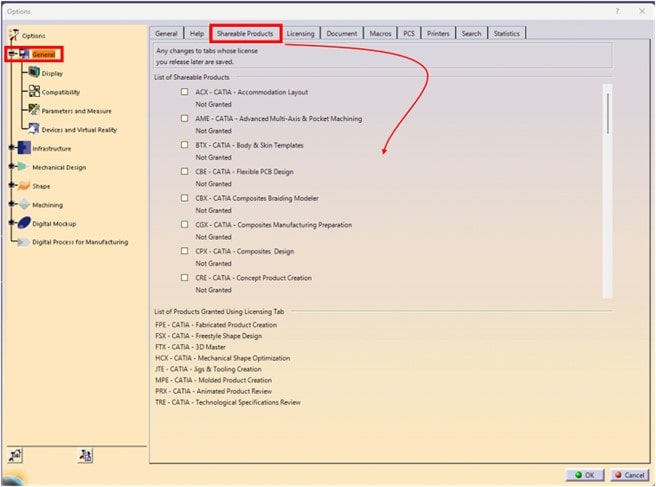
This license can be found under Tools > Options > General > Shareable Products. From there, simply locate the ST1 ‘Shareable Product’ and request access.
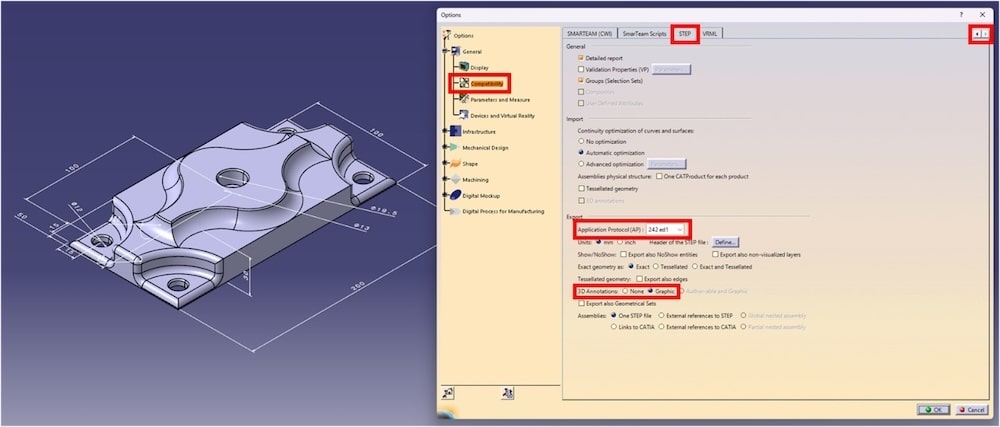
To successfully transfer all necessary information to another supplier or client, you also need to ensure a few additional settings are enabled.
First, navigate to Compatibility > STEP. The STEP tab within the ‘Compatibility’ section may not initially be visible, so click the ‘right’ arrow at the top right of the Options dialogue until it appears.
You will need to modify some ‘Export’ settings in this area to ensure a comprehensive transfer of all 3D Annotation information.
In the ‘Export’ section, the Applications Protocol (AP) should be set to a minimum of 242 ed1. While ed2 and ed3 provide additional information in the STEP export, ed1 is sufficient for most purposes. Each of these options will facilitate the export of CATIA PMI data.
Next, navigate to “3D Annotations:” and select “Graphic” instead of “None”.
If left on “None”, no annotations will be visible when a SOLIDWORKS user imports and attempts to work on this file.
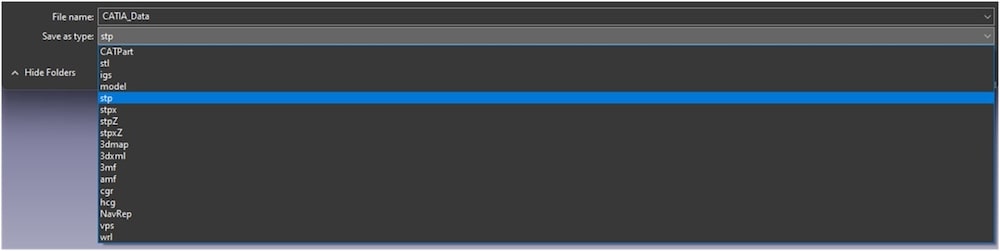
After pulling the ST1 license and changing all the settings, you’re ready to save the CATPart as a STEP file and send it to your SOLIDWORKS partner.
When saving, make sure to change the ‘Save as type’ to ‘.stp’.
Step 2 — Double Check These Items in SOLIDWORKS Before Import
Once you’ve transferred the STEP file to your client who uses SOLIDWORKS, they will need to adjust their settings before importing.
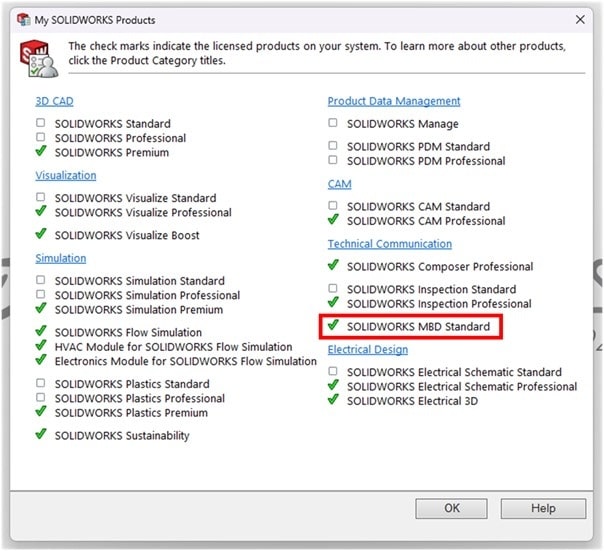
The CATIA end of this process is more complex than for the SOLIDWORKS user. The only real requirement for a SOLIDWORKS user is to have access to an MBD (Model-based definition) license. This is easy to check!
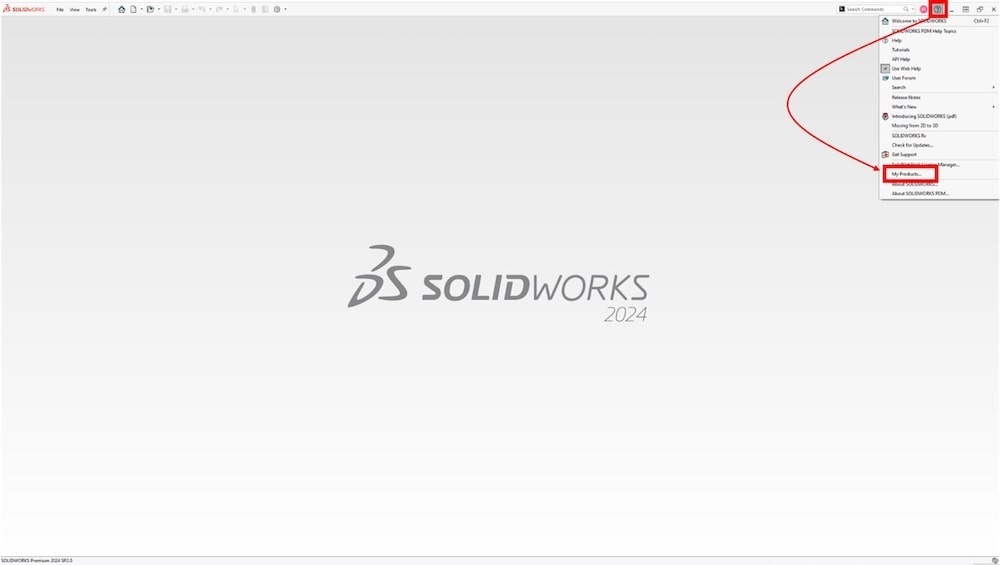
After opening SOLIDWORKS, go to the top right of the window and select the ‘?’ mark. From the menu, choose “My Products…”. A new window will appear showing all the SOLIDWORKS products you currently have access to.
After selecting “My Products…”, a new window will appear on our screen, providing a clearer picture of what we can and cannot do in SOLIDWORKS. All you need to do here is ensure that there is a ✅ next to “SOLIDWORKS MBD…”
Step 3 — Import STEP File with 3D Annotations
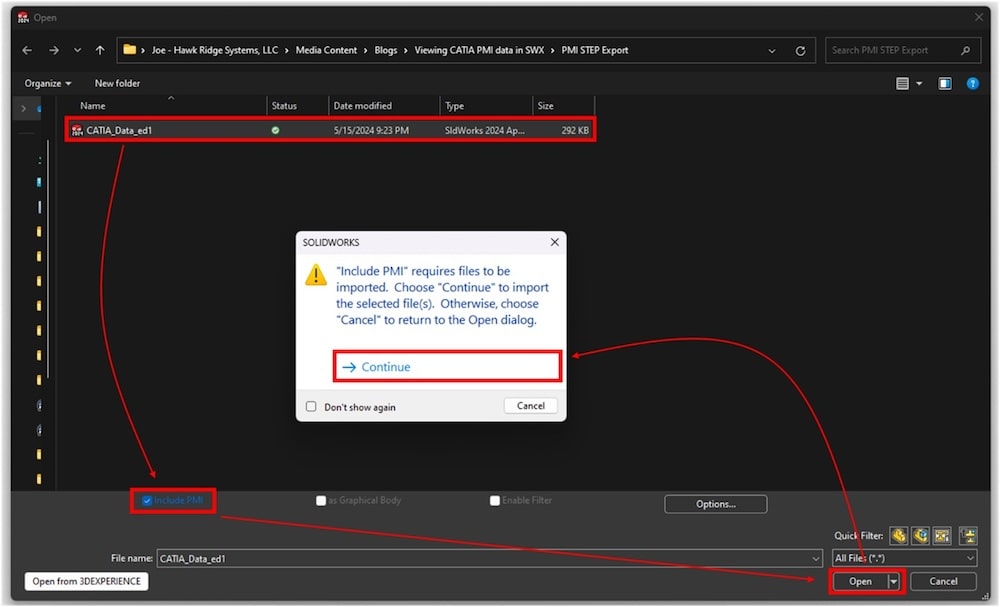
From SOLIDWORKS, select File > Open and navigate to the received STEP file. If all the previous steps were done correctly, you’ll now have the option to “Include PMI” upon opening. Be sure to select this box before clicking “Open”.
Once you select “Open”, SOLIDWORKS will notify you that, to include PMI, it needs to import the file. This process automatically precludes you from using the 3DInterconnect tool.
Interestingly, this does not require you to turn off 3DInterconnect in your options to work with the new file. However, you won’t receive any updates about the model from the CATIA end. That being said, the data should be ready for the SOLIDWORKS users by the time you receive it.
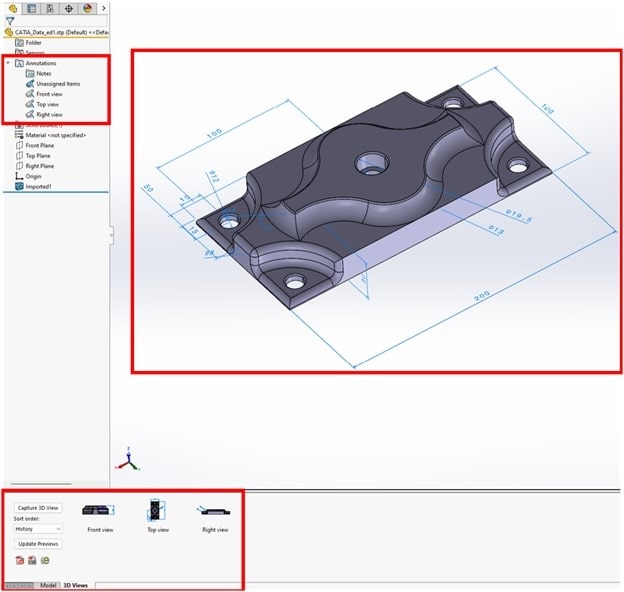
Once the imported STEP file opens in SOLIDWORKS, you can access a wealth of useful information that allows you to complete your tasks with just one document.
Here’s what you’ll see (provided the annotation setup was correctly done on the CATIA side):
- In your graphical display, you will see the imported STEP file along with all the attached PMI.
- The ‘Annotations’ folder in the Feature Manager Design Tree will organize the imported dimensions into their standard views, just as if you had set up these annotations yourself within SOLIDWORKS. You can show or hide these annotation views, as well as right-click on a specific view and select “Activate and Reorient” to view the annotations from the views they were saved under.
- You can also select from the “3D View” tab at the bottom of SOLIDWORKS to quickly switch between each of the “Captured” views by simply double-clicking the view you want to orient to.
The Final Note
And there you go! You have successfully imported your CATIA PMI data into SOLIDWORKS. Now the question is, what’s next? There are even more possibilities working with CATIA files in SOLIDWORKS — it’s the best of both worlds, as they say.
If you have any questions about CATIA and SOLIDWORKS, contact us today.


