I have had the pleasure of using numerous CAD systems through my years in manufacturing & design. And despite the learning curve for SOLIDWORKS being the most favorable one by far, typically my learning path is always the same when approaching a new system. At first, I would simply learn how to use the tool through a mixture of formal training and on-the-job experience. Once I had enough experience and was proficient enough, I would always start getting curious about design automation. Every CAD system has some way to deal with low level automation, but for anything advanced you would always inevitably need to turn to API coding. This of course requires the working knowledge of a programming language such as Visual Basic or C#. In our case, when it comes to us wanting more from design automation with SOLIDWORKS, you will not need to learn a programming language let alone even know what an API is period.
The reason for this is simple, and that is DriveWorks Xpress. It is an incredibly powerful, free tool for advanced design automation which you already have access to right now directly inside of SOLIDWORKS. It essentially works through the SOLIDWORKS API for you, without having to know a single line of Visual Basic code. You might be getting by with some of the low-level automation methods in SOLIDWORKS, but DriveWorks Xpress is by far the best place to put all your automation. Let us begin by discussing some of those methods you may have been already using in SOLIDWORKS.
Configurations
Configurations are likely your first taste of low-level design automation. Configurations give us the ability to house multiple variations of a design all in the same file. We can have different dimensions, different file properties, and even turn features & parts off or on with configurations. These variations inevitably make our design the same, but different. For every design variation, we need to create a configuration within the Configuration Manager and then make our changes to it. Some good use cases in part modeling could be for modeling hardware for example. If you offer 50 different lengths of hardware and need a model for each, configurations will allow you to store all 50 of those in the same file and just vary the dimension. The nice thing here is it makes drawings and assemblies much easier to deal with for these types of components.
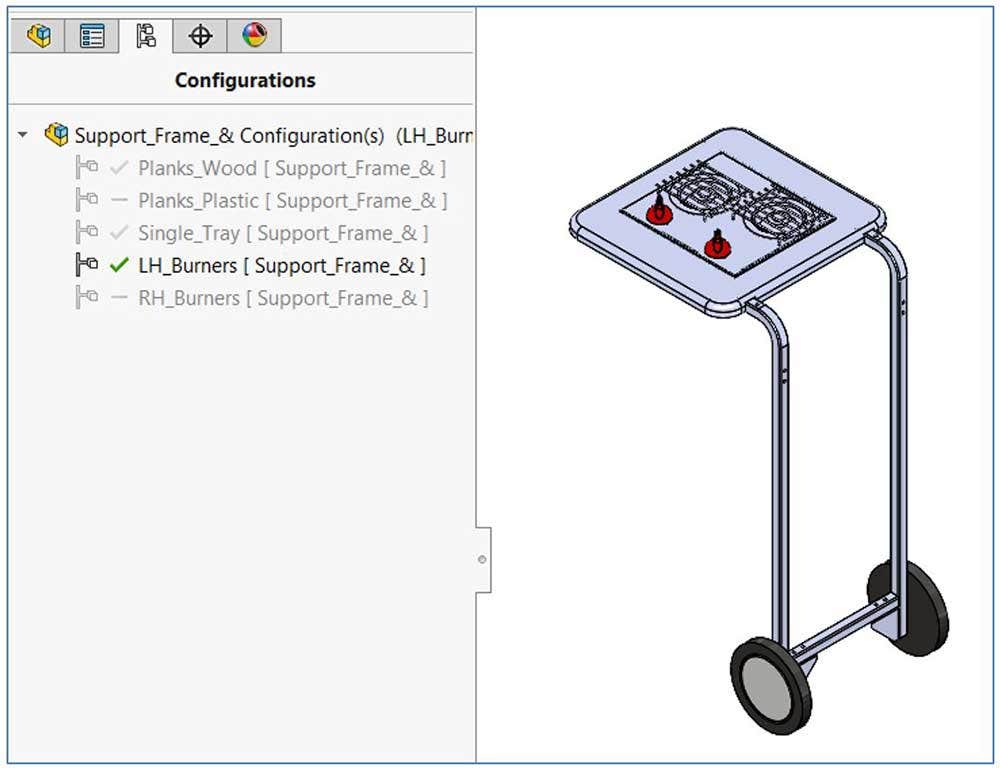
But we can also use them for assemblies and as such this is where it can become a low-level design automation tool. In this example below we are configuring a BBQ side table for five different options we offer. We want to present the customer with a visual of each option here, so we come up with five different configurations for the side table. Each assembly configuration simply has different parts being suppressed or having their part configurations switched.
Configurations are great in certain cases, but when it comes to using them for design automation they do come with challenges. Let us suppose that your product can be ordered with three different “accessory parts” installed for an additional charge (a digital thermometer, a sear zone burner, and cast-iron vs stainless grilles). Your customer can order it with none of them, all of them, or any combination of them. How man configurations would you need to create? For 3 parts, you would need 8 configurations which is certainly manageable. But what if you had 6 unique accessories, or even 12? In the case of 6, that would require 64 configurations while 12 parts would require a stunning 4,096 configurations. Not only is this impossible to work with, but the file size would balloon and be enormous. Let us say you are okay working with up to 100 configurations. What happens if your document control process changes such that you need each configuration to be saved to a file on its own, including having to assign part numbers? It is possible, but this is quite a daunting task even just dealing with part numbering needs alone.
Configurations are great, but it is not true automation and is best used to represent a very limited set of variation possibilities. They are useful to represent a series of standard components but is not a replacement for true design automation. Let’s look at another method you may have considered, design tables.
Design Tables
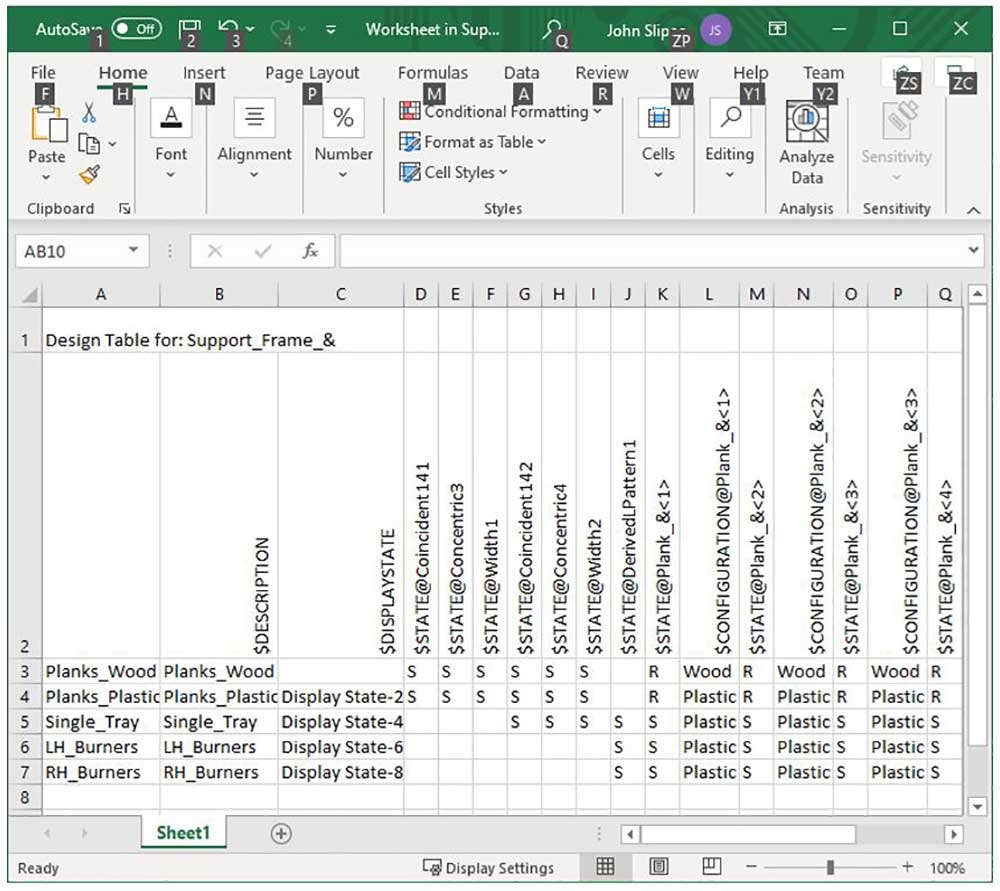
Inevitably, design tables are simply an extension of configurations. Here we can setup configurations to represent design variations, only we gain much more control over the underlying math in the variations. With a design table we setup a series of configurations as rows while every parameter we vary shows up as a column. It works similar to setting up configurations, only now we get to leverage the power of Excel. We can utilize Excel formulas, link to other cells, and perform numerous calculations quite easily. We can even link this Excel data externally so that design data is driven from a saved Excel file on our system.
Design tables make our job easier at calculating complicated data which may also include limited logic, and this is certainly powerful. However, when it comes to the sheer number of design permutations we could still end up with hundreds of thousands of configurations being required at which point we run into the exact same issue as using configurations directly. There are some ways you could deal with this. You could for example, just use Pack and Go and use your nicely setup parametric design to save customer orders with new part numbers. Again, this is certainly going to be impressive design automation. But we are basically still doing workarounds to make this feel like automation.
Since design tables are merely an extension of configurations, they come with all the exact same problems and limitations. Design tables are simply another way to compile lists of design variants and at the end of the day is still not true design automation. Not only are these lists very much a manual effort when new variants are required, but as these lists become longer and longer the SOLIDWORKS file gradually becomes more complex, bloated, and cumbersome to deal with if you are holding onto them all. With the added complexity and increasingly longer design tables, there is also a constant risk of errors and things blowing up. Throw enough calculations into a design table and you may be sitting there for awhile waiting for calculations to occur. This is especially true should you wish to make changes to your model and add, remove, or just rework existing features.
Finally, let us turn our attention to a true design automation tool for storing all your logic, DriveWorks Xpress.
DriveWorks Xpress
DriveWorks Xpress is a free, entry level design automation tool that comes in every seat of SOLIDWORKS. It allows you to create basic design automation far quicker and easier than using the traditional methods we spoke about above. It operates on a master model approach which means you first must develop a robust master model, ideally with zero external references, in-context modeling or equations of any kind. The reasoning for this recommendation is that DriveWorks is meant to be the single place to store all your logic in a single location. With everything in one place it is not only easier to understand, but easier to simplify with modular rule building techniques.
The DriveWorks Xpress user interface you must work with makes everything you need to do quite organized and easy to setup. We capture all the design data we want to drive from our master model, develop a simple user interface for data entry, and then write rules to govern all the design changes. DriveWorks Xpress essentially compiles everything you setup into a set of instructions to fire at the SOLIDWORKS API. When you run your completed automation, these instructions are executed on the master model to create a set of brand-new parts, assemblies, and drawings with unique part numbers.
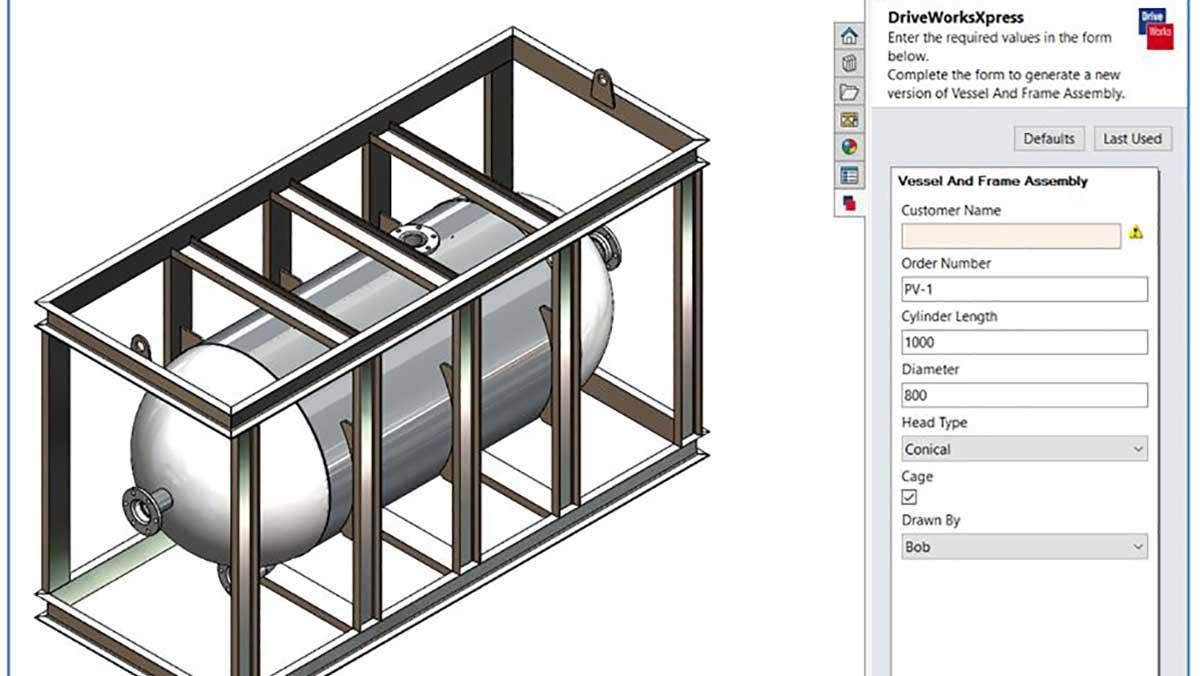
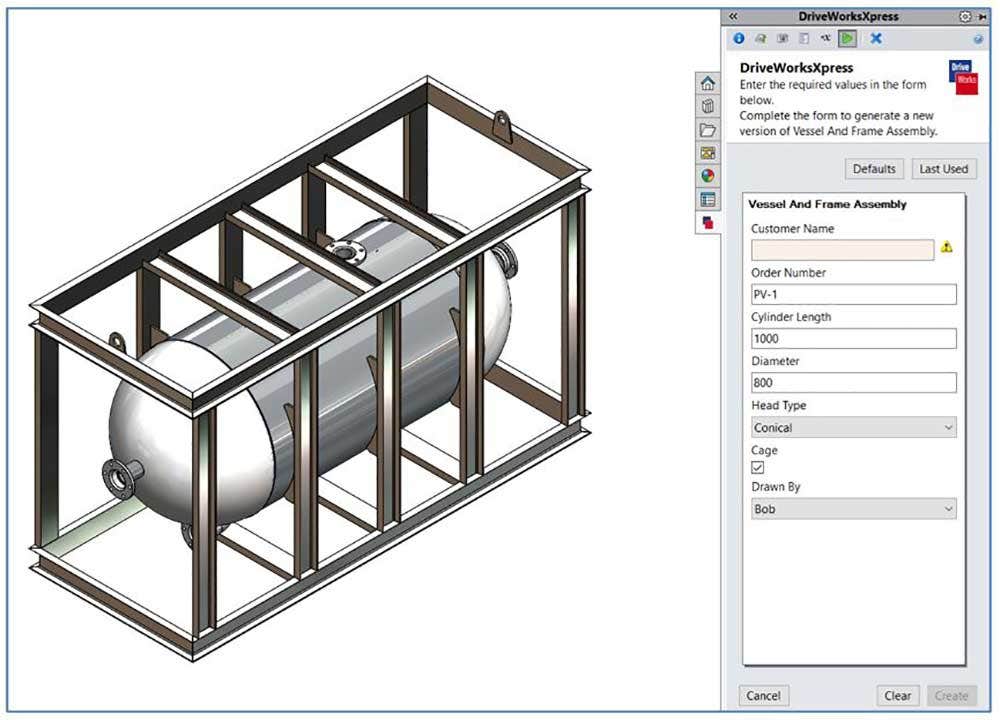
Here is an example of a DriveWorks Xpress project to automate the design of pressure vessels. You fill out the simple user interface in the task pane, hit create and watch your automation unfold as all the models are saved.
Developing a design automation with DriveWorks is pretty much always the same. It follows four basic steps:
1. Using your master model, capture all the dimensions, features, and custom properties we wish to drive.
2. Develop a user interface to permit easy data entry while restricting options we do not wish to offer.
3. Taking the data we captured in step one, and the user interface we developed in step two, we now write all of the rules and logic to tie them together.
4. Run our automation and test it.
On top of DriveWorks Xpress being completely free, as mentioned earlier, writing rules also does not require you to have a shred of experience working with a programming language such as Visual Basic. Writing rules in DriveWorks Xpress feels more like writing Excel formula which I think we can all agree is something pretty much everybody has done at some point. There is really nothing stopping you from using this over the low-level automation methods of configurations and design tables. If you decide down the road you want to do even more with automation you can investigate the other flavors: DriveWorks Solo and DriveWorks Pro. These tools not only offer steadily increasing capabilities to automate brand new things never possible, but they also allow you to do it much faster and more effectively. Since DriveWorks is scalable, anything you do in Xpress can be upgraded into a Solo or Pro project once you are ready to cross that path.
By now you must at least be curious to give DriveWorks Xpress a try and see for yourself. Although it is included in every seat of SOLIDWORKS, it does require you to activate it.
If you are interested in learning how to get started to activate DriveWorks Xpress, check out our blog, “Introduction to DriveWorksXpress.” For more information, check out our YouTube channel or contact us at Hawk Ridge Systems today. Thanks for reading about design automation for SOLIDWORKS!


