Have you ever looked at a material data sheet and wondered what flexural strength and flexural modulus are? Or considered how those properties relate to the 3D printing world?
What is Flexural Strength?
Flexural strength refers to the resistance of a material to breaking when subjected to a bending force. Flexural strength is typically measured using a three-point bending test where a bending force is applied to a standardized test specimen. In typical flexural loading conditions, areas on the top and bottom of the part have the highest stress, while the center line of the part stays at a relatively low stress along the neutral axis.
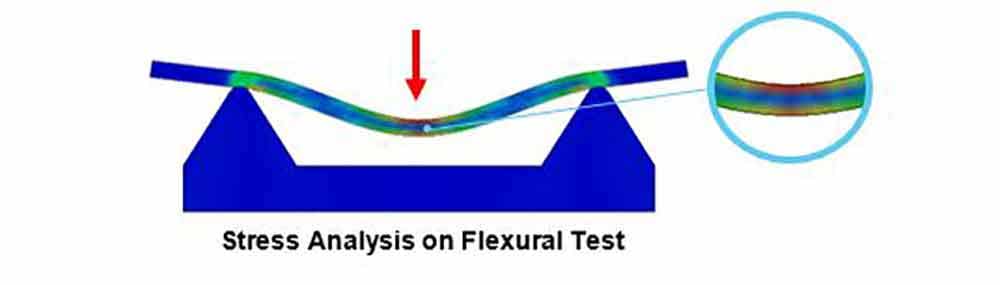
In this example, red coloring indicates areas of high stress.
Understanding Flexural Modulus
Flexural modulus is a good measure of stiffness. A great way to think of this is to ask, “How much will the part flex when I try to bend it?” Flexural modulus is calculated by dividing the change in stress by the change in strain. A higher flexural modulus relates to a higher stiffness. 3D printed composite parts reinforced with continuous fibers have significantly higher flexural moduli.
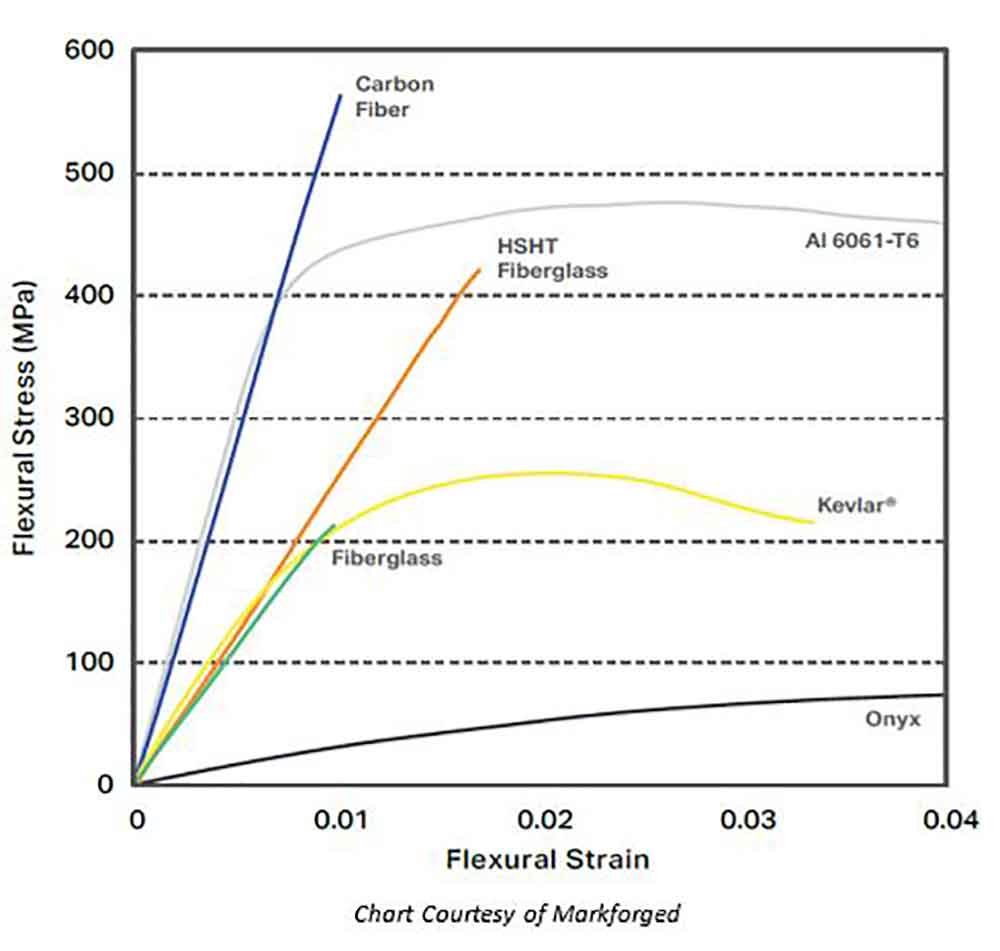
In this chart, flexural modulus is identified as the slope of each curve on the stress-strain chart.
Print Orientation and Splitting Parts
One of the easiest ways to improve flexural strength is to effectively orient your part on the build bed. For many 3D printing technologies, print orientation is critical for optimizing mechanical performance. This is especially true for 3D printers that fall under the American Society for Testing and Materials (ASTM) category of material extrusion (FDM, FFF, CFF). These machines produce parts that are stronger in the XY planes compared to the Z plane. This behavior is known as anisotropic properties.

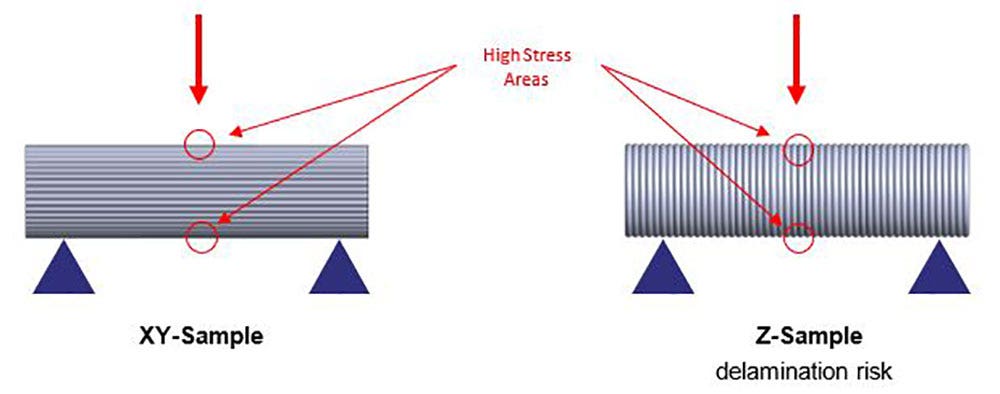
In this example, we have two cylindrical models. One is printed primarily in the XY plane and the other is printed primarily in the Z plane.
In a three-point flexural bending test, loading conditions are favorable for the part layers to delaminate in the Z-Sample. Recall that the regions of high stress in the flex test specimen were centrally located at the extremities of the part. The XY sample will perform much better in this test.
Adding Fiber Reinforcement
One of the most effective ways to maximize flexural strength in a 3D printed part is to add or embed reinforcement from stronger materials in specific areas of high stress. There are a few different strategies that can be taken to significantly improve part strength. A patented technology known as CFF (Continuous Filament Fabrication) developed by Markforged gives users the ability to embed fibers in printed parts. These fibers include Carbon Fiber, Kevlar, Fiberglass and High Strength – High Temp Fiberglass.
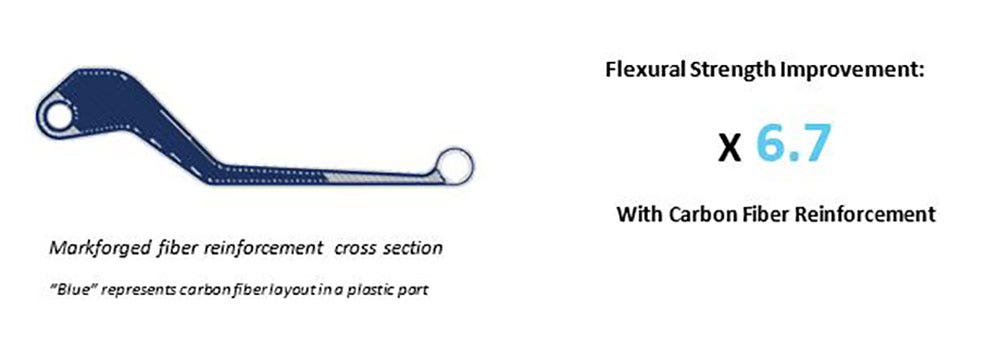
Fiber patterns, locations and orientations are all customizable depending on your design requirements. Eiger, the slicing software, makes the reinforcement process seamless and automatic. This ease of workflow allows you to spend more time designing your next part while your printer produces parts with excellent strength properties and cosmetic finish.
Changing Geometry
Another tried and true method for improving flexural strength is to change part geometry. Adding ribs, trusses and gussets can significantly improve part performance in flexural testing. In this example, we are going to consider the flexural testing specimen once again. We will focus this time on displacement during bending which is shown in the diagrams below: (A) No ribs, (B) Two Ribs, and (C) Three Ribs. Using a SOLIDWORKS static simulation study, we can predict how much each sample will bend under a given load.
Let’s take a look at the calculated displacement of each sample:
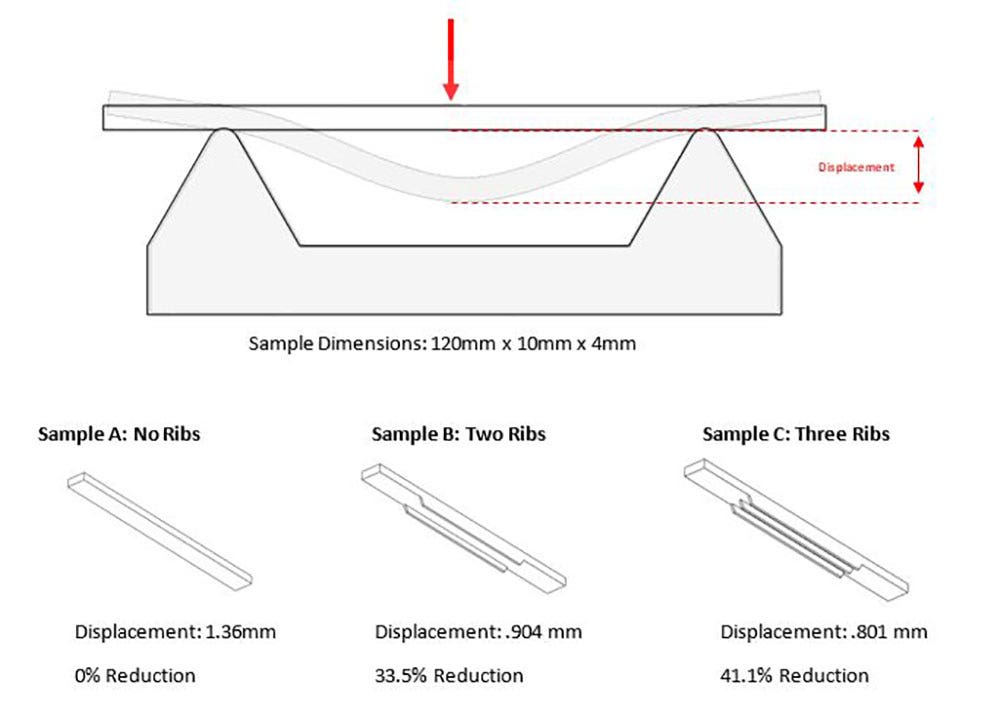
From the test results, we see that adding ribs significantly reduces the amount of deflection experienced under the same load. In our test we could have kept adding ribs, however, there is a certain point when the benefit of adding extra ribs is no longer worth the additional weight. The designer must be aware of the added part weight and size when adding features to improve flexural strength. It is a balancing act for sure, but we are engineers!
Adding Structural Members and Bushings
Another reinforcement strategy is to add stronger structural members to printed parts. This can be very effective when off-the-shelf items are added to customized 3D printed geometry. Off-the-shelf items will generally be standardized shapes, readily available and cost-effective. This allows 3D printed parts to focus on the customized geometry needs of the design. This strategy is also commonly used in areas of high wear such as threads, contact surfaces and bushings. The images below show a 3D printed part reinforced with standard aluminum flat pieces for structural support and brass bushings in the high wear area bores.
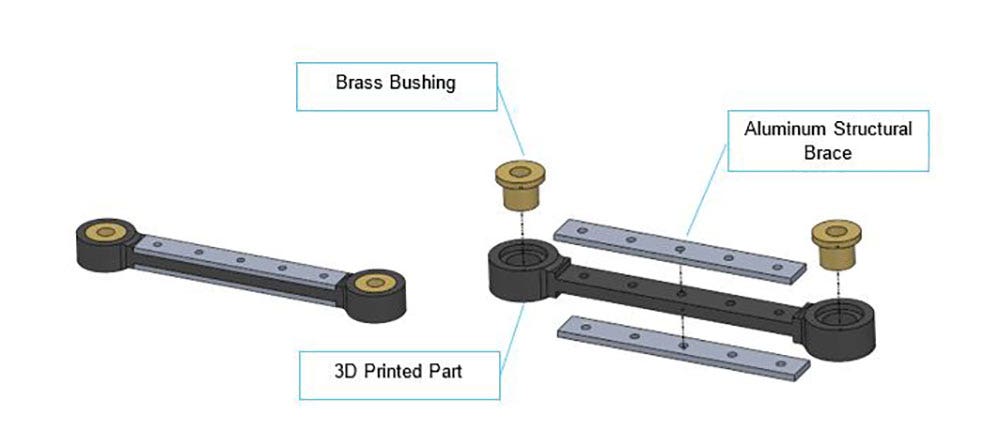
By utilizing this method, you can produce parts that are strong and long-lasting for a fraction of the cost of other manufacturing methods. Depending on the part design, it is also possible to significantly reduce print times by using long spans of off-the-shelf structural members in place of plastic.
There you have it. By using these tips and tricks, you are sure to produce stronger and stiffer parts. Do you have any other tips and tricks for improving flexural strength in 3D printed parts? Let us know in the comments.
Check out our page for more information on Markforged 3D printers or if you have any questions, contact us at Hawk Ridge Systems today. Thanks for reading!