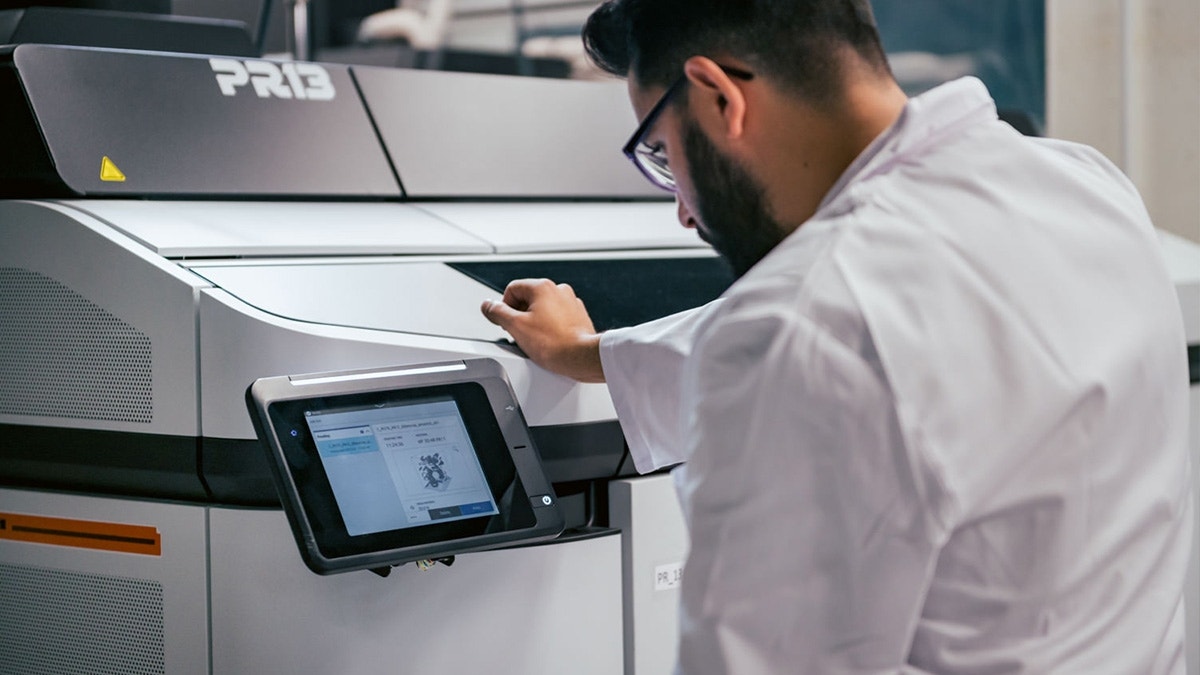
HP recently announced the release of a new Robust PA12 print mode for the HP 5200 3D printer. This print mode will prove to be a nice addition to the suite of existing print modes along with balanced and fast print modes. When you want to achieve the best possible combination of cosmetic finish, dimensional accuracy, and mechanical quality, this is going to be the print mode for you. These benefits have a place in every industry vertical that HP Jet Fusion currently serves.
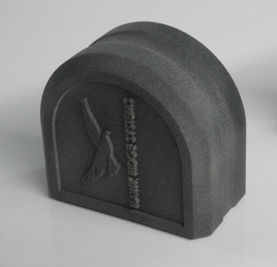
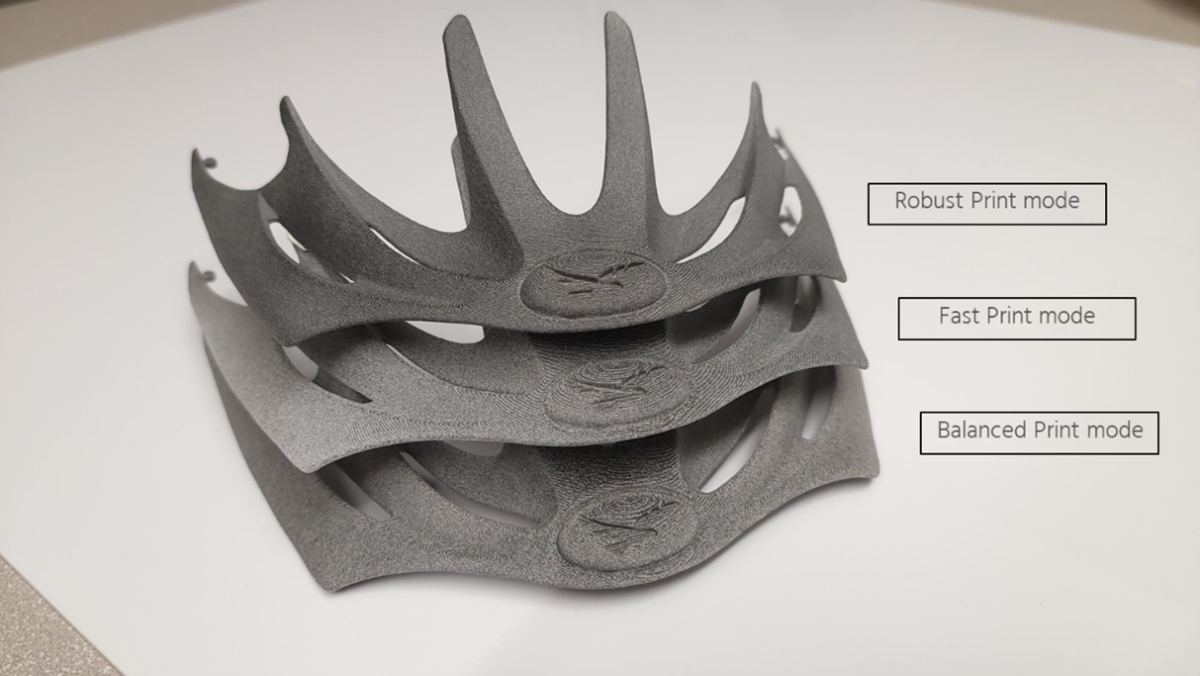
HP 5200 3D printed part using Robust PA12 print mode.
A few application examples would be eyewear, consumer products, enclosures, fluid movement applications, and structural components. In today’s article, we will get the scoop on what this new print mode can bring to the table. The icing on the cake is that this print mode is provided free of charge.
What Are the Advantages of Robust Print Mode?
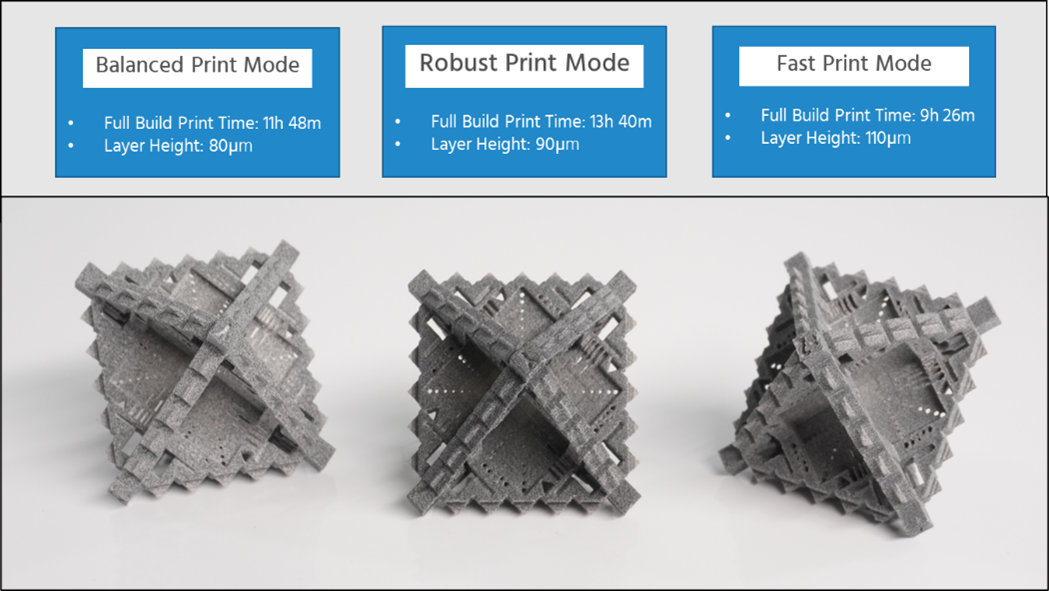
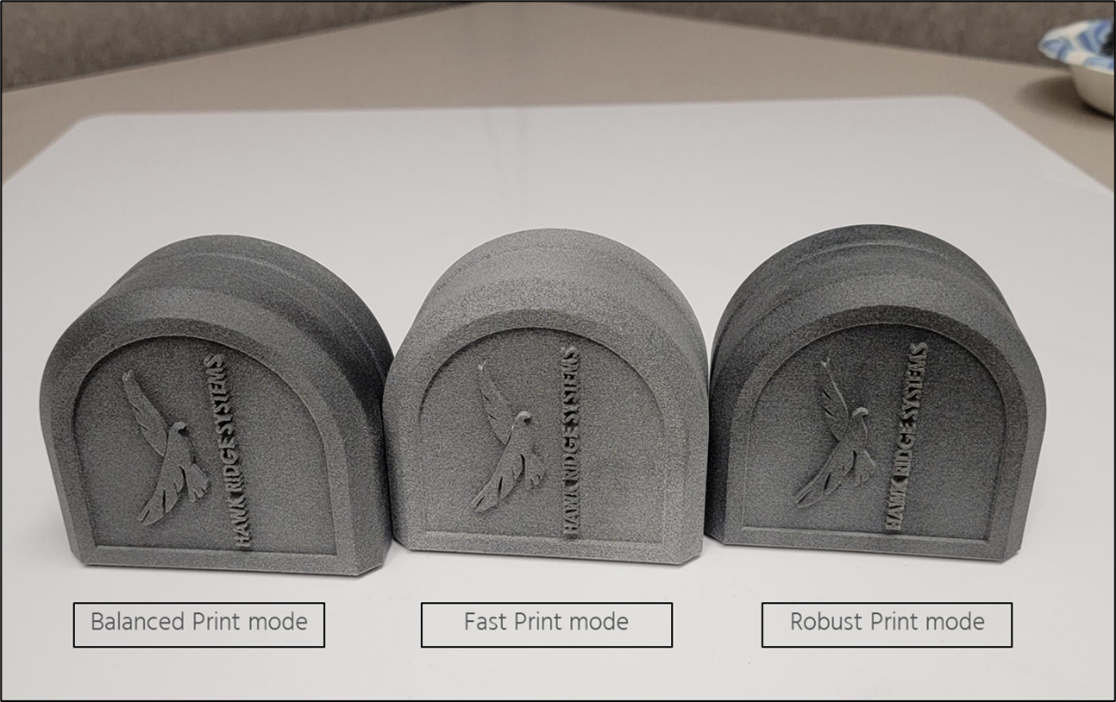
Comparison of balanced, robust and fast print mode on HP 5200 3D printer.
Robust print mode has three distinct advantages:
Best Part Quality – Robust print mode can provide a higher level of fine detail on textures as well as improvement to color uniformity and surface quality on printed parts. Parts that have a low thickness, high levels of detail, or critical dimensions are ideal for this print mode. In our testing the most striking difference was the darker color of parts printed with this mode.
Mechanical Property Improvement – Mechanical properties are improved when printing with Robust print mode compared to Balanced print mode. Tensile strength, tensile modulus, elongation, and impact strength are all improved with this print mode.
Improved Dimensional Accuracy & Process Uniformity – Improvement in repeatability of mechanical properties and dimensional accuracy has been observed and catalogued through HP’s internal testing. The mode also allows for the use of an XY offset to dial in dimensional parameters when printing.
How Does the HP 5200 Print Process Change with Robust Print Mode?
Robust print mode benefits occur due to a couple of process changes. First, the carriage and re-coater speed are slower to help improve melt completion layer to layer, which improves the mechanical properties. Robust print mode also uses a higher amount of fusing and detailing agent to provide a better look and feel as well as better dimensional accuracy.
This print mode also allows for a smoother transition between fusing agent and detailing agent. As a reminder, fusing agent is applied to the interior areas of a geometry cross-section while detailing agent is dispersed around the perimeter. The last process change is that 90-micron layer heights are used with Robust print mode compared to 80-micron layer heights used with balanced print mode. This increase in layer height will not be discernable to the naked eye, yet it allows the system to make up for the lost time that occurs from slowing down the carriage speed.
How Does Robust Print Mode Compare to Other HP Print Modes?
With the previously mentioned advantages of Robust print mode, it is good to take a step back and look at the whole picture. Below is a graph that details how each print mode compares to another.
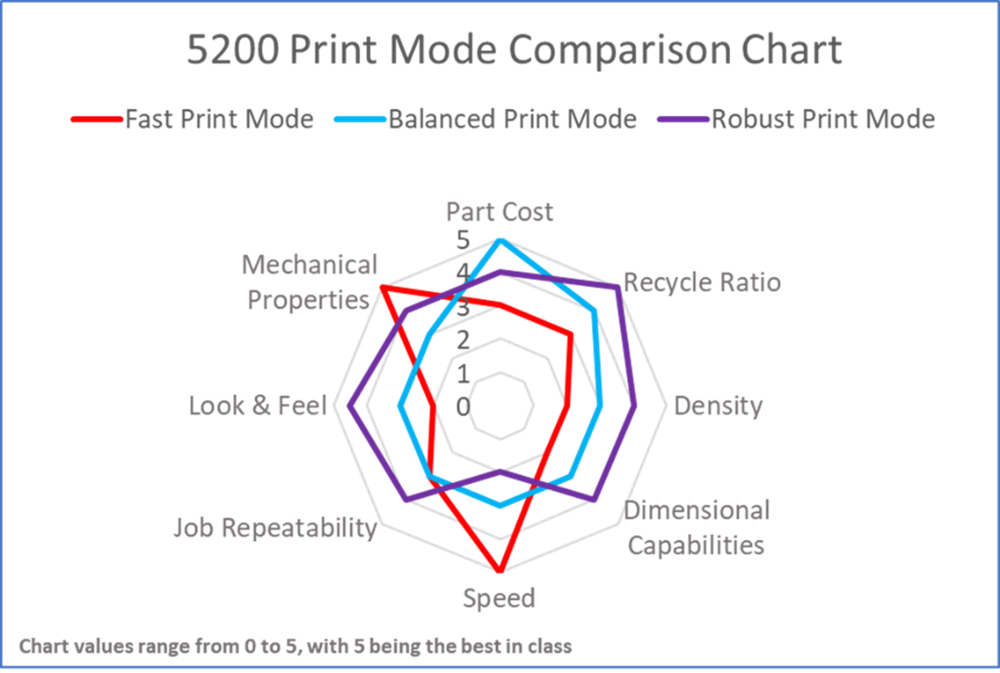
Robust print mode has key advantages while sacrificing a little speed and part cost compared to Balanced. Balanced print mode is the most widely used print setting by the majority of our customers.
Robust print mode advantages, however, may be enough to move the needle for some.
When seeing and feeling parts printed with each print mode side by side, the improvement of Robust print mode specifically in cosmetic finish becomes very clear. At Hawk Ridge Systems, we are considering moving over to Robust mode internally to provide our customers with the best possible print quality.
PA12 Print Mode Mechanical Properties
Below is a comparison showing how a few mechanical properties line up between each print mode.
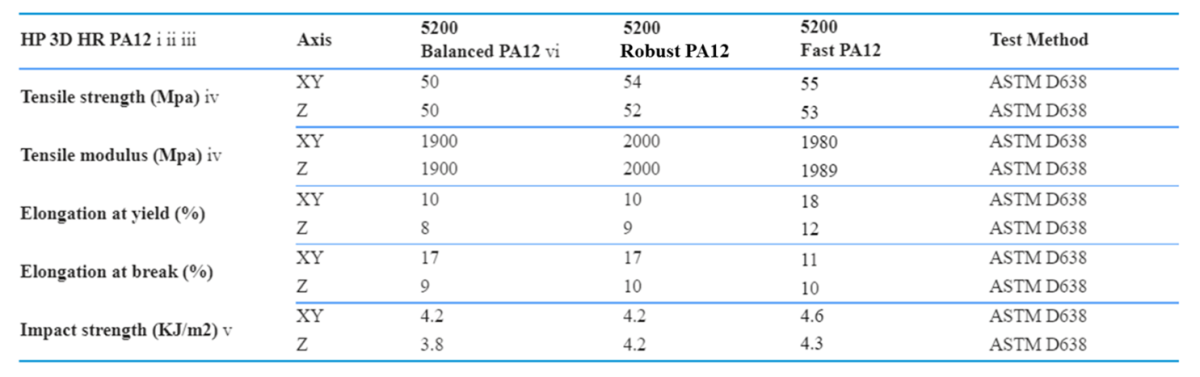
It may be surprising to some that Fast print mode produces superior mechanical properties; however, Robust print mode is not too far behind.
PA12 Print Mode Dimensional Accuracy
Dimensional comparisons between Balanced Print Mode and Robust Print Mode can be seen below:
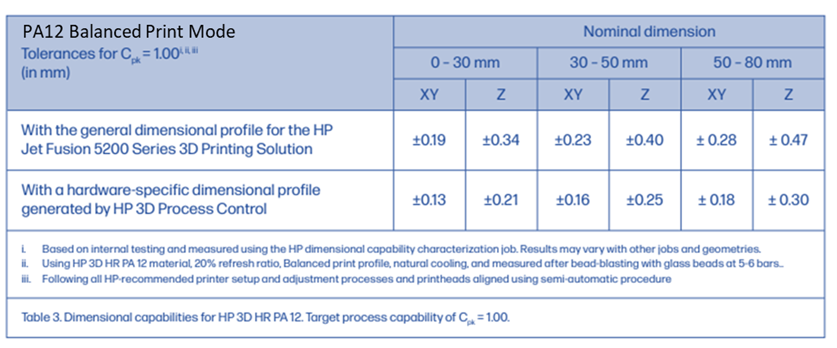
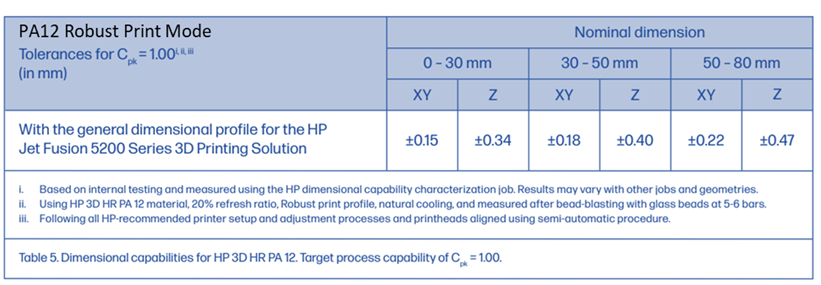
With accuracy it is important to note that only the XY accuracy is improved with Robust mode and not the Z axis. Also worthy of note is that customers running the HP 3D Process Control software using balanced mode will still have an accuracy advantage over those running Robust mode. When comparing a default 5200 setup, Robust mode does come out on top in terms of accuracy.
Automotive Endcap Example Production Print Mode Comparison
Using a nested build example of an automotive endcap production build, the differences between each print mode become clearer from an ROI perspective.
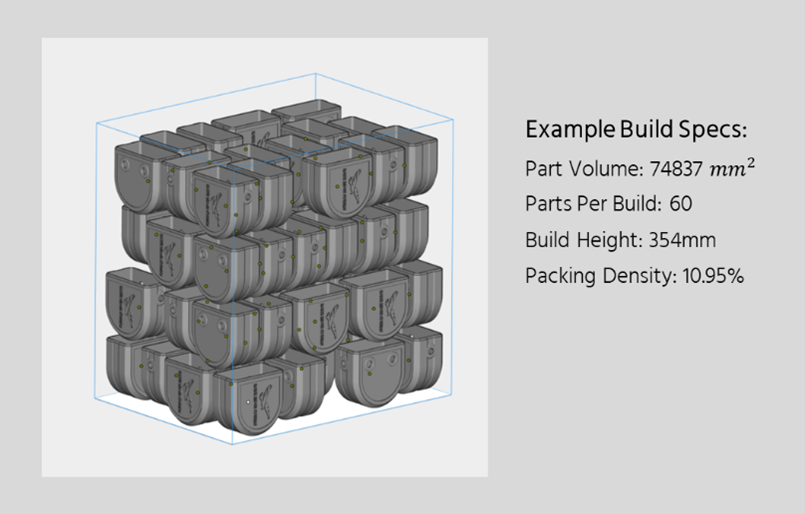
The build shown above has a 10.95 percent packing density which is in the ideal range for an HP machine (7-12 percent optimal). It is important to note that the print modes have different recycle ratio recommendations which equate to a different fresh material percentage with each job. Twenty percent fresh and 80 percent recycled powder is the default; however, powder tends to degrade faster at higher nesting densities. Robust mode has the most optimum recycle ratio at higher densities while Balanced and Fast modes require more fresh powder in those higher ranges resulting in more powder material cost for that same build.
Print Time and Productivity
Here is a comparison of print times for a full build between each print mode. Depending on your current production setup, the additional two hours from Robust print mode compared to Balanced may be insignificant. For example, if you are running no more than one build per day, this additional time would not affect your overall productivity.
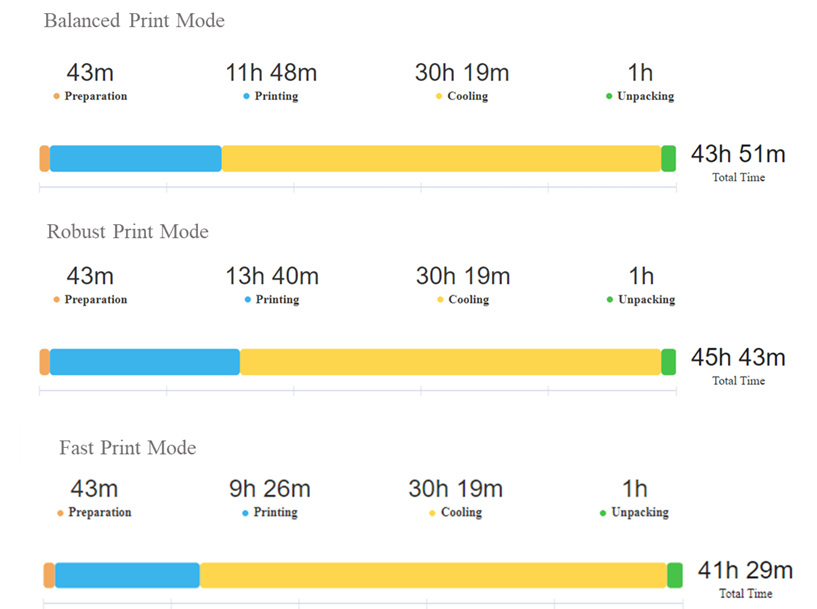
Cooling time may seem high on these builds, but keep in mind that these are natural cooling times as opposed to fast cooling times. The HP 5200 printers are equipped with natural cooling units that allow operators to cool on the side to free up the printer to begin the next job and the post-processing station to unpack previous jobs. This initial cooling time is virtually eliminated after the first job in a production scenario due to multiple jobs cooling at once. Jobs can also be fast cooled using an onboard vacuum in the post processing station to reduce the overall cooling time for a full build to around 10.5 hours.
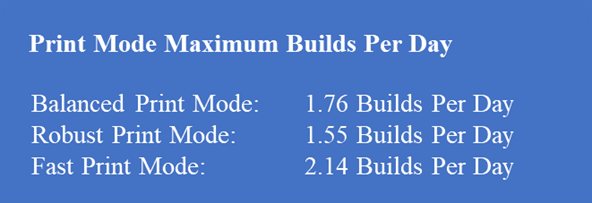
Another way to look at the speed difference between print modes is by comparing the maximum builds per day that the printer can output for each mode as shown below.
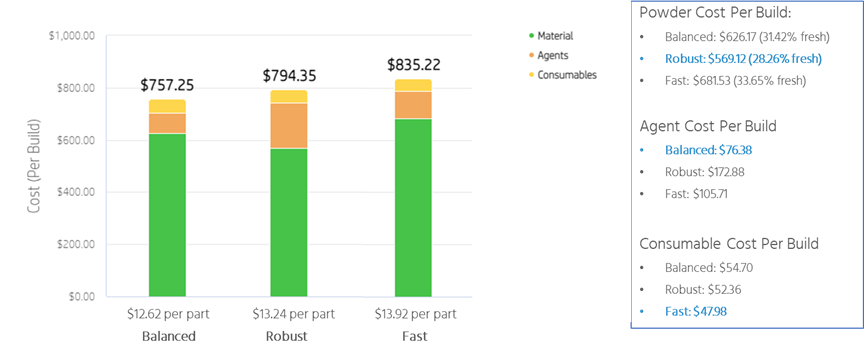
Part Cost
In our part cost analysis for the automotive end cap build, Fast print mode ends up being the most expensive option from a part cost perspective when running at recommended powder recycle ratios.
Fast mode results in a price increase of $1.30 over Balanced mode with Robust mode being right in the middle. Robust mode has the cheapest material cost due to more optimum recycle ratios, yet it does have the most expensive agent cost.
It is important to gauge what your average long-term packing density is when considering part cost differences between each print mode. If you consistently average below seven percent packing density for your builds, then Robust mode will end up being the most expensive option because lower packing densities allow for each mode to be set at 20 percent fresh material.
Check out our article, “Understanding Elements of Part Cost For HP Jet Fusion 3D Printing” to learn more about what goes into part cost calculations.
How Can You Start 3D Printing with Robust Print Mode?
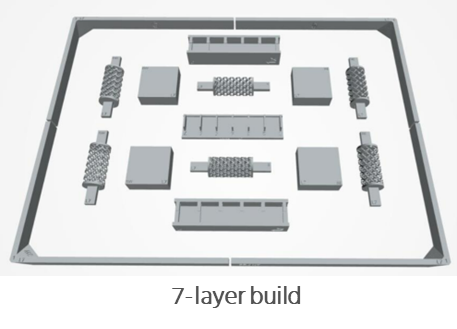
To begin printing with the Robust mode, a few steps are required to properly calibrate your machine for the new print parameters. The main calibration required will be re-running the seven-layer build which would have been completed on your initial machine installation. The seven-layer build allows users to select a level of parts that have the best quality for a given print mode. Total calibration time for you to be up and running with Robust print mode is one to two days. After initial calibration, users can freely switch between print modes without needing to recalibrate. These install steps can be found at the PrintOS Knowledge Zone and are briefly described below:
- Install the latest HP firmware (higher than RJD_16_22_20.34)
- Restart HP Smart Stream 3D Build Manager
- Launch Semi-Automatic Alignment (printhead alignment)
- Set Fusing Lamp Power to 0% on printer front panel
- Utilities →Process configuration →Energy configuration →Enter values manually →Fusing irradiance →1000 HP 3D HR PA12 →Robust →Override the fusing lamps power values to 0%
- Launch Build Platform Temperature Calibration (7-layer build)
- Utilities →Process configuration →Energy configuration →Calibration →Guided calibration →Print build-platform temperature-calibration build →Robust
- Fine Tune as Needed
- White Temperature
- XY Offsets
- Irradiance
Additional Fine Tuning with Robust Print Mode
Robust print mode provides more adjustment and fine-tuning capability compared to the other modes. Most users will be familiar with irradiance adjustment which will adjust the fusing lamp heat applied for a given build. Robust mode adds two more ways to fine tune your builds with white temperature adjustment and XY offsets. Descriptions and keystrokes for build-to-build adjustment are detailed below:
- White Temperature Adjustment 0.5ºC
-
- Improve part surface quality: decrease 0.5ºC (be careful with the elephant skin)
- Utilities →Process configuration →Energy configuration →Calibration →Enter values manually →Build-platform temperature →1000 HP 3D HR PA12 →Robust
- XY Offsets
- Improve part accuracy by adjusting XY Offsets (from -168um erosion up to +168um dilation)
- Utilities →Process configuration →XY offset compensation →Robust
-
- Irradiance Adjustment
-
- Improve mechanical properties: increase the fusing lamp power by 1% (take note of part roughness)
- Utilities →Process configuration →Energy configuration →Calibration →Enter values manually →fusing irradiance →1000 HP 3D HR PA12 →Robust
-
Learn More About HP Robust Mode
Watch a recent presentation we created on this topic.