Though much of the design and engineering world has moved on to 3D CAD solutions over the last couple decades, DraftSight is often used as a collaboration tool to communicate with other departments, companies, or vendors using 2D design data, even if you yourself are working in 3D. In many cases, this design data may be provided in PDF format, making it difficult to modify and revise. Fortunately, the PDF Import functionality of DraftSight allows users to quickly convert PDF files into DWG format, unlocking all the revision, editing, and design capability within.
In this article, we’ll be covering the PDF import capability offered in both versions of DraftSight Enterprise, along with some critical options for successfully converting a PDF into DWG format.
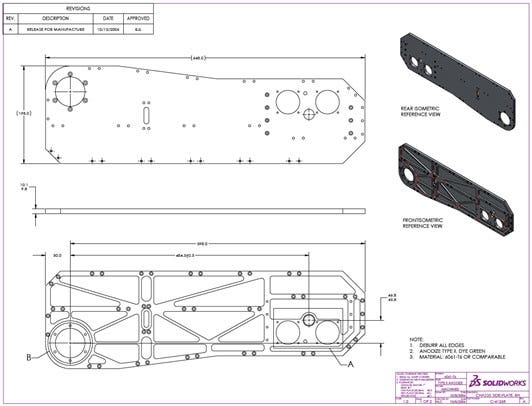
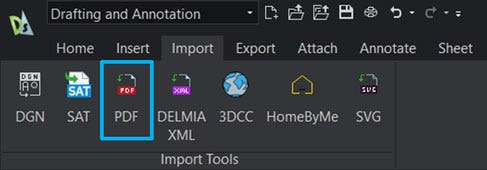
The chassis plate drawing pictured above is a file that I’ve received from a vendor, and in its current PDF format, I’m not able to do much with it outside of some basic annotations. For true editing capability, we need to convert this to DWG or DXF format within DraftSight. With a new blank document open, select PDF from the Import tab in the command ribbon to get started or, alternatively, enter IMPORTPDF into the command line:
The resulting dialog will be used to control the settings for the imported PDF, starting with the Mode:
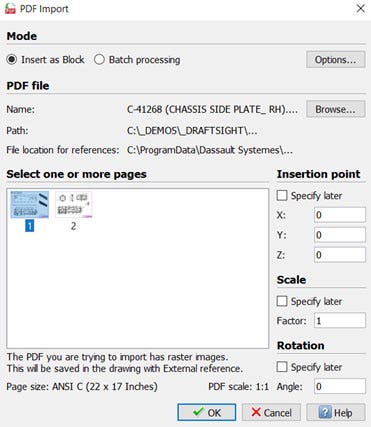
Use Insert as Block for a single PDF, or Batch Processing for multiple files.
Importing PDF Files With Insert as Block Mode
Beginning with Insert as Block mode, click the Browse button and select the PDF you wish to use. If you have a particular location at which you’d like to insert the results of the import, use the X, Y, and Z fields under Insertion Point to specify the coordinates. Alternatively, enable the Specify Later option to position the results on-screen after the PDF has been imported. Likewise, a scaling factor along with a rotation angle can be specified now or after importing.
When using Insert as Block mode, you will be prompted to select which pages you’d like to include if your selected document contains more than one page. You may use control or shift to multi-select pages if desired. If you are importing multiple pages, it is recommended to use the Specify Later option for Insertion Point, otherwise both pages will be imported to the same location, and will likely overlap, as seen below:
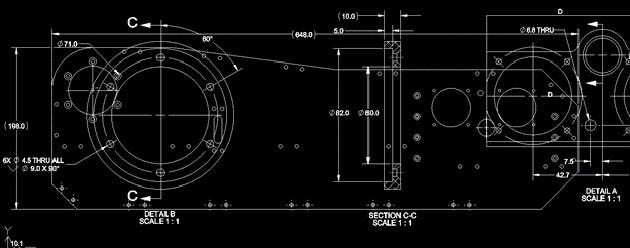
Finally, the Options button at the top-right of the dialog contains a handful of options critical to the success of the PDF import:
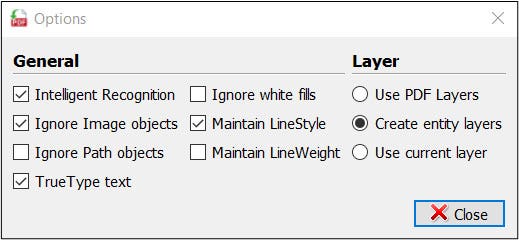
Important PDF Import Options in DraftSight
Generally, it is recommended to enable Intelligent Recognition, as this ensures that any arcs, circles, or ellipses in the PDF are converted into the same shapes within DraftSight. Without Intelligent Recognition, these entities will instead be converted to splines, as seen below:

Additionally, if the Ignore Path Objects option is enabled, DraftSight will not import any vector information from the PDF. Lines, arcs, splines, etc. are typically stored as vectors within the PDF, so unless you only want to import your dimension values and notes, we recommend leaving this option disabled. An example of the chassis plate PDF imported with Ignore Path Objects turned on (and therefore, with no geometry present) is shown below:

Finally, we also need to consider how layers will be interpreted and created for the resulting DWG. The Use PDF Layers option will create layers in the resulting DWG that match the layers of the PDF, if any exist in the source file. If the PDF does not have any layers, the Create Entity Layers option will automatically be used. In this case, layers are generated based on the types of imported entities, such as a layer for text, a layer for geometry, a layer for fills, etc. as seen in the following screenshot of the Layers Manager:
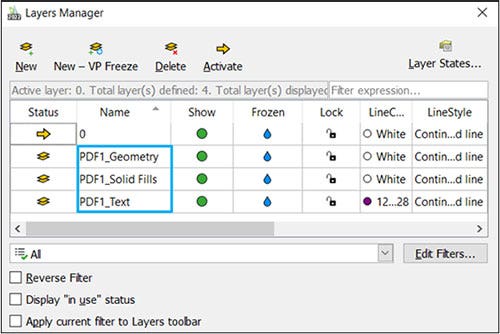
The last option, Use Current Layer, will simply import everything to the current active layer.
There are several other options available in this dialog that were not discussed here that may be of some interest, but which are less critical to successful PDF import. It should also be noted that all these options apply in the same manner when using Batch Processing mode. For complete documentation of these options, check out the Help File on Importing PDFs.
Completing Your PDF to DWG Import and Conversion
Once you are satisfied with your options, click OK to complete the PDF import. If you selected Specify Later for Insertion Point, Scale, or Rotation, you’ll be prompted to input those parameters now, using either numeric keyboard inputs or by clicking in the graphics area.
Insert as Block mode is great for importing an entire drawing in PDF format but can also be used to import smaller subsets of data into existing drawings, as the result is in fact a block. If we’d like to use this drawing in its full capacity, we’ll need to use the Explode command, found in the Modify section of the Home tab or typed into the command line:
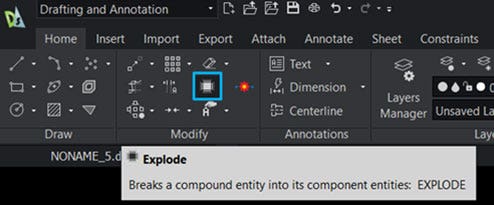
Then, click any piece of the drawing and press enter to confirm. You should now have a fully functional DWG file, complete with any layers created during the import process, and paving the way toward more successful collaboration with your PDF counterparts.
Importing PDF Files with Batch Processing Mode
But what about Batch Processing mode? When you have hundreds or even thousands of documents to get through, this process can be incredibly time consuming. Batch Processing mode follows the same general procedure, but requires the selection of a source folder rather than an individual file, along with a destination folder which will hold all the imported results:
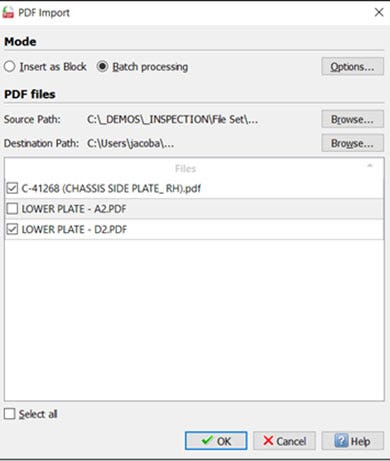
Like Insert as Block, the Batch Processing option will allow you to choose which files should be imported and which should be excluded using a simple checkbox. Use Select All at the bottom left of the dialog to quickly select all the documents in the identified folder. Confirm your selected options, then click OK to begin the conversion process.
Though the process is similar in general, there are a few key differences as well. You may notice that the options for Insertion Point, Scale, and Rotation are not available in this mode, and as such those parameters may need to be adjusted after the fact. Additionally, Batch Processing creates a separate, unique file for every page of every PDF processed, and does not combine them automatically. Finally, these resulting documents are in DXF format rather than DWG, though it should be noted that DraftSight works just as well with DXF files, and they may be saved to DWG at any time. The resulting files from the batch processing of two documents (two pages each) are shown below:

Now that we have our PDF files imported, we can leverage all the reviewing, annotating, and modifying capabilities of DraftSight as needed, and of course, once we’re finished, the DWG/DXF files can always be converted back to PDF format if necessary.
Watch the Webinar
Want to see this functionality (and much more!) in action? Check out our recorded webinar “DraftSight: What AutoCAD Veterans Need to Know” where we reviewed:
- The DraftSight user interface
- Features and productivity tools
- Licensing options
- Workflows to transition 2D data into 3D SOLIDWORKS parts
- The basics of data management for DraftSight using 3DEXPERIENCE
Conclusion
As you’ve seen here, we’re able to convert PDF files directly into DWG/DXF format with DraftSight in just a few clicks, either individually as blocks, or even in batches.
DraftSight is a fantastic design and collaboration tool whether you work primarily with 2D or 3D CAD. If you happen to work with SOLIDWORKS it’s even more effective, including the ability to help migrate design data from 2D to 3D and leverage SOLIDWORKS PDM or the 3DEXPERIENCE platform for file management and revision control.
If you have any questions or thoughts on DraftSight, be sure to contact us and let us know! We always appreciate the chance to talk with our community. Thanks for reading!


