With most of us working from home, hopefully everyone is settling in and successfully accessing their SOLIDWORKS tools just like you normally would if working from the office. If you are having any issues, check out our blogs “Working Remote? Use SOLIDWORKS Effectively With These Tips,” and “Work From Home During COVID-19 With SOLIDWORKS Temporary Licenses.”
Now I would like to make sure you are using your CAD tool to its full potential and that means testing your design for strength before making a prototype. During the design phase, changes are easiest to implement and cheapest to make; so iterate now using built-in simulation tools.
If you have access to SOLIDWORKS Premium, you may already know that you gain full capabilities to run a linear static analysis by turning on the Simulation add-in. For you SOLIDWORKS Standard and Professional users, did you know that all levels of SOLIDWORKS CAD (Standard, Professional and Premium) have basic analysis capabilities? Yes, trust me, they do! You gain access to running a structural simulation study, with a few limitations (check out this blog “Is SimulationXpress Enough?“), through the SimulationXpress tool. This tool is great for a first pass on your single body part to check the strength of your design. It is a great way to do a comparative analysis to see if the strength of your design has improved or not and iterate toward a better design.
Getting Started With the SimulationXpress Tool
Getting started is really simple and takes less than a minute. All you need to do is activate the SimulationXpress tool and you will be on your way. First, open a single body part file, then you can navigate to Tools>Xpress Products and select SimulationXpress. You will see other Xpress tools that I highly recommend checking out to get the most out of your CAD tool.

If you have never used this tool before, it will open up a window asking you to follow the link to https://my.solidworks.com/xpress to get a Product Code to complete the activation process. You’ll sign in using your SOLIDWORKS online account to activate the tool. If you don’t have an account, it is really easy to create one. This doesn’t require an active subscription service contract and gets you a ton of great information like webinars, forums, example CAD models and training. Here is some additional information on what you gain with your SOLIDWORKS online account. If you need help with creating an account, contact our technical support or take a look at our support article.
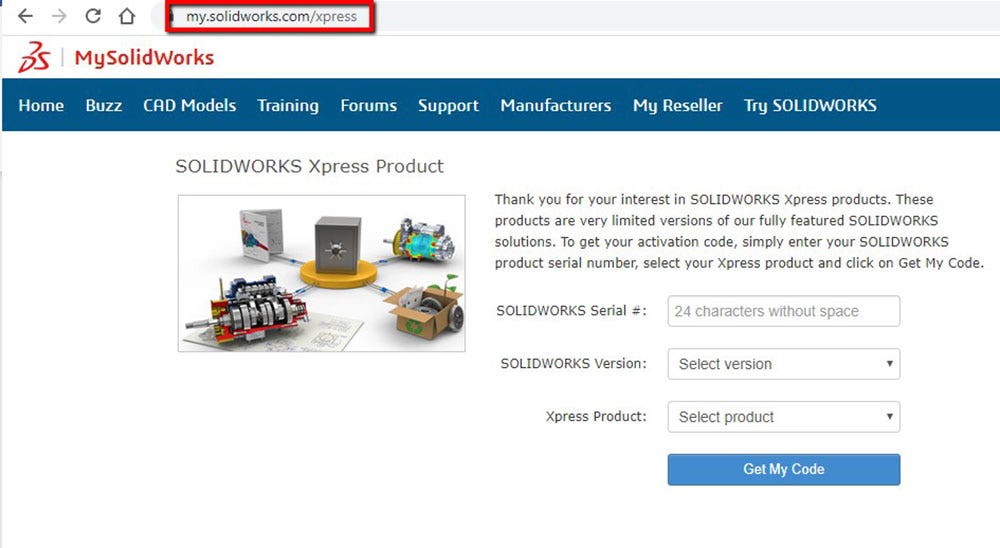
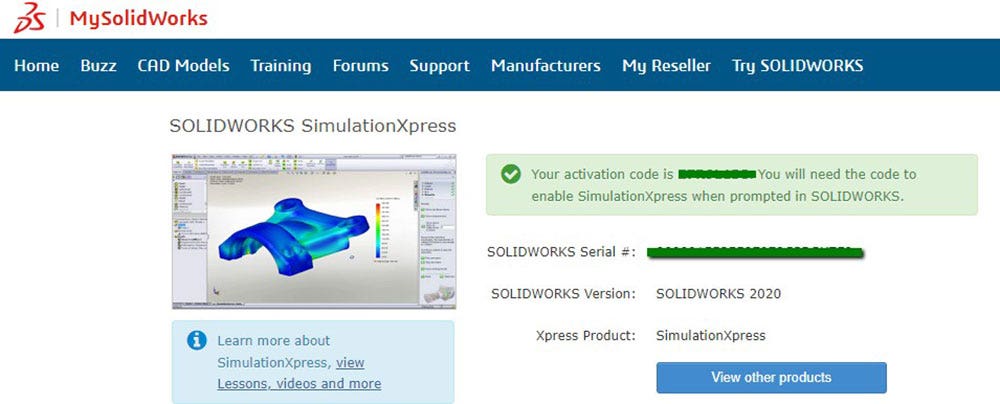
After you login and enter the serial number, SOLIDWORKS version, and Xpress product, in this case SimulationXpress, click on “get my code” and it should appear in the same window, highlighted in green. Now just copy and paste the code back into SOLIDWORKS and click OK. And that’s it! You now have access to the tool and will no longer require you to do this moving forward.
Building a Static Analysis
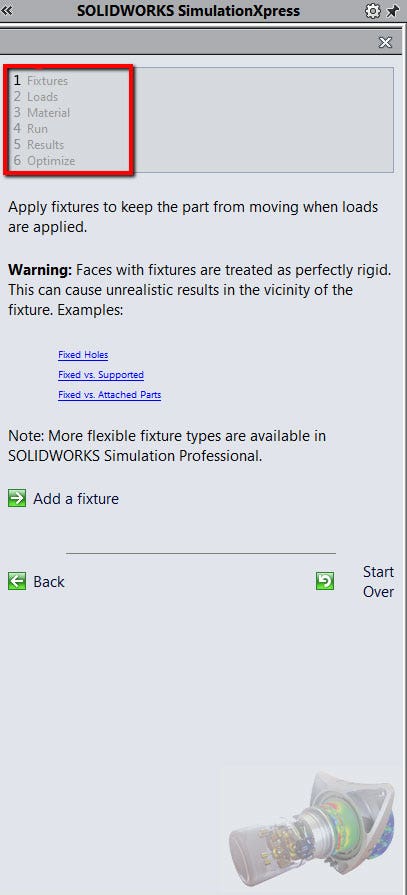
You can now use great features like the wizard located in the task pane to walk you through a step by step process to building a static analysis. This can be done in just four simple steps! These steps include adding a fixture to restrain the body, applying a load to represent how the body will be deformed, a material that references the built-in material database, and lastly to mesh/run the study. Each step on the wizard interface has a description as to what that feature is, what their assumptions are, and some visual examples as to what the features do. You will never feel left in the dark not knowing how to set up your problem, much less setting it up properly. Here is a video to see the process in action.
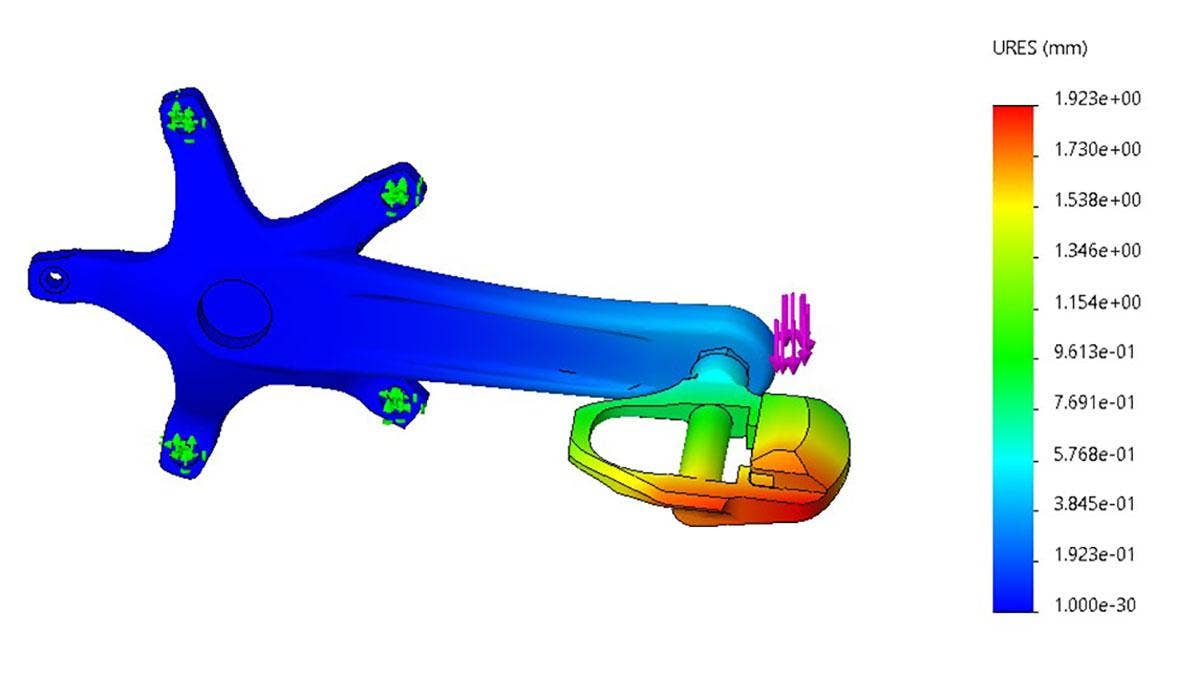
After running the study, you can see 3 result types: Displacement, Stress and Factor of Safety. I would recommend new users start by reviewing the displacement plot. This is a quick way to validate the study, compare against hand calculations, or a physical test.

You can activate the animation to visualize and confirm if the body is deforming the way you would expect. Finally, I’d suggest looking at Factor of Safety (FOS) where anything below a min FOS of 1 is not a good sign that your part is strong enough under that given load. This means that the part was not able to withstand the given load you provided and now it’s time to make a change. Remember, SimulationXpress is integrated with the SOLIDWORKS CAD interface and features, so make a design change and re-run the study to see how the results have been affected.
At this point, I want you to open that part design you have been working on and give it a test. Does your part seem strong enough? Test it against some other design options you were thinking about and see what iteration is going to work best. You will find that using SimulationXpress can help you compare the strength of your design alternatives and make improvements without guessing. Sure you can design really cool things in SOLIDWORKS, but it’s important to know, is my design strong enough? Running a simple static analysis to answer this, is a simple yet powerful first step.
Check out this tech support article on Activating SOLIDWORKS Xpress Products for a more in-depth look on activating your Xpress tools. Visit our site for more information on SOLIDWORKS and if you have any questions, be sure to contact us at Hawk Ridge Systems today.