Would you like to be able to create photo-realism imagery, video or VR interactive content within a tight deadline? Join Hawk Ridge Systems for an introductory look at the fastest, easiest to use, and most polished rendering software available – SOLIDWORKS Visualize. In this presentation, we will be covering the import of SOLIDWORKS 3D CAD models, applying materials, decals, custom environments, and exporting in various professional formats.
Introduction to SOLIDWORKS Visualize Professional
Video Transcript
Welcome to this week’s Webinar Wednesday. Today we’ll be covering SOLIDWORKS Visualize. My name is Ricky and I’m one of the Senior Application Engineers at Hawk Ridge Systems. We’re going to focus in on this espresso machine. You can kinda see it, it’s familiar with SOLIDWORKS. This was designed in SOLIDWORKS. We needed an objective and what we want is to be able to get a photograph of this. We have this SOLIDWORKS model and imagine that instead of waiting for it to be built meaning, all the parts are created and it’s physically assembled together and then take a photograph of it. SOLIDWORKS Visualize allows us to capture the images of our design work. So the tagline is it’s a camera for your card data, right? I’m going from this SOLIDWORKS model assembly and going into this realistic high-render image.
Product Visualization Roadmap
You can see here how my focus is drawn towards the ship trail and I’ll show you how to do that. Focusing on different aspects of our espresso machine. We’re going to cover the product visualization roadmap. We’re going to look at what we need to get our product camera ready, then we’re going to incorporate lights and cameras into our scenes. Then we’re going to make the products come to life. I’ll use those images and you will see different variations of it with configurations. I’ll also demonstrate how to do animations with Visualize Professional. And then we’ll take a look at how we can do some of the other outputs like a panoramic or an interactive image. Once that is done, then we’ll get the results. We’ll send them to our queue and I’ll review that also because that occurs intermittently throughout the demo. That will save you a lot of time because typically the product renders will take quite a bit of time. But instead of having you to wait for it, step by step, it can all be done and offloaded at the end.
Prepping the Models
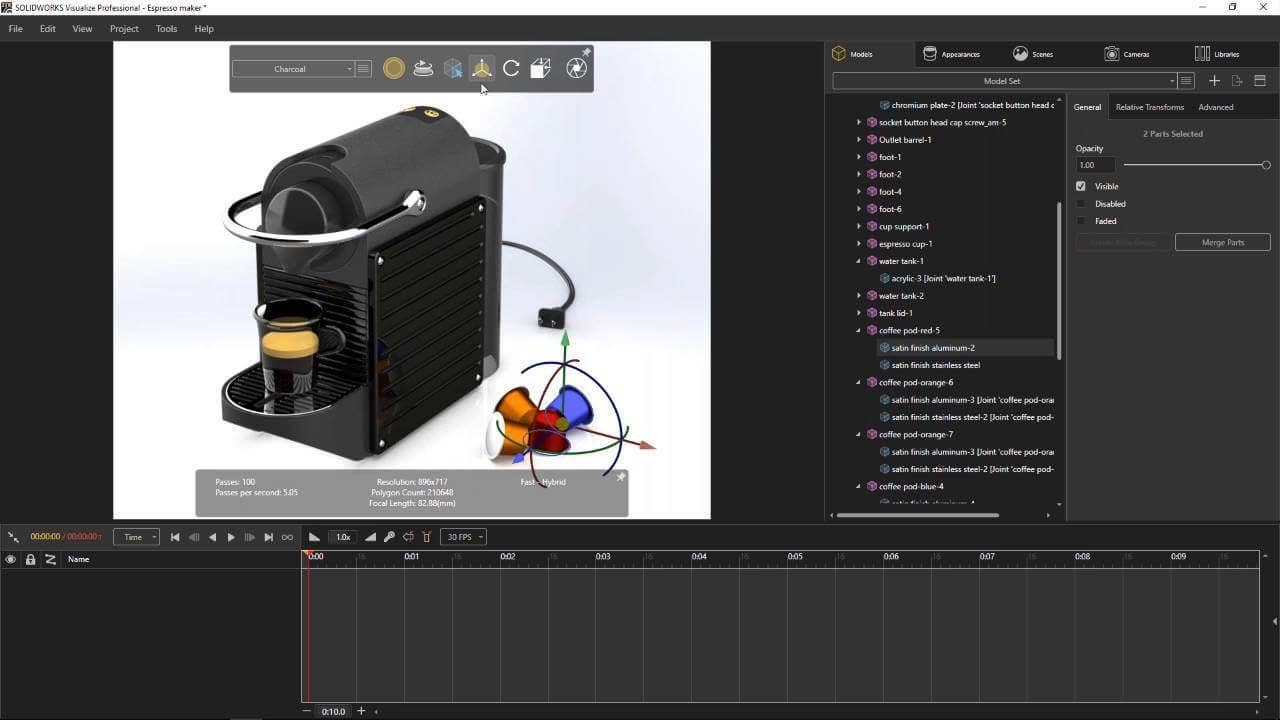
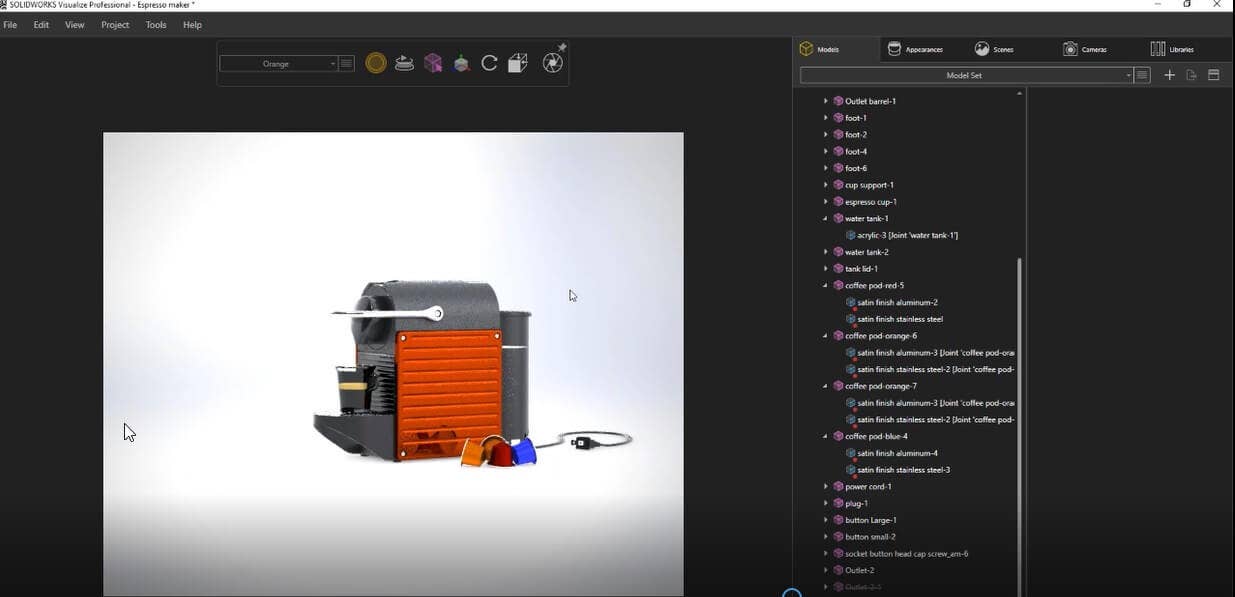
All right, so first thing is prepping the models. We’re going to adjust our materials and then catalog any versions or variations of our espresso machine that we want to create. So jumping right into SOLIDWORKS Visualize. You can see it here we have our espresso machine or SOLIDWORKS model brought into our assembly. On the right-hand side, we’re going to be working with the graphics area here, it’s going to update real time for us. The model tree is going to be imported from SOLIDWORKS so if you’re familiar on that end, it’s going to look the same for you. So there’s not a lot of guesswork on what things are and what they represent. We have the ability to while we’re in here just really make things easier for us. We can decide how things are sorted out by actually grouping them into certain components.
Select Individual Screws
For example, I can select individual screws, and say that wasn’t part of their own parts or anything like that. I can go ahead and create new groups right here, as you can see, we’ve also created a group. I can also assign these as multiple parts, so I can assign that as a single part and by doing that it pretty much is saying that the panel is going to be the same color on both sides. Of course, if you don’t want them to be the same color you wouldn’t want to merge them here, but selecting those, creates it as a specific part that groups them together every time I select it, as you can see it’s on both sides.

Satin Finish
Let me go in and turn this one off. And then at this point, say we want to, you know, dive into our appearances. You’ll see here that this is the satin finish is what we basically applied to this. Let me turn these ones off. This will adjust our color in real time. So as I comb through and adjust the hues, you can see our updates that are modifying the saturation color and our values. You can also type in values here as well. I’m going to go ahead and make sure my satin finish is applied.
Now we can adjust the roughness. I will also talk about some of the textures and things like that. I don’t want to have any of the reflectivity in my part. I can jump in and go in the opposite end where I can make this extremely shiny. So giving it more of a reflective quality where I can see those pods, for example, the coffee pods. I can set the roughness. Another side thing, too, is navigation. If you’re familiar with SOLIDWORKS, its the middle mouse button rotation, right, panning left and right.
Libraries
It’s no a whole new interface that you pretty much have to relearn. We have our appearances here but it’s not limited to just what you see here. So if I go to my libraries, we have our local and then we have our cloud library. And just looking at my local library, I’m going to go ahead and pop into my appearances here. They are categorized based off of the sections and the folders that we’re looking for. But maybe I want to focus in on just this top portion here. I have my plastic and maybe I’m looking more for like an alter glass finish and as a simple as dragging and dropping on to my part that I want to focus in on.
Now, taking a look at my appearance, it adapts to whatever it sees into there. We have the ability to adjust our texture with our bumps strings and our texture mapping. I’m seeing more of a kind of a molded look texture. I can increase the bumps strings. Again, you can input values here if you know the exact value that you’re looking for, so in this case, you probably want the bump string to be about 0.5. It appears up there a little bit to gives it a little bit of texture. You can also adjust the roughness as well. So, once we’ve gotten to pretty much the degree of texture and then the appearance that we want for our model, you can see how it affects seeing the entire part. The one that I selected and I want that propagated through all my version. Instead of spending time there and green display states and things like that, I wanted to create different versions of this espresso machine. Just to give it some variation and being able to present this in different models and different colors.
Different Color Models
I can do that by quickly outputting what we call configurations and just different variations of this. It’s as simple as just adding in a different color. For example, this is orange but say I want to bring in like a turquoise one. Think that’s just a turquoise and then charcoal. How would we select the configurations? You pull the drop-down menu, you have orange, we got turquoise here, and then charcoal. Obviously, right now it’s all showing the same color but what I’m looking for in my turquoise is my satin finish.
I’m going to create a new color, new appearance, and pop into my color. I can adjust my hues again, to the correct amount. For example, to get it the correct amount that I want, I probably know the hue is about 180. Saturation levels should be about 90, My values are going to be more towards this end here. And you can kinda see the new color, you can also click on take you back to what it was before. How would I apply this? You just left click and drag then drop in it. And because the parts are merged, it is doing it in both panels.
I want to set this appearance is in this configuration so that it’s specific to this one is not affecting all my other ones. I can check my orange one and see that is still orange. For charcoal, it’s the same process. Grab that color, copy and paste it, by doing a Ctrl C and a Ctrl V. Adjusting the color may be the hue of this one is pretty high, it’s kinda on the 240-scale. Saturation is low and the values are around 40. It really getting not too dark in color but more of a charcoal color that is borderline black. Again, left click, drag and drop it in just to make sure that’s applied and then you set in that appearance in our configuration.
Render
So you kind of see in a couple of minutes that we created different variations of this where we have orange, our turquoise, and then our charcoal. So at this point, say we’re done and I want to render this out. I’m going to go into my output tools, which is right here. Render is going to be the active render but what I’m looking for is the ability to say all my configuration. In SOLIDWORKS Visualize Professional, I can do multiple configurations but then also render them all out at the same time.
I can set all my configurations to saves us time and select my resolution that I wanted to be set to in my render settings. This is going to affect your time and how long they render out and affect the quality also. Afterward, I have the send the queue option, if I uncheck it will start the render, but that means I can’t use visualize in the meantime.
If I click on the send and queue, it’s sending it to a queue and it’s in line here as you can see. I have other ones that I’ve done already. We’ll go ahead and clear out some of them here. I’ll just go and remove these ones so we start off fresh. So it adds it in here. This isn’t started yet and then what we’re gonna do is we’re going to do the animation. We’ll add in a couple other renders, four different cameras, and then at the end, we’ll talk about starting it. At this point, what I can do is add them in there and basically, by postponing it towards the end it’s going to save us time in regards to how that all process will be done. Then we don’t have to wait for it all to be done to render them up. So popping back into our PowerPoint, we can see that we’re able to design multiple configurations quickly. Being able to do all of that experiments and catalog different finishes easily, and then we can apply those.
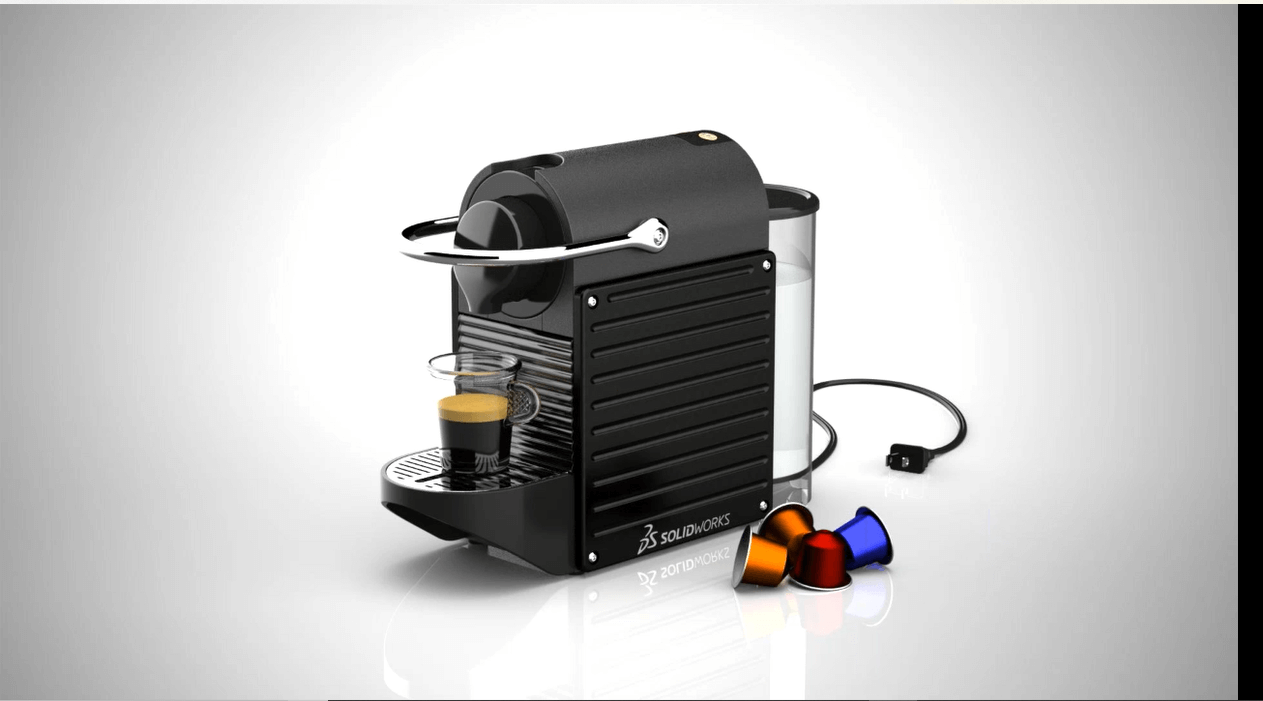
SOLIDWORKS Visualize takes advantage of the ray-tracing capabilities of new RTX graphics cards. So the gaming ones are new but the type of core was available with Quadro for a little while. The next step I want to work on is the final renders. Obviously, the renders will take a little bit of time to check on the output, right. We have the orange, we have our turquoise, and then we have our charcoal. Now, we want to focus in on the scenes, the camera, and really capturing the kind of division that we want to focus in on. So starting out for our charcoal here, I’m gonna literally go from left to right. So far we’ve talked about the models, the appearances, then into our scenes. You can download these HDRI environments online. We can also adjust the brightness. For example, the demoscene. If I increase the brightness of my environment, you kind of see it reflects onto my model. You can decrease the brightness as well.
Cloud Library
And then now popping into the library. It’s the same place where I found the appearances. I’m gonna look at the Cloud library. Into the Cloud, it will be like check marks to tell us, “Hey, you know, what’s been loaded in already, what’s not.” So the green is basically ones that I’ve used before. Say we want to use the softbox neutral. I’m gonna go and drive that in. It’s like your appearance. It’s going to affect and have certain pre-set settings already.
You have this German dirt road affecting the hue and the color of our part and our assembly. Now we’re going to focus in on this white panel here. We want to use this one, kind of as our default, and then as it in here kind of like when we do our appearances. We’re gonna increase our brightness slightly, let’s go to about two. And we’re going to include a little floor reflection in here. Let me go just to 1.5 here.
On the bottom, you can kind of see your shadows, but maybe we want to change it to a reflective surface. Similar to a glass or some kind of mirroring that I can include the floor reflection. I can go ahead and just increase that to be 20. Then we can see some of the reflection on the bottom of the surface. Now, it’s getting into the post-processing. So the post-processing allows us to bring them into something else instead of having to really output these images.
We do it all inside SOLIDWORKS Visualize. We’re going into our cameras here, like focusing on a specific to MyCamera. I began to take a look at post-processing options and enable them. We can decrease clarity towards the edges, so the viewer can kind of focus in on, “Hey, you know, I want to look this specific espresso machine.”
We can begin to darken areas in the image, so I can go ahead and increase this for certain areas. It will make my darks darker if you will. At the same time, I can also increase any kind of light exposure to areas where I want to increase the light. Sometimes you’ve got to rotate it just to increase that exposure.
Final Render
So you imagine that it’s almost kind of like when you do it in real life, where you’re focusing on something, Everything else kind of blurs out, right, post-processes it. But at the same time if I want to copy and create a new camera, say the same thing, same view, same camera position relative to the object and change it so that I’m looking more the drip tray – then it begins to blur out the other parts of my assembly, then the focus is on that. You’ll see it in the final render. Let me go and show you. Same process. Once you’re all done, similar to our configurations.
You have your output mode instead of doing all configurations, we’ll do all cameras. So, again, same in time in the sense of we’d have to do one first, then the other kind of in series, you can do it all parallel, render out all those cameras at the same time. And then, send that to the queue, so then it gets added in here.
I’ll make sure that gets added in all cameras, send. There you go. We can add in multiple cameras, right, to control different positions and different variations of our model. You can reduce the post-processing in the sense of we can do it inside of visualize. And then, here are some of the renders.
Part Animations
So now, we’re going to take a look at part animations and setting up the camera animations so it can really come to life. I want to go and show my timeline here on the bottom. Okay, and then, say, it’s the default camera here that’s available. And I’ll rotate around and zoom in a little bit. And my primary objective is that it’s going to be a short four-second video. The four-second video is going to focus in on is pretty much the espresso machine.
We’re going to clear the pods out of the way, and then we’re going to zoom in specifically and look at this espresso machine. So, the first thing that we want to do is look at the default camera. Working with that, I can adjust down my timeline a little bit. There are different abilities to select by selection tools. I can select by appearance. I can select the model itself.
In this case, I want the entire part. There are coffee pods here. There are also lids that are on here as well. I’ll go ahead and grab all of those. So, I have my coffee pods. I’ll go ahead and grab the subsequent lids too. That one and here in the media. Turn that one off so it’s easier to grab all the components we need. To save you on time, we probably want to group this all together so it’s a little bit easier for us to select.
Did you see that triad come up? I’m going to first, identify my time. Say you want to do, like, a four-second animation. Sometimes they do three, I like four just because it gives us a little bit more time to see kind of what’s going on. Once I have those selected, I’m going to go ahead and add in the keyframe. By adding it to a keyframe here, it’s a keyframe animation. On the left-hand side, you can see it’s selected the coffee pod but also the lids that associated with them. And then I want you to then drag our yellow timeline with our keyframing on, auto keyframing. So whenever it senses that there’s a change in position or something is different, then it’s going to add in the automatic keyframe. We’re going to move those to keep those copy pods out of the way because you’re moving it over to the right. I can take a look at my yellow kind of my timeline here, and I can see exactly what’s happening.
Too positive, just moving out of the way, something simple. Seeing kind of scrub through. I can see them kind of translating add to the picture. Moving out of the picture smoothly. So, the next thing I want to do it, if you look back to my PowerPoint, I talked about animating the cameras. And it’s nothing fancy. All we want to do is relate to the camera. So really we’re zooming into it.
So, going to my cameras, I’m going to, again, create on another camera. I can name all these so you’ll see default cam one, cam two. Then you activate it and add self and the keyframe. I want to animate this camera as well. And if I scroll down you’ll see it adds in that camera animation. It’s being tracked as being recorded as being something that’s changed.
Camera Position
So once it adds in a key-frame, I’ll go ahead and move it to my final time. I have four seconds where the pods move away. Where do I want my position to be? I want to rotate it a little bit and zoom in head-on pretty much to my espresso machine. Looking straight onto it, giving it pretty much going in full view. Again, maybe taking a look at the drip tray or the final product of how we go from coffee pods to the actual end result of the espresso.
From here, I can go ahead and scrub it to the left, again. Move the copy pods out of the way. And that brought the camera position so that the camera changes to bring it in closer.
Final Animation Result
So rendering this out, the same way we’d done everything else. You choose the movie format, how many frames per second, and then go ahead and start that animation render. It will then add it in into our queue. Let me show you the final result. Copy pods are moved out of the way, and then bringing that into full view. Here, it brings the products to life in terms of the animation.
So it’s giving you pretty much another output. You can give it more of an emotional and deeper connection to, you know, what exactly it looks like.
In summary, we talked about the ability to pop out the high render images and doing that quickly within the queue. We also talked about creating interactive images and animations. Thank you all for attending! If you would like to get more hands-on with SOLIDWORKS Visualize, sign up for our SOLIDWORKS VISUALIZE FREE TRIAL.