

The Hawk Ridge Systems 3DP ROI calculator is a powerful tool for understanding the investment and payback period for additive equipment. The tool can also be used to understand the part cost and production estimates, as well as unique geometries. When considering additive equipment, it is key to understand both items to make smart business decisions. This article will explain how the calculator works in greater detail and provide insight into how to create a strong ROI using this tool.
Identify a Geometry that Has Value to Your Organization
Identifying a part file or series of part files for your ROI calculation is critical for creating a strong justification. Ideally, you want to know what it currently costs you to produce this part file, as well as understand the lead times and labor involved. Good candidates for ROI justifications are parts that have been difficult or costly to produce in the past. Perhaps parts are being produced overseas and the lead times and supply chain disruptions are causing production delays. Some parts also lend themselves well to an additive process much better than traditional manufacturing processes. Areas where you see many design revisions or if the design requires custom elements with each unit are perfect for additive manufacturing.
Selecting a Machine
Before starting your ROI calculations, it is good to understand the machine technologies contained in the calculator. Printing systems from Markforged are listed in the ROI calculator. Below is a description of each technology.
Markforged FFF and CFR
Markforged printing systems are based on FFF (fused filament fabrication) printing technologies in both metals and composites. Markforged has made a name for itself in the composites world by implementing CFR (continuous fiber reinforcement) to provide incredibly strong parts. They also develop their own materials and are well known for producing excellent surface finishes right off the machine. Markforged machines generally have a small footprint, and they are easy to learn how to operate and install. Markforged is a leader when it comes to software solutions for managing prints and even providing built-in laser inspection capabilities with a solution called Blacksmith. On the metals side, Markforged has developed metal filaments bound with polymers to make metal printing easy and safe. Changing materials on the metal machine is quick and painless, and part design techniques are almost identical to the composite systems.
Determining Part Cost and Production Estimates
 Calculating the ROI for 3D printing your parts
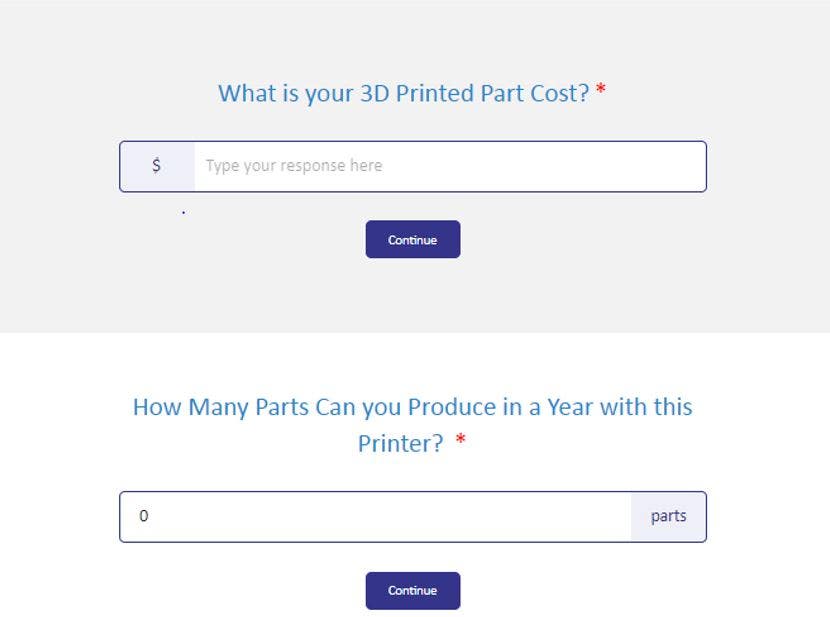
To create a strong ROI, it is very important to know the part cost and production capability for a machine when producing a representative geometry that has value to your organization. The 3DP ROI calculator has built-in tools to assist with determining these numbers through step-by-step instructions. Calculation methods are different for each type of technology and machine.
Markforged X7 Calculator
The part cost calculation method for an X7 3D printer relies solely on reports from the Markforged Eiger software. You begin by signing up for a free Eiger account and then upload your part file (STL) and then choose your material and slice the file to receive a part cost estimate. The most common printed material on the X7 is Onyx material which has a nice black matte surface finish. This is the most accurate way to estimate costs for this machine. After receiving the part cost number, it is time to estimate the number of parts per year. This can be done by looking at the overall print time for your part and determining how many parts per day can be produced. After determining the parts per day, it is time to multiply parts per day by the number of working days per year for your organization. This is typically somewhere around 260 working days per year for many organizations.
Markforged Metal X Calculator
Like the X7, the Metal X part cost calculator also relies on the Eiger software to provide a material cost estimate although there are more factors that must be considered. The Metal X print process has three steps of printing, washing, and sintering. Each step has associated costs that need to be considered. Once you have the Eiger material cost it is time to record the scaled-up X, Y, and Z dimensions followed by the print and wash times of your part as reported by Eiger. These numbers allow the 3DP ROI calculator to estimate how many parts can fit in a single sinter run as well as the overall processing time for your unique geometry. Once these numbers have been provided, the calculator will output an overall part cost breakdown and production estimate for your part file.
Choosing an ROI Style
The 3DP ROI Calculator offers two styles of ROI calculation, Traditional ROI and Savings-Based ROI. It is recommended that both styles are run for part files to understand which one fits your use case the best.
Traditional ROI
A traditional ROI uses an amortized part cost approach by baking the turn-key hardware cost into your part cost value for a set number of years. This style of ROI will enable you to account for the true cost of owner ship for a piece of equipment and correctly charge for jobs and parts produced so that the machine is paying for itself during the set year of amortization. We see this type of ROI work great for production scenarios, especially with robust 3D printing equipment that can handle large volumes.
The calculator breaks up cost in three categories: variable cost, fixed cost, and labor. Variable cost is associated with the material and consumables required to make a part. This is the most common part cost number that you will see from manufacturers. Fixed cost is the amortized hardware cost for your part broken down into years of amortization and production expectations. The 3DP ROI calculator defaults at five years of amortization and 260 working days per year for production. Labor is broken down into the cost of human involvement on a per part basis. Depending on the process and geometry, this is usually less than five minutes per part.
Ways to calculate ROI for 3D printing your parts
Savings-Based ROI
A Savings-Based ROI takes a different approach by comparing an additive process to a current manufacturing process and looking at all the individual part cost savings that can occur. With this style of ROI, it is important to know in-depth information about your current manufacturing process and lead times. Each of these savings add up on a per part basis to offset the cost of the machine and ultimately provide a break-even point (number of years). Below is a list of the savings accounted for with this tool.
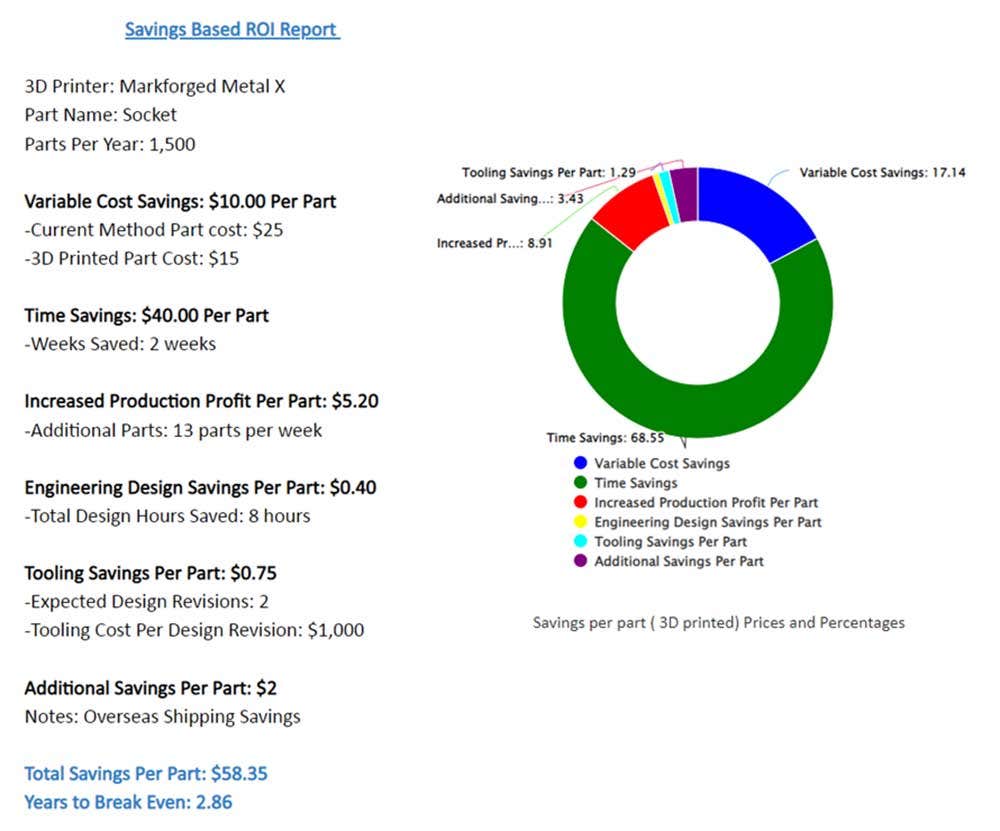
Variable Cost Savings: The difference between your 3D printed part cost a current manufacturing method part cost for a representative geometry. 3D printed part cost can be calculated using the ROI tool.
Example: You part file is traditionally produced on a CNC machine at $50 per part. An additive process brings this part cost down to $35 per part. Your variable cost savings are $15 per part.
Time Savings: Time savings are often recognized as a benefit, but rarely do we see organizations put a dollar value on that saved time. Additive manufacturing solutions have the potential to save time by bringing production in house. Long shipping lead times for traditional manufactured parts can be a deciding factor that shows the value of in-house additive manufacturing.
Example: Your current lead-time for an order of 100 parts could be two months, but an additive process can bring that lead time down to one month for 100 parts. What is the value of this saved time per part?
Increased Production Profit: If an additive process allows you to produce and sell more products, then capturing that profit increase will be important.
Example: You determine that an additive process will allow you to produce and sell 100 more products per month. Your profit per part is $20. You now make $2,000 extra per month by switching to additive.
Engineering Design Savings: Switching over to an additive process can greatly simplify the design process as there are less design constraints compared to traditional manufacturing for many cases. This simplification saves design time which can be costly.
Example: You now have more freedom to design parts without injection molding constraints. This saves 10 hours of engineering time for a part file. Your engineering labor rate is $100/hr and you need 10,000 parts. What is the value of saving this design time?
Tooling Savings: Additive manufacturing has a unique advantage of being flexible with design changes at no additional tooling costs. This flexibility can have value to an organization that typically sees a few revision changes during the product life cycle.
Example: Your product is normally injection molded but you incur high tooling costs for design changes, now you want to look at an additive solution to allow for free revision changes. You typically go through two revisions during a product life cycle and each revision will cost $15,000 (not including the original cost for the tool since this is captured in the original variable part cost comparison).
Additional Savings: This is a section to calculate any savings outside the scope of the ROI calculator. Every organization is different and there are likely additional benefits unique to your business that need to be captured.
Example: Your product is normally injection molded but you incur high tooling costs for design changes, now you want to look at an additive solution to allow for free revision changes. You typically go through two revisions during a product life cycle and each revision will cost $15,000 (not including the original cost for the tool since this is captured in the original variable part cost comparison).
Interpreting Your Results
Once you have run through both a Traditional ROI and a Savings Based ROI it is time to look at what the results actually mean.
With a Traditional ROI the years of amortization are important to consider because that is when the machine is expected to pay for itself, and the tool allows you to set the payback period in years. A target of around five years is good baseline break-even point for a piece of additive equipment. With this approach you will have a good comprehensive part cost estimate that you can use when billing jobs internally or externally. You now can include the machine payment on a per part basis.
With a Savings-Based ROI, the payback period is reported rather than set at the beginning. Again using five years as a benchmark is a good idea. When receiving a payback period of over five years, it might make sense to go back to the drawing board to look at other part files or to closely consider where else the additive equipment can save your organization money on a per part basis. If your payback period is five years or lower, then you are in a good ballpark range for a solid ROI.
Production numbers and working days per year can vary from organization to organization. The 3DP ROI calculator assumes 260 working days per year in calculations.
Understanding Your Purchasing Options
When you are ready to look at purchasing options, Hawk Ridge Systems is here to help with quick quotations as well as options to reach out for a virtual demonstration. A trend we are seeing with additive equipment is that more and more folks are opting for OPEX expenditures through the form of customized lease options rather than moving forward with a lump sum CAPEX purchase. These new flexible plans allow for better money management, and they allow organizations to keep the equipment by the end of the term. Reach out to us to learn more about which purchasing option is right for you.
That’s all for this article. If you would like to know more about creating strong ROIs with our new ROI calculator and justifications for purchase, feel free to contact us at Hawk Ridge Systems today!