For many users, drawings are a critical aspect of the design documentation process. When creating drawing views, SOLIDWORKS automatically applies labels to the new views with respect to the assignedSystem Properties. By default, these labels are not reused once a labeled view has been deleted. As such, inconsistent lettering is often a problem when deleting and/or replacing views. In this article, we’ll take a quick look at a simple fix for this behavior, which is shown below:
Figure 1: Label B Skipped as a Result of Deleting a Detail View
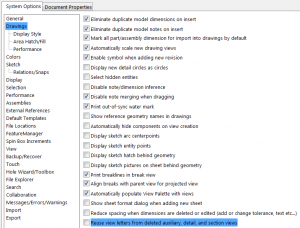
As seen above, creating a new detail view has resulted in the label Detail C being applied – this is because Detail B existed once before, but was deleted before Detail C was placed. Fortunately, this behavior can be changed through the System Options. Access System Options -> Drawings and select the checkbox labeled “Reuse view letters from deleted auxiliary, detail, and section views.”
Figure 2: Enabling Reuse of Letters from Deleted Views
Once this option has been enabled, letters will be reused from those views that have been deleted, preventing letters from being skipped. Caution should be exercised, however, as using this method on an existing drawing with many established views may result in a confusing label order; for this reason, enabling this option is only recommended for new drawings.
Figure 3: Additional Detail View Added after Enabling Letter Reuse
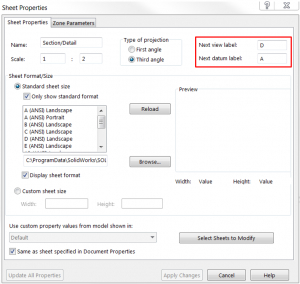
If you’ve followed the procedure above and still find that drawing views are being added with inappropriate labels, it’s also possible that the document’s Sheet Properties need to be adjusted. Begin a new drawing document and, before placing any views, right-click the sheet in the FeatureManager Design Tree and select Properties. Both Next View Label and Next Datum Label should be set to A. If this is not the case, set these values to A and click Apply Changes, then exit. This should result in the next-placed view being labeled as A, continuing alphabetically.
Figure 4: Adjusting Drawing Labels through Sheet Properties
If adjusting the Sheet Properties is required as shown above, this typically indicates that the drawing template needs to be updated in order to retain the appropriate label order for future documents – otherwise, the above procedure will be required every time a new drawing is created. To learn more about creating and using drawing templates, please visit this video.
Now that your drawing views are being labeled properly, what’s next? If you’ve found this article helpful, be sure to have a look at the rest of our blogs and videos for hundreds of helpful tips and tricks. For more information, request a SOLIDWORKS 3D CAD quote or contact us at Hawk Ridge Systems today. Thanks for reading!


