When designing in SolidWorks, at times it may be beneficial to create parts
that have more than one solid body, in applications like weldments, sheet
metal, or mold tools. It may also be necessary to show how those parts go
together using an exploded view. While it is possible to save the individual
bodies as separate part files in an assembly and perform an exploded view
there, it may be easier and quicker to perform the exploded view in the
multi-body part. This functionality was introduced in
SolidWorks
2012.
This process, outlined in the steps below, is similar to creating exploded
views with assemblies.
1. Create a New Configuration
Manage exploded views by putting them in their own configuration. Click on the
Configuration tab > Right click below > Click “Add Configuration” >
Add Name “Exploded View”

2. Create Exploded View
Go to the Insert menu and click on “Exploded View”. You may also locate the
exploded view using the command search in the top right corner of the
SolidWorks window.

3. Explode Steps
This will bring up the Exploded View Property Manager. Select the bodies to
explode then drag the manipulation handle in the desired direction. You may
select single or multiple bodies to explode in a given step. These steps are
added on the left side titled “Explode steps”. Under “Settings” it lists the
bodies selected, the direction, and the distance. To add additional steps,
just select different bodies and drag.

4. Auto-Space Components
Clicking the “Auto-space solid bodies after drag” option will take all of the
components selected and space them equally apart from each other.

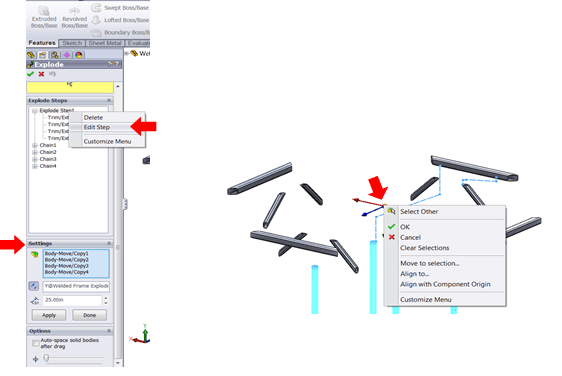
5. Edit Explode Steps
Right-clicking on the intended step and selecting Edit Step allows you make
adjustments to the selected components, their direction, and distance.
Components may be added or deleted. The direction can be edited by selecting
an arrow and toggling the reverse button. You can align the drag handle to a
specific entity by right-clicking the drag handle and selecting: Align to,
Align to Component Origin, or Move to Selection. After aligning the drag
handles, select an arrow for the direction. You may specify a different
distance next to the “D1” field. When finished, click “apply” and then “Done”.
You may continue to edit existing steps or add new ones. Click the
green check-mark when finished.

6. Finished Exploded View
To go back and forth between the collapsed and exploded state, go to the
Configuration Manager tab and expand the “Exploded View” configuration; inside
is a derived configuration that holds the exploded view with its explode
steps. Right click on the derived configuration to collapse or explode the
part. Edit Feature takes you to the Explode Property Manager. The “Collapse
Items” option just collapses the configuration tree.

Limitations:
There are a few limits to this command. You may not re-use a multi-body
explode in an assembly exploded view, like you can re-use a sub-assembly
exploded view. Also, you cannot animate explode or collapse or save it as an
.avi file. Lastly, cannot hold down alt to move and align the drag arrows like
assembly explodes.


