There is a huge amount of capability available to the user from the SOLIDWORKS APIs. Basically, most everything we have available in the graphic user interface (GUI) is also available through the API interface.
But there are some road blocks that prevent most of us from dipping our toes into the API waters. First, it’s programming. If you haven’t done much programming, it can feel like a daunting task to get started. Second, it’s not just programming – it uses Microsoft’s Component Object Model (COM), which can seem even more daunting.
Rather than trying to spend a lot of time up front trying to understand everything about programming and COM before writing anything, the intent of this article is to jump head first into the shallow pool by showing the steps to write a simple macro using Visual Basic for Applications (VBA).
So, let’s get started…
Why Create a Tree Display Macro?
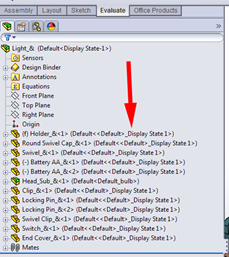
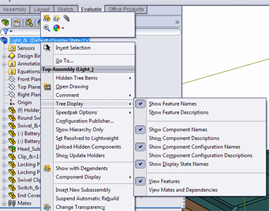
Creating a New SOLIDWORKS Macro
This is a perfect case for using a macro assigned to a keyboard shortcut. It’s actually a very simple macro to record or write. There are separate commands for the configuration name and display state name. Let’s do the display state name for this example, and write this one from scratch, rather than recording it. It makes cleaner code.
To create a new, blank macro, just follow these steps:
- Open an existing assembly document with some components in the tree
- Select the Tools/Macro/New… command. A Browse dialog box will open asking you to give the macro a name and save it to some location. Call it ‘DispStateTreeDisplay.swp’ or whatever you like. You will want to save this in a convenient folder somewhere on your local C: drive. I have a ‘MACROS’ folder under ‘C:\SWX_COMMON’
- Make sure the ‘Save as type:’ drop down menu is set to ‘SW VBA Macros (*.swp)’
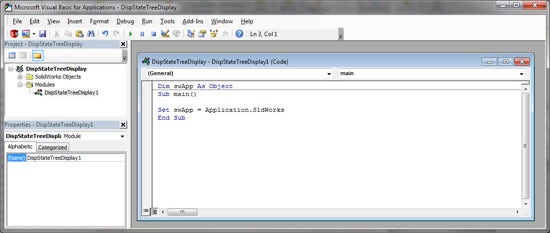
When you hit the ‘Save’ button, the VBA Editor pops up – don’t panic. There are only a few lines of code to write. Here’s what the screen should look like:
Adding the VBA Code
Just type in the following lines (or better yet, copy and paste them from here):
‘ **********************************************************
‘ * Show or Hide Display State name in Feature tree
‘ * Same as right-clicking the top of the feature tree and
‘ * selecting ‘Tree Display/Show Display State Names’
‘ * Works like a toggle. Run macro to turn it on or off.
‘ ***********************************************************
Option Explicit
Dim swApp As SldWorks.SldWorks
Dim Part As SldWorks.ModelDoc2
Dim swFeatMgr As SldWorks.FeatureManager
Sub main()
Set swApp = Application.SldWorks
Set Part = swApp.ActiveDoc
Set swFeatMgr = Part.FeatureManager
If (swFeatMgr.ShowDisplayStateNames) Then
swFeatMgr.ShowDisplayStateNames = False
Else
swFeatMgr.ShowDisplayStateNames = True
End If
End Sub
The green text is code that already existed in the new macro. You can leave that text there and add the new, or delete out the existing text and replace it with the text above.
Understanding the Macro Code
Comments
Any time you see a single quote mark, ‘ , anything that comes after that mark on that line is a comment, meaning that it does not get run as an instruction – it’s ignored by the code. It’s there for us humans.
DIM and SET statements
Generally, the DIM statement is for telling the computer to set aside some memory to be used by a variable or ‘object’. It stands for ‘Declare in Memory’. The ‘SET’ statement puts the data for the object allocated by the DIM statement in that memory location. In this case, those DIM and SET commands are used for COM objects. In the case of our macro, here’s what that means: it’s like telling the computer where to find the command that you want to use, which, in this case, is the command to show or hide the display state in the feature tree.
Rather than put all of the commands and data available with an application in one big bucket, they set up a hierarchy – like a folder structure – to help organize them. If you look at our blog article, Connecting SOLIDWORKS API Macros to Documents, it is basically describing this folder-like structure of where SOLIDWORKS has logically organized commands. This is a simplification, but for this simple macro, these DIM and SET statements are just giving us access to the command that we need. You can use the API help file to figure out which ‘bucket’ a command resides in to use in your macro.
Showing and Hiding the Display State
The actual turning on and off of the display state from the feature tree is done in the IF and ELSE part of the code. Anything that is a simple ON or OFF is specified as either TRUE (ON) or FALSE (OFF). So the IF statement is just asking if it is TRUE (ON) – and if it is, then make it FALSE. Otherwise, it must already be FALSE, so make it TRUE. Pretty simple. The only tricky parts are finding the command in the Help file, and the fact that we begin each command with the name of the object that has the command. In this case ‘swFeatMgr.’
Keyboard Shortcuts
Now we’re ready to set up our keyboard shortcut. Make sure you have identified your MACRO folder in ‘System Options/File Locations/Macros’.
- Select the ‘Tools/Customize’ command and then select the ‘Keyboard’ tab of the Customize dialog box.
- Select ‘Macros’ from the ‘Category’ drop down list. There should be a ‘New Macro Button’ row in the table.
- Click on the browse button (the three dots) and browse out to one of your macros you just saved.
- Now, click into the ‘Shortcut(s)’ column and type an unused key or key combination to your liking. I have ‘u’ for Display States.
Voila! Turn the display of this information on and off with just the press of a key on the keyboard. You can create another one to show or hide the configuration name, too. Same macro, just use ‘ShowComponentConfigurationNames’ instead of ‘ShowDisplayStateNames’.
Note: The state of this command is saved as part of your assembly templates. So if you don’t want this ‘on’ by default when you create a new assembly document, turn it off in your assembly templates!
If you’re interested in learning even more about SOLIDWORKS API, you might also want to check out the webinars and blogs:
- Getting Started with SOLIDWORKS API Programming
- Getting Started with the SOLIDWORKS API Automation
- Connecting SOLIDWORKS API Macros to Documents
- Top 5 Commonly Used Interfaces in the SOLIDWORKS API
If you have any questions about the SOLIDWORKS API or macros, reach out to us.