If you’re coming over to SOLIDWORKS from another CAD program, you’ve probably
recognized the navigation with the keyboard and mouse is a little different.
No problem! One of the advantages of SOLIDWORKS is that you’ll find there are
numerous ways to achieve the same result, and today we’ll dive deeper into
some navigation tools at your control!
In addition to the simple rotation via the Middle Mouse Button, here’s a quick
rundown of some of the other default navigation tools:
-
If you find you’re zoomed in too close or too far away from a model, you can
double click your middle mouse button to Zoom to Fit, or
just hit your F key. This will either Zoom in or Zoom out on the model so
you can see the entire part, assembly, or drawing. -
To pan your model across the screen, you’ll want to select ‘CTRL + Middle
Mouse Button’.-
If you prefer the Arrow Keys, you can hold down ‘CTRL’ and click the Up
arrow to Pan the model up, ‘CTRL’ and click the Down Arrow to Pan down,
and so forth.
-
If you prefer the Arrow Keys, you can hold down ‘CTRL’ and click the Up
-
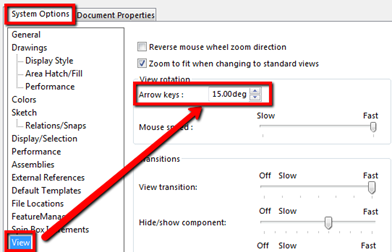
If you want to rotate your model exactly 90 degrees, you can hold down the
‘SHIFT’ key and use the arrow keys. But what if you’re looking for 180
degrees or 15 degrees, instead? Luckily, that’s easily customizable by going
to ‘System Options > View > Arrow Keys’ and entering the preferred
degree value there. Afterwards, you can then use your arrow keys (holding
down SHIFT is not needed) to rotate your model with that specific value.
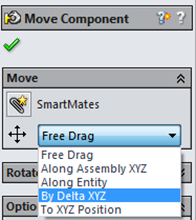
In assemblies, we have two features we’ll focus on to move our components:
‘Move Component’ and ‘Move with Triad’. With
the ‘Move Component’ feature, you can choose to position your
parts by:
-
‘Free Drag’ any component as long as they are not
constrained by Mates or Fixed. -
Drag the component ‘Along the Assembly XYZ’ axis identified
by the triad on the bottom of the left hand screen. -
‘Along an entity’, such as an axis or edge, to translate it
along that direction, as seen below:
-
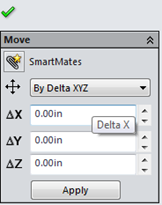
‘By Delta XYZ’, where you can input numerical values for
the component to move in the specified axis direction(s).
-
‘To XYZ Position’ where you’re able to select a point/edge
of a component, and type an X, Y, and/or Z coordinates. The component’s
point will move to the specified position.-
If a point or vertex is not selected, SOLIDWORKS will use the
component’s origin to move to the specified location. For reference, 0
inches for X, Y, and Z will place the component at origin.
-
If a point or vertex is not selected, SOLIDWORKS will use the
In addition to those, what other options do we have? If you prefer more of a
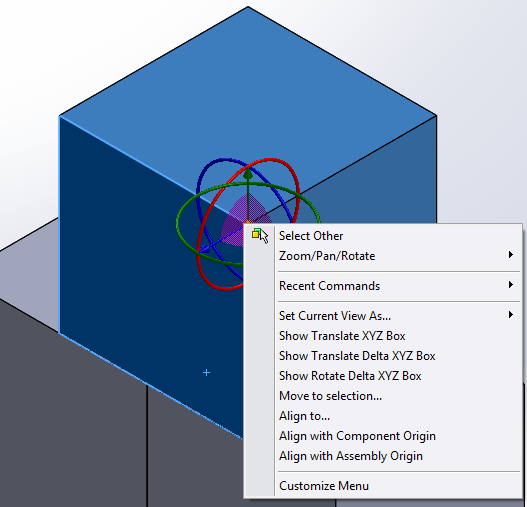
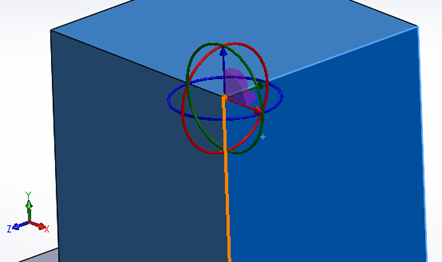
visual representation and like to drag your component using the Triad, you can
right-click on the component and select ‘Move with Triad’. Similar to exploded
views, you can select X, Y, or Z arrows to drag in the desired direction. If
you right click on the orb in the middle of the Triad that appears, you’ll
notice you get menu seen below:

The’ Show Translate XYZ Box’ and ‘Show Translate Delta XYZ Box’
options are going to be near identical to ‘To XYZ Position’
and ‘By Delta XYZ’ in the ‘Move Component’
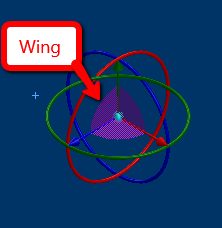
feature, respectively. If you drag a wing, it’ll drag the component along the
plane of that wing (think Front, Top, and Right planes).
You also have flexibility in where you can align the triad! If you hold down
the ‘ALT’ key, you can drag the center ball to an edge, point, or face to
align the triad and the X, Y, and Z axis. You’ll see that after ‘ALT’ dragging
the center ball to that edge, the axis isn’t aligned to the triad in the lower
left hand corner anymore. If later you find you want to return the alignment,
simply right-click on the center ball and select ‘Align with Assembly Origin’.
Today, we took a look at a few alternatives to orienting your components in a
part, as well as in an assembly. You can see we’re easily able to maneuver our
components using keyboard keys to rotate specified degrees and pan, as well as
using the ‘Move Component’ and ‘Move with Triad’
in assemblies to move components in a specific direction and value without
having to apply any mates! These are simply another set of tools at your
disposal if you find mouse functionality may be limited.


