In today’s hyper-connected world, collaboration with external partners is critical to getting business done. With the 3DEXPERIENCE platform, bringing in these external collaborators is easy and fast. In this guide, we will break down the invitation steps and give you a look into the licensing options for these external team members. Let’s dive in!
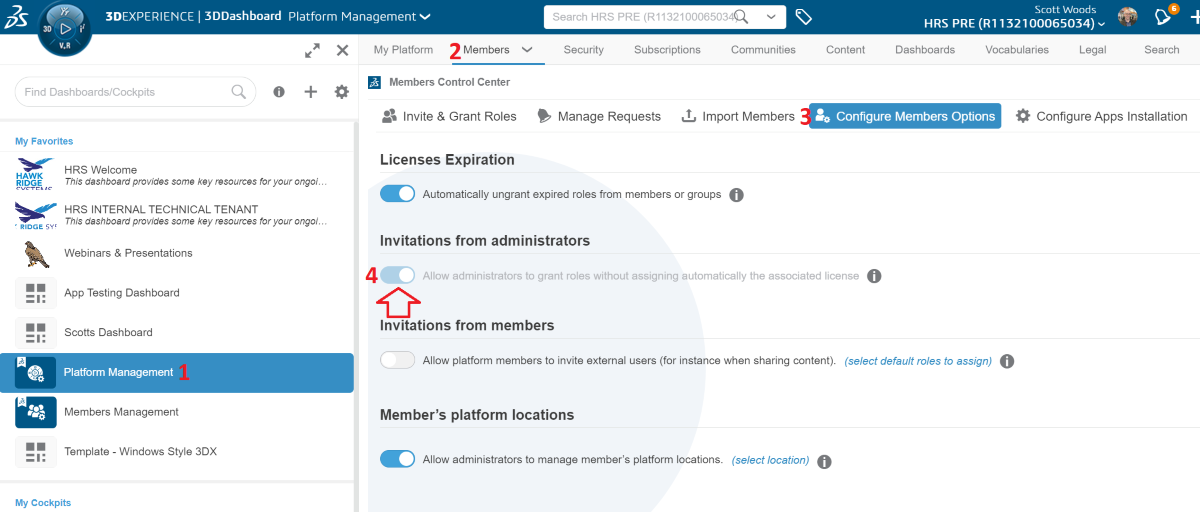
Important Note: Double-check the following settings for administrators. Make sure the ‘Allow administrators to grant roles without automatically assigning the associated license’ option is turned on. Need a hand finding it? Just head over to Platform Management and look for the ‘Configure Members Options’. You’ll see it in the Invitations from Administrators section.
How Do You Invite External Members to the 3DEXPERIENCE Platform?
Now that we’ve tackled the nitty-gritty, it’s time to bring those external folks into your 3DEXPERIENCE space. Head over to the Platform Management or Members Management dashboard and click on ‘Invite Members’.
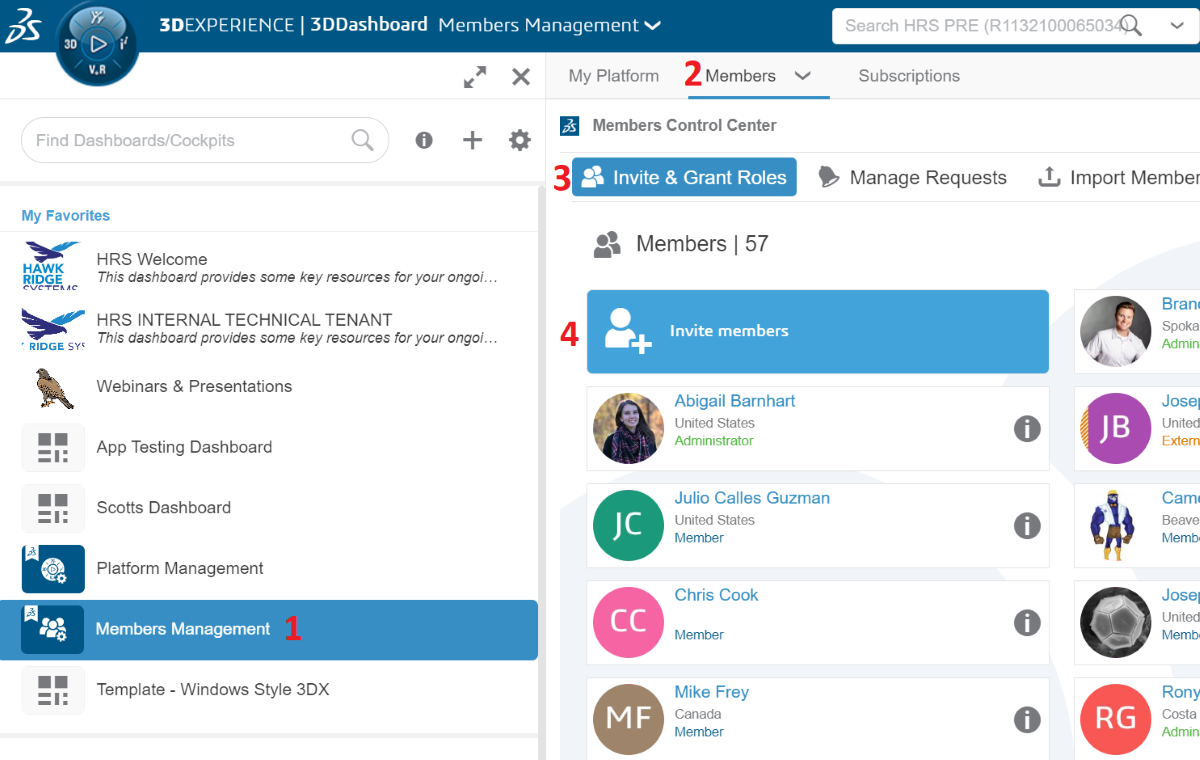
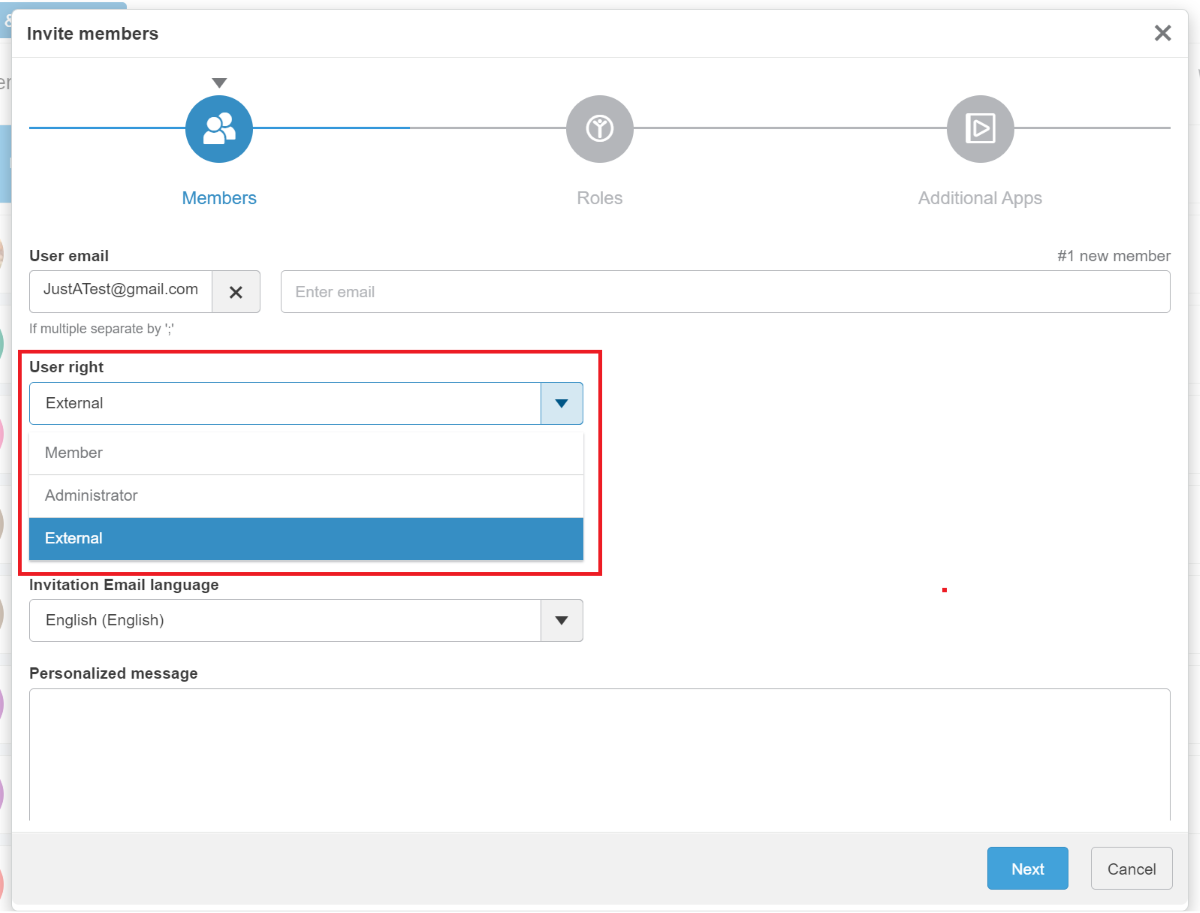
Next up, enter the email address of the person you’d like to invite where it says, ‘User Email’. Then, hop over to the ‘User Right’ dropdown and pick ‘External’. Super important: Make sure you set it to ‘External’ when inviting members from outside your tenant. This tags your invitee as someone who’s already on the 3DEXPERIENCE train but from a different station. It lets them use their stuff in your space. But don’t sweat, you’ve still got the reins on what they can and can’t access. We’ll chat more about that in a second. Click ‘Next’, and you’re all set to assign their user roles.
Note: When inviting external partners, there are multiple licensing scenarios to consider:
Types of Licenses for External Partners in the 3DEXPERIENCE Platform
There are a few different license types in the 3DEXPERIENCE platform: Casual, assigned, and externally owned. Here’s some more information about each of these license types:
Casual Licenses: If you’ve procured casual licenses, these can be assigned to external members. By selecting Casual 40h/month, the member will be able to use applications for up to 40 hours within a calendar month. They can later be switched to unlimited licenses if required. Casual licenses only show if they are available, if you don’t see this option, it’s because they have not been purchased yet.
Assigned Licenses: In scenarios where external members require regular access to the platform, you might opt to assign them a specific license from your organization.
Externally Owned Licenses: Often, external partners already own licenses. In such cases, ensure you’ve enabled the ‘Allow administrators to grant roles without assigning automatically the associated license’ option as stated at the beginning of this guide. Without this option toggled on, the platform will not allow you to move on to the next step to assign roles.
Selecting Next will bring you to assigning these roles.
Assigning Roles in the 3DEXPERIENCE Platform
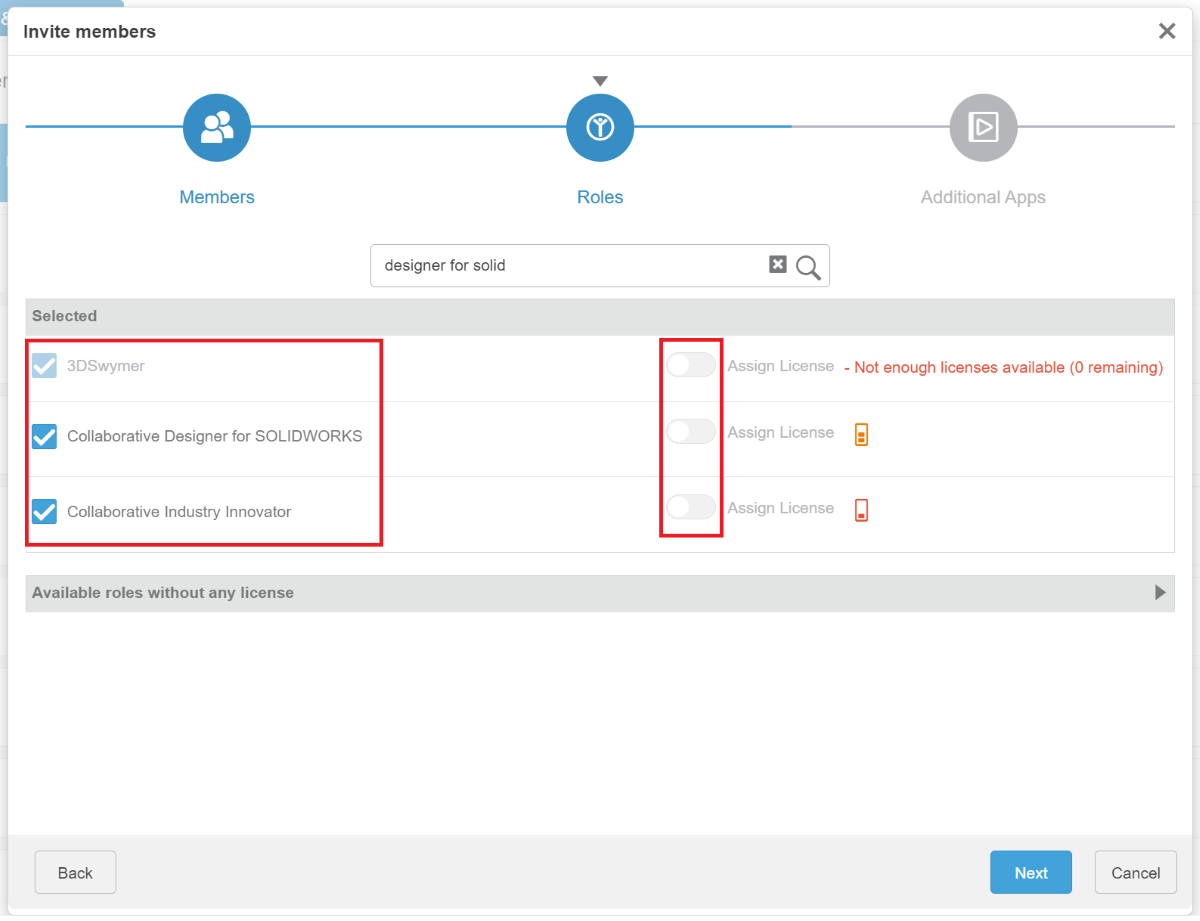
In this step, you’ll be designating roles for the External User. While this might appear redundant, as they’re using their own licenses, this action essentially sets permissions on which licenses they’re allowed to tap into within your tenant or what licenses they are allowed to use from theirs.
At a minimum, assign the roles ‘3DSwymmer’ and ‘Collaborative Industry Innovator’. If they’re tasked with design functions, you’ll also need to assign either ‘Collaborative Designer for SOLIDWORKS’ or ‘3DEXPERIENCE SOLIDWORKS’, based on their specific licenses. During this process, you have the discretion to either share your licenses or enforce the use of their own. If you prefer the latter, make sure to uncheck the box next to ‘Assign Licenses’.
Having noted that should you wish for external users to make use of your licenses, you can permit them this access by ensuring the ‘Assign License’ option remains activated.
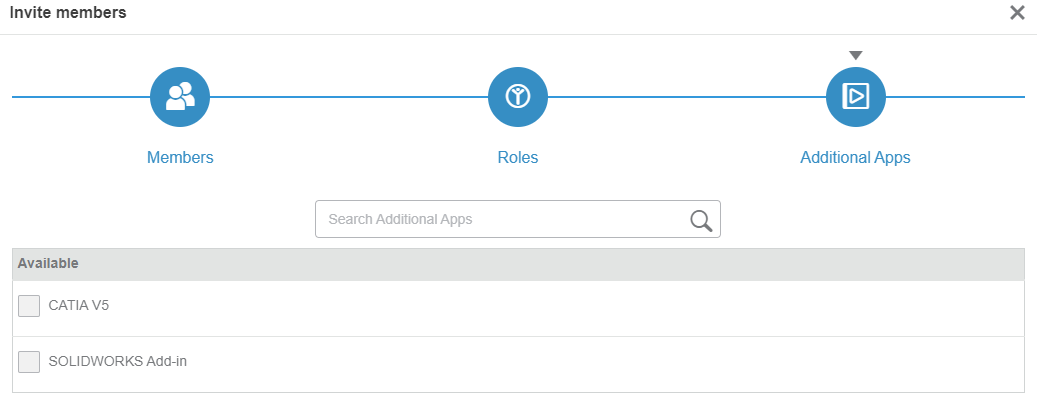
Select next to move to Additional Apps.
Granting App Access in the 3DEXPERIENCE Platform for External Users
In most cases, there’s no need to assign Additional Apps. The intricacies of this section can be complex, but in essence, using xApps activates supplementary add-ins that may serve as alternatives to ‘Collaborative Designer for SOLIDWORKS’. While this scenario is rare, please reach out if you believe it pertains to your situation, and we’ll provide the necessary assistance.
On the final screen select Invite and it will send out the invitation.

Non-restricted Settings for External Partners in 3DEXPERIENCE
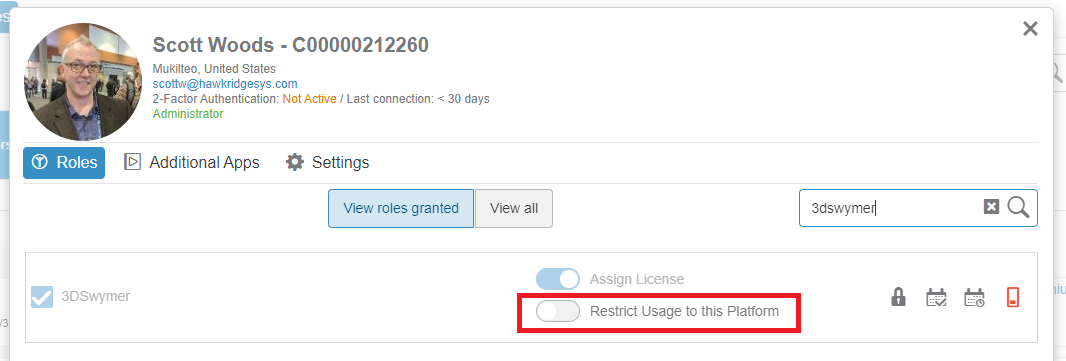
For a concluding but essential step, it’s imperative that the external user’s roles on their tenant are set to non-restricted. The user must access ‘member management’ from their tenant and modify their user details accordingly for each role. Ensuring that the ‘Restrict Usage to This Platform’ option is deactivated. If left activated, it will inhibit them from leveraging their own licenses and bar them from accessing your tenant.
Sharing Data with External Partners in the 3DEXPERIENCE Platform
Alright, with all the techie talk behind us, let’s dive into how you can share your data — and just the bits you want — with both outside folks and your team members.
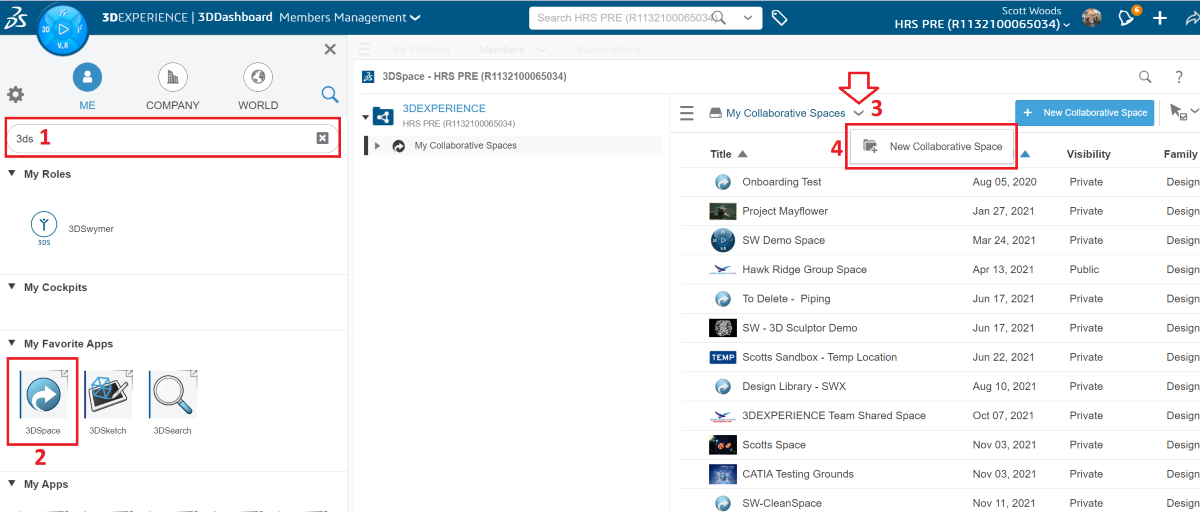
Using the 3DSpace App create a New Collaborative Space or modify an existing Collaborative Space.
If you want the external member to have their own space to save data, go to the 3DSpace app and select ‘New Collaborative Space’ under the ‘My Collaborative Spaces’ dropdown.
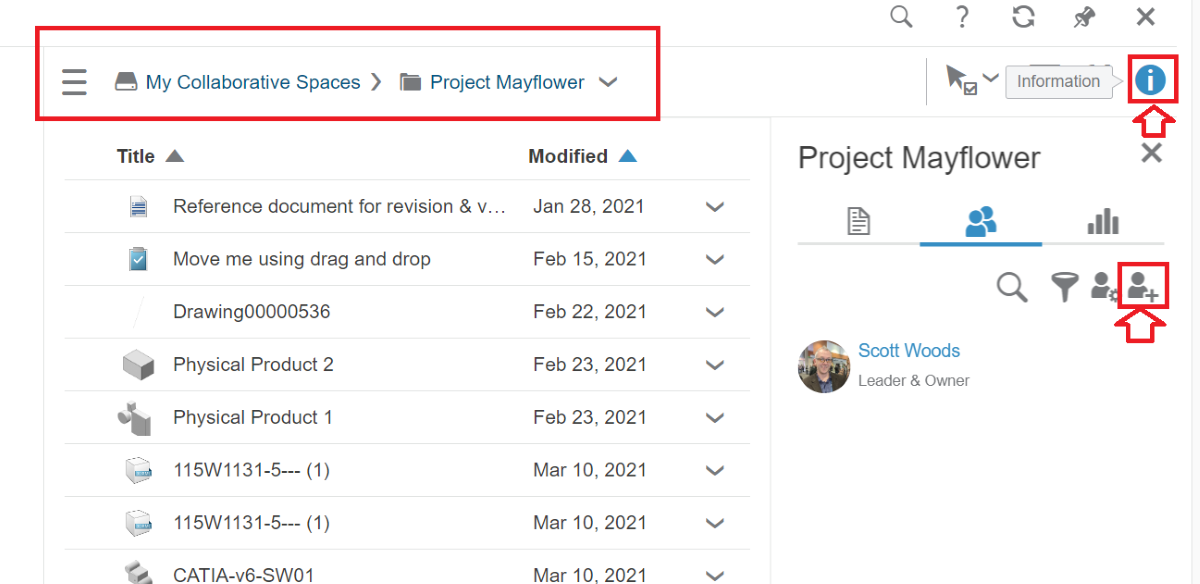
Once in the new or existing Collaborative Space click on the Information icon and then on Add Members.
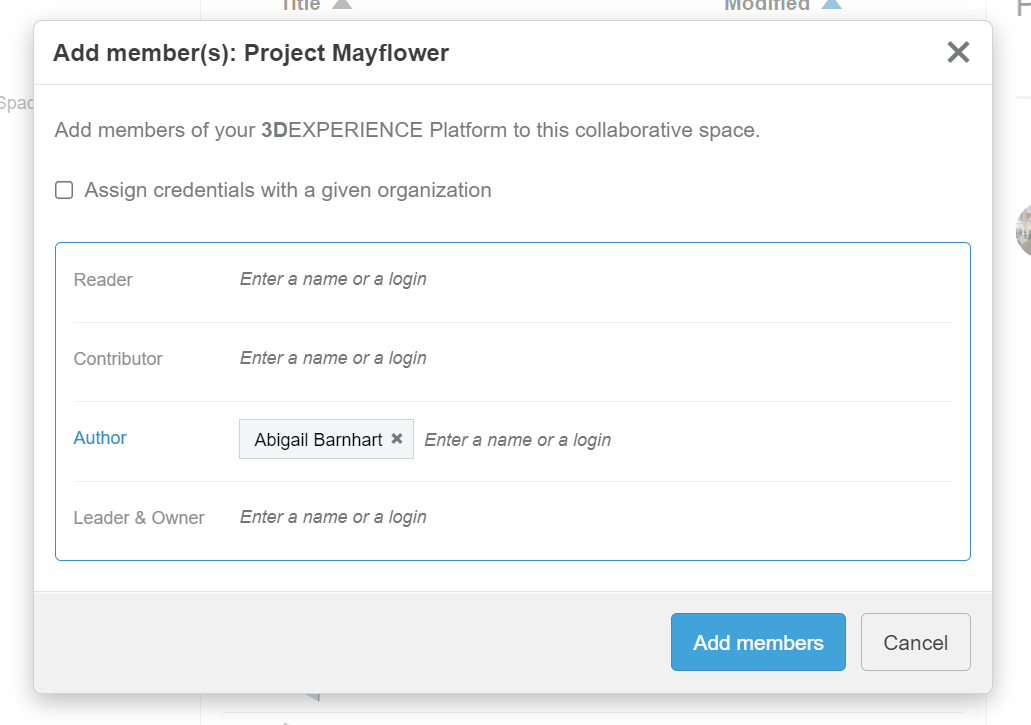
When adding members, you will need to type their username or email address next to the required permission level.
Permission Levels for Collaborative Spaces with External Partners in the 3DEXPERIENCE Platform
There are a few options you can choose from for permissions. Here is what each of them means:
Reader: Able to read content.
Contributor: Can read and add content.
Author: Can read, add, and edit content.
Leader & Owner: Can read, add, edit, and delete content.
Selecting ‘Add Members’ will grant permission to this space for the selected users, and you will be able to collaborate with projects saved to this space. Note: Be sure you and other team members, internal and external, who need to collaborate are also added to this space.

Need more Information about Working with External Partners in the 3DEXPERIENCE Platform?
I genuinely hope this post clears up the process of adding members and sorting out roles and permissions. I get that every situation is a little different and this might not hit every single point for you. Don’t be a stranger — reach out anytime, and we’re here to help you navigate the waters! You can reach out to your customer success manager anytime or also send us a message through our contact form.
