SOLIDWORKS Product Data Management (PDM) solutions enable your design team to get your design data under control and substantially improve the way your team manages and collaborates during the design cycle. SOLIDWORKS PDM is a full-featured data management tool for organizations large and small to help take out some of the time consuming and mundane tasks of organizing your data. Focus more on innovation with SOLIDWORKS PDM!
Learn How to Streamline Your Workflow with SOLIDWORKS PDM
Video Transcript
Introduction
Welcome to another episode of Webinar Wednesday. I am your host, David Lefebvre. I am a PM specialist with Hawk Ridge System. Today’s topic is, Integrate Your Engineering Changes in SOLIDWORKS PDM. Without further ado, let’s start this webinar with a little definition. What is an engineering change document? I know we could get into a discussion about change management and the complexity of it, but I just wanted to put it in a very simple word. Engineering change document is a numbered document that is used to track product changes. Basically, you approve your document and then you implement your changes and modify your product and stuff.
You can use it to plan, to review, to approve, you can have approval through this, and then you implement your changes. There are many acronyms that come with engineering changes, there’s ECO, ECN, ECR, you might be familiar with those. Again, this is not a webinar about what is a request, what’s an order, what’s a notice, when they should be done, this is just about integrating that process inside PDM. Here’s a little summary of what we’re going to be looking at during this webinar. First of all, the engineering change document template. The things to know what SOLIDWORKS PDM is, you can have any type of file as a template.
PDM File Template
Whether you have your document all ready or you don’t, you can create a brand new one. Obviously, the most common amongst our clients are Excel document or Word document. A lot of our clients already have their change document created, so you can just use that one. They can use a separate data card and then it can integrate with the custom properties of those with an Excel document, and we’ll look at them. The second part is the actual PDM template functionality inside PDM. The right-click inside Windows Explorer that will allow you to trigger a new document coming from that template.
There are different things that come out of that, you can have a template card or a prompting from the user, then put some information up front that is controlled by a permission, so you can allow or disallow certain user groups to use the template functionality.
The last one is the engineering change of workflow. You can have a separate process for your engineering changes, have it from your card or for other processes that you have already set up in PDM. You can use the notification system in PDM to notify the right people at the right time throughout the workflow. It might be further approved and then you can synchronize with your CAD.
Admin tool
There’s going to be four items in the admin tool that we’re going to touch on today. The PDM file data card. We’re going to make a specific file data card for the engineering change. The PDM template card, which is the prompting for the user to enter some information for the engineering change. The PDM template feature, which is the wizard or the feature inside of PDM or inside the inventory, create the template and then, the PDM workflow. Specific to the engineering change, a new workflow just for that.
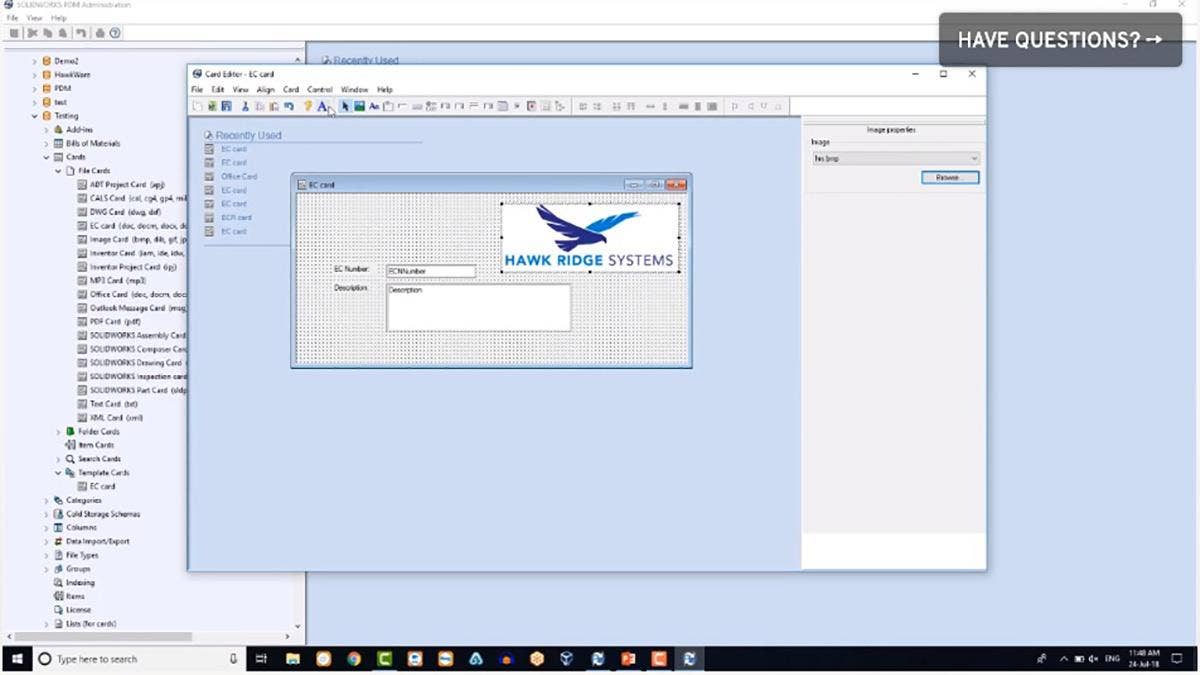
Let’s get into our admin tool and PDM. Browse through our cards, file cards, and then create a new engineering change card. What I’m going to do is open the Office card and save it as a new card. This one I’m going to write an engineering change card and then save it in a specific folder. You see, I have in my body, EC folders, I’ll save it in there. So it’s only valid for that folder. Then, from here, I can change that card with just the information that I need for my engineering change card.
What I’ll do here is, I’ll just select what I want to keep and drag that outside. Maybe keep some of those images in here and then drag those outside as well. I’m just going to delete that tabulation and drag those back up. I just got rid of my tab feature, going to replace those boxes around. Let me get those images down there and then I’ll change the title. Maybe I’ll put that as a description. I’ll put a bigger box, put my description in here and then change the label or the free text in here.
Then, the number, going to put that as an engineering change number and instead of document number here. I’m just going to select my engineering change variable. Created by, I’m going to browse to a creator, and for my created data, I’m going to just use a different one and push the property into my document. Just like that, I can copy also, those fields, those boxes, and then I create new ones so I can put in approved by in here. Approved by and then a different variable here for my approved by. There you go.
That’s a pretty simple quick little data card. So now I have an engineering change data card – I’m going to save that one, and go to the template card. Down there, I don’t have any template card. I’ll re-do a little bit of the same trick. Open my newly created engineering change card and then I’ll save as, as a different type of card. You can see down there I have a drop down I can use it as a template card. You can keep the same name and save it as a template card. You can see on the right side I have a template card.
I’m just going to delete a couple of things here that I don’t need. For my template card, I just want to ask my user about the description of the change and have my number populate automatically there. I’m going to keep that in there, and maybe for my prompting, I want to put an image of the company so I’ll browse for a picture, yes. Put a picture on the side here and I’ll put some text in the top of my engineering change cards. I’ll just put engineering change in there so it’s labeled. Maybe put that a little bit bigger. There you go, change of font. I’ll put that in bold and quite bigger. There you go. Again, I’m just going to center this text box, and I’m going to have a quick redone engineering change template card created.
Vault
Now that we’re done with the data card, let’s get out of the admin tool and open our vault where I’m just going to log in as admin for now and we’re going to bring our actual engineering change template. Let’s say we have something that exists already. I can just drag and drop them in there in my template folder, for example. It can be anywhere in the vault. As you can see, I have a Word document and an Excel document just to show that you can do with both. Here’s the Excel document, here’s my Word document, they are pretty similar documents. What I’m going to do here is, I’m just going to check those in the vault. They are secure and controlled.
Let’s get into our admin tool and download here there’s the template feature, let’s right click on it, new template, and give it a name. I’m going to put a new engineering changer, EC as a name. I’m going to click next and keep it with the permission of the logged in user, click next. This is the place where we’re going to add a card. It shows our template card and it recognizes that we have a description and engineering change number on it. What I’m going to do is I’m going to create template variables to transfer the information from the template card to the template wizard.
When you create this T underscore EC number and I’m going to put a format string and clear that result and then I’m going to put also a T underscore description, and the description’s also going to come from the template card. I’m going to just put format string here. As you can see on the EC number, I would have had the chance to put a serial number here but because I want to put the serial number on the template card, I’m going to leave it to a format string and they will come from the template card. Then what you need to do is associate those, so basically when it comes from the template card, you need to put it to a variable in this template feature.
Click next. You see, I can put my template in the current folder or I can choose where I’m going to put it in my vault. Here, I’m going to put it in my EC folder. As you can see, I have a folder in my vault called engineering change or EC, and I’m going to make sure that every time I create an engineering change, it goes there. On the right side, this is where you choose which file is your template. I’m going to choose the Word document here. There are two things, a couple of things here, you can always browse and change your template. I’m going to change the name of this to always use the EC number, the name of the file will always be unique.
I can show the data card when I create my template, I can check in the file automatically with a comment, and I’ll make sure that the template variable goes back to the data card, file data card. We associate those, make sure they go at the right place with the description and the engineering change number.
Once I have this setup, I only have two other things to set up, the icon, so this doesn’t matter, this is like an extension or something like that, but it’s really just associate an icon with your template. I’m just going to get the blueberry little icon here and I’m going to give some permission, maybe I just want my engineering change review and then till access to create those template.
Now it’s done. You can see I have my serial number created here. Then, as I said, I wanted to be coming from the template cards, so I’ll come back to the template card and make sure that in the card I use that engineering change the serial number from here.
Workflow
The last part in the admin tool is our workflow, actually. As you can see on the bottom where the workflow is, I have my default CAD workflow. What I want to do is create a new workflow for my engineering change classes. I’ll right-click new workflows and create a condition here. I’ll give it a name first, engineering change, and then I’ll create a new condition.
I’ll use file path and I’ll make sure that everything that goes in that folder, EC, go through this workflow. I’ll just put percentage sign backlash EC, backslash percentage. Now my workflow has started, started with initiated. This is my initial state and it’ll create– I’ll just change the name of this to EC initiated and give a couple of permission for my engineering and EC review so they can have free reign on that state.
I’ll create a couple of other states. I’ll just copy that one because I want to copy the permission as well. I’ll name this one EC in progress and, as you can see, it retained my permission here, so I can have those groups making modification and seeing the change. I’ll paste the last one, which is being change-approved.
I’ll just create a simple workflow. You can get way more complicated than that. I’ll give manufacturing a read file permission here. You can see my engineering change with approved. I’ll put a couple of transitioning between output assigned engineer.
At this point, when the engineering change is initiated, I can assign the engineer and then I can use the notification for this. If I look at my notification, I’ll make it valid for my engineering change folder and then put my engineering group in there and use the dynamic selection, will let me choose which engineer I’m assigning this engineering change.
Then I’ll put some permission there and make sure that my engineering change reviewer is allowed to send that to engineering change in progress. I’m doing a new transition again to engineering change approved. I’ll call this one change approved and give permission to engineering change, just like this group, make sure they’re permitted.
This is for my workflow, nothing too fancy. As you can see, I have change approved as the last transition in this workflow. The idea here is to give the same name, change approved, on the CAD workflow and on the engineering change. Also, I will notify my engineering change review when something is submitted for review. Basically, my engineering change review will be changing the state of both the CAD and the engineering change document.
We’ll see how this works inside of SOLIDWORKS PDM. We’re basically done with the admin tool. I’m going to actually go and jump inside PDM. What we’re going do here is an example of the whole workflow or the whole process. We’ll start with someone in our engineering change review, Ian Jones, triggering an engineering change, and then start the document, putting some description, and associate the CAD files with our document. Our reviewer will submit it or assign an engineer to do the modification on the CAD, the engineer will get the notification, will do the modification on the CAD, and then will ask for a review on the CAD, which our engineering change review will be notified, then approving the engineering change document, which brings the CAD with it.
Let’s log in as Ian Jones as part of our engineering change review. Look inside this EC folder, you can see that if I open it, it’s empty. I will right-click anywhere in an empty space and use that new EC to start my new engineering change document. I’ll put a description, Wednesday webinar, and maybe a description a change in here. You can see I’m using my, on the trigger, there’s my template card that just popped up, and then I accept that and click OK, and I will create or pop up the file data card. That was one of the options I selected. I have the option of opening or creating the file.
I’m just going to select create the file, and then it will place it automatically in my engineering change folder. From here, you can see that if I look at or I edit my engineering Change, it will check it out and open it.
And inside, if I enable the content here, you can see that my fields on my card updated some description is not there. What I’ll do is I’ll just link it to the different field. In order to link it, you can insert and click parts and then there are the field options here. Under doc properties, this is where in advance property you would have created all your new custom property and then you can see the description from the data card appears directly on the documents. That’s our integration with the custom property with a Word document.
Now I can get out of that document and browse to my CAD files. Finding this real Bhasin CAD file, I can right click on it and copy this file. I can then browse back to my engineering change and associate those files together. Any file can be associated with another file. Use the paste as the reference on the engineering change and then associate those two files together and then check back in that engineering change. So as you can see, the content is populated with that CAD file.
I’ll then use the workflow to push to my engineer data five. That engineering change, I’ll assign it to David. I’ll leave a comment here that will leave a tracing the history so what change or look into the engineering change for the description and then also leave a notification comment and goes to the notification so knows that it’s pretty urgent. This is going through the workflow. It changed the state as you can see, and now I can get out of the vault as Ian Jones and log back in as my engineer David that will do the work on the CAD looking at the engineering change.
I will log back in as data five and then from here, I can obviously browse in the EC folder. I can use the search. Ultimately, what I wouldn’t be getting is a notification with the proper hyperlinks, with easy access to where are my files right now I click on it, and you can see it has all the description, who did the change on that EC, and then I have those hyperlinks, the comments here, so I’ll just browse in the folder where this engineering change is. It will highlight the engineering change, and from here, I’d already had the content, so I can browse to my CAD file and I don’t have to look for it. I can be right on that file.
I’ll change your state of this file, it’s approved right now. I’ll just request a change and put some comments. My history is well populated with comments. So I know what happened. I’ll do changes. Changes, I’ll just check out my file and do a little change in the description just for the example here and then check it back in and then submit it for a review. I right-click check in and then send it to my workflow. Again, submitting it for a review, leaving a little comment, and I’m done as an engineer for my changes on the CAD. The idea here is that the reviewer for the CAD will get a notification.
If I look into my workflow, I’ll just go back to the admin tool and go look at the category flow. As you can see here, I put a little notification for the engineering change review to get a notification when the CAD gets reviewed. Before that, I’ll log out as the engineer. I’ll go back in the admin tool and put some actions in there. What I want to do is I want to make sure to map the approver. I will put an action in the approve transition so that my approver gets mapped. You select the right variable.
I want to choose the user to be mapped whenever the approver is selected and is passing the engineering change to that transition. I’ll save my workflow. I’m ready now to log back in as the engineering change reviewer and come in and approve that engineering change. Getting in, again, I could go in the project folder to get in the notification. Again, I can just see the information, the notification comment or the comment. Just browse through that hyperlink to the file that gets highlighted. I’m doing a bit of the reverse, the path that I use.
I can look at my preview and look at the changes that have been made. It looks good. I can look at the where use and see that there’s an engineering change associated with it. I’ll browse through it. I can look at the engineering change, look at the data card. I don’t have to get inside the engineering change. The description or all the fields that would be important could be there. I don’t have to be there. As a reviewer, this is really good. From here, I’m going to go and send it for approval.
As you see, everything is linked together. By approving the engineering change, it’s also approving the CAD. Everything is selected for going to the transition. They’re going to their own workflow. Now that I’m approving, you can see that in the state here, the engineering changes approve. If I go back to my CAD file, I will see that it’s in a different state. It’s in the approved state. Everything, as I was approving the engineering change document, it also approved the CAD after the review. That’s it for our little process.
I’ll jump back in the admin tool quickly to just show you how you could use another template. We had an Excel sheet in there as a template. I’ll copy my engineering change and then I’ll just paste just a copy of it, jump into it, go where you add your file or your template and just change the template. I’ll just jump back into the existing one. I’ll change the name of it. I can keep the numbering scheme, the same numbering scheme.
Now it’s going to be an Excel sheet. I’ll make sure to browse into my other template and just demonstrate quickly that you can do that in the Excel sheet just as we did it with the Word document. I’m not going to change anything else. Then that, click okay on those. I can just come back in the vault, click new in the copy of engineering change, use the same template card, same numbering scheme. As you can see, if I open the file from the data card here, it will open an Excel document, then use a different template. Again, the integration with the custom property, my card fields are on my document.
Closing Tips
This was a quick little example, very basic. Don’t forget, if I go back in the admin tool, don’t forget that this process can be as simple or as evolved as you want. Here’s a simple one that we have in our autopilot. We have a bit more evolved one. We also have more complicated, more complete engineering change that’s been developed by an engineer at Hawk Ridge Systems. We work with you guys to map what’s your process for the engineering change.
We also have a best practice engineering change like this one. Your template cards can use a lot of those control box, their signature, the browse button, the date field. You can play with those cards and have exactly what you need as far as information, as far as that process workflow. That’s it. Thank you for attending this webinar. I’ll see you on another webinar on Wednesday.


