Setting up and using an Excel Based Bill of Materials can be frustrating if
the rules are not known between Excel and Solidworks. You may have run into a
couple of error messages in the process, or even ran out of memory with enough
failed attempts. Following are the rules for successfully utilizing an Excel
Based Bill of Materials in
SOLIDWORKS.
Excel has a set of rules for setting up an Excel Based Bill of Materials to be
used in
SOLIDWORKS. While trying
to create one, you may have run into a couple different error messages. The
most common message is, “Error creating Bill of Materials” as seen in
the image below.
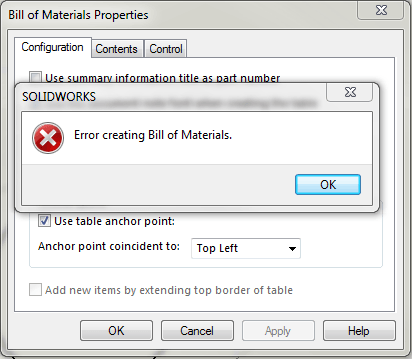 Figure 1: Failed creation message
If there are enough failed attempts at creating the Excel Based Bill of
Materials, you may have gotten an error message indicating that there is
insufficient memory, followed by another message saying,
“Excel cannot complete this task with available resources. Choose less data
or close other applications”. If this occurs, you may have to restart the computer.
The first error message is due to the 1st rule not completed. Here we will go
through the steps and rules to successfully set up and implement an Excel
Based Bill of Materials.
Rule #1.
The minimum requirement to create the Bill of Materials in SOLIDWORKS
is the Part Number, and it must be put in a specific way, and defined in
Excel. The column name can be labeled anything but it must be defined in Excel
exactly as, “Partno”.
Here are the instructions for defining a name in Excel:
-
Select the cell that you would like to define. Go to the Formulas tab, then
in Defined Names section, click on Define Name as seen in the figure below.
 Figure 2: Define Names location in Excel
The Name Manager allows editing of the names that have been defined. The
“Value” is the column header name, and the “Name” is the name in Excel
Rule #2.
If you want the Quantity or Item Number in your BOM and for it to reflect the
quantity/item number of your SOLIDWORKS parts, you will need to define the
name “quantity”/ “Itemno” (respectively) in Excel exactly as seen in the
figure below, -OR- label the column header as “quantity” / “Itemno” exactly.
You will not need to define a custom property in SOLIDWORKS for the quantity
or the item number, since it is being read in.
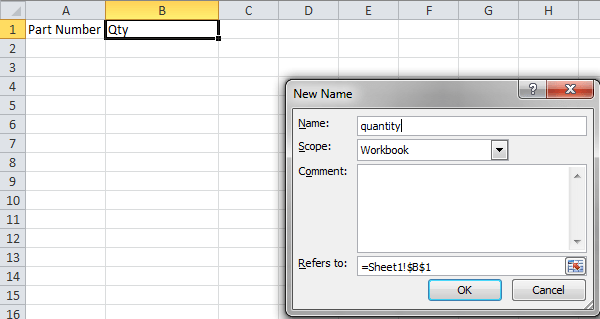 Figure 3: Property name defined in Excel
Rule #3.
The Bill of Materials can bring in all other custom properties established in
SOLIDWORKS by either defining the name in Excel or by matching the column
header. The names must be identical. For SOLIDWORKS, if there are spaces in
the names of your properties, they must be filled in (e.g. an underscore),
where in Excel spaces are fine. An example of this is shown below.
 Figure 4: Material Property format in SOLIDWORKS
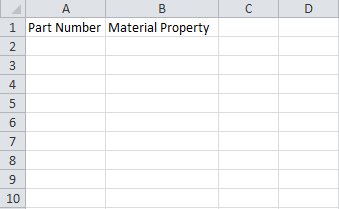
Figure 5: Material Property format in Excel
When ready to insert, the drawing view must be pre-selected for the Excel
Based Bill of Materials option to be available. After clicking ok on the
options prompt, SOLIDWORKS will take a moment or two to bring the table in the
drawing. This Bill of Materials is editable inside of SOLIDWORKS with a double
click, but will not save back to the BOM template. Editing the table inside
SOLIDWORKS you will see $$END as the last column header. This is automatically
brought in for
SOLIDWORKS to know where
the stopping point is and will not show up in the table.


