Learn how to enhance your customers’ experience and streamline internal communications by repurposing your CAD data to create assembly interactive instructions that can work with any device! See firsthand how to create step-by-step assembly instructions with interactive SVG files, fortify them with 3D PDF’s from SOLIDWORKS, and 3D Interactive renders from SOLIDWORKS Visualize.
Creating a Perfect & Interactive Assembly Manual with SOLIDWORKS Composer and Visualize
Video Transcript
Introduction
Hi everyone, and thank you for joining us today. Today’s our Webinar Wednesday on how to create a perfect interactive assembly instruction, with SOLIDWORKS Composer and Visualize. My name is Scott Woods, I’m the product manager for technical communications suite here, at Hawk Ridge systems, and today I’m gonna go over how to take all those high level features out of Composer and out of Visualize, and use them to create step-by-step assembly instructions.
This is kind of a new concept when it comes to assembly instructions but don’t just pigeonhole there because this setup I’m gonna show you today can be used for maintenance procedures, operations, or any kind of manual that you’re gonna be putting together – like an online presence. The one I’ll be showing you today is assembly instructions, but it can be used for many different kinds of publications.
The two programs I’m gonna be covering, they’re both SOLIDWORKS applications, SOLIDWORKS Composer, SOLIDWORKS Visualize. Both these applications are not add-ons for SOLIDWORKS, they’re actually separate applications, being sold separately. You don’t even have to have SOLIDWORKS installed or even own SOLIDWORKS to use either one of these. They both work with SOLIDWORKS files, of course, but with many other different CAD formats. So, don’t think that you have used these only with SOLIDWORKS, basically, but, if it’s in 3D you can get it into either one of these applications and do a ton of stuff with them.
What’s New in SOLIDWORKS 2019
Before we get started, two things, I just want to call it here, just what’s new 2019, we got service pack zero, right now we’re waiting for service pack one, and for Composer, the PMI data import we now have are just like the top of the list here. For Visualize you can actually do ten times faster rendering. If you haven’t taken a look at SOLIDWORKS 2019, it is available and both these programs have great enhancements this year.
I’m gonna be covering quite a bit today, so I’ll try to explain this as best as I can. But really the concept is what I just really want to get off there. We break this down into three different programs because – there’s SOLIDWORKS CAD and again we don’t need that here, but it does help if you want to make changes to things like that and then there’s Composer, and then there’s Visualize. CAD is where you’re going to develop all the 3D design.
3D Models
Without 3D models, these other two applications, we really can’t use them. So, it all starts in SOLIDWORKS, it starts with that 3D CAD creating those 3D models. If you have SOLIDWORKS you can do this today. You can export as 3D PDF. All you have to do is open up the model in SOLIDWORKS, do a save as PDF, there’s a little checkbox to say yes, save 3D PDF, and you can save a 3D PDF.
We’ll be showing that PDF and attaching that to our assembly instructions today. Now, if you have SOLIDWORKS model base definitions, we can export that 3D PDF but we can add stuff to it. You can put into it a template, you can have dimensions, annotations, things like that, and we spice it up. So that’s for a different kind of story but just keep in mind that the 3D PDF can have PMI data, it can have dimensions and annotations. The one today it’s just gonna be a 3D model.
Then we get into Composer. And in Composer, this is where we do all of the step-by-step procedures. Composer is really good at that, that’s what its made for. To take the model and to break it down into individual steps. Now, we’re also gonna take Composer to link, to not only Composer files, but exterior files, animations, 3D PDFs, you can link to websites, you can link to SVG files, and different publications.
We’re showing that linking today, so that’s a big one. Also, suppose you can do animations, so you can publish out of three, animation out of Composer video files. And then also this entire structure of this website is gonna be used, it’s gonna be constructed using SVG files, which is the standard vectorized graphics file. It will be the backbone of the of the project today.
Photorealism Imagery
Now, in Visualize, this is where you get the photorealism imagery – the VR content. Even 3D animation that’s in photorealism. Now, all this stuff just spices up that assembly instruction and really takes question away from things. So, you know, ’cause Composer’s very technical, it’s not photorealistic and then Visualize is very photorealistic but it’s not technical, so you combine the two together and you can create a really cool output, so let’s do that. First off, let’s get into Composer, let’s close this down here, shrink it down, and let’s jump into Composer.
First, I want to cover what I’ve developed and then we’ll go through ‘How?’ So let’s do the ‘What’ first. So, first off, we have our cover image, right? This is a Composer rendering, this is kind of what you can expect to get out for your images but then we get into more of the technical application, something like this.
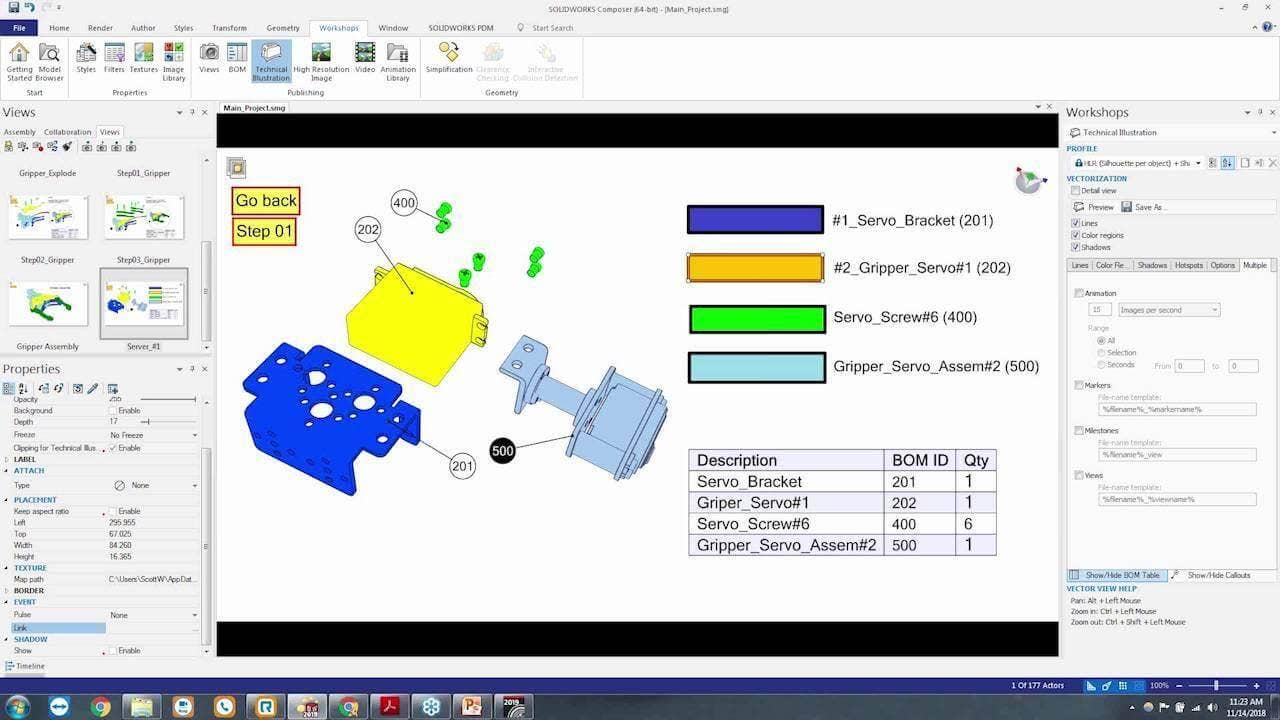
Activate this slide here and what I have going on is I have the basic balloons as some BOM ID’s on these components, I got my text here that says this is the assembly and here is the subassemblies. Now, this guy right here, if you notice when I mouse over, it highlights. So, if I select that, come down here in the ‘Properties’, and keep in mind, everything in Composer’s based off ‘Properties’, so, we’re going be doing a lot of that today and editing these properties here.
Properties
If you go to ‘Properties’, you see this link, and then we see that it’s actually linking to a file. Where that file is, is actually on ‘My Computer’ here, it’s in this folder and it is this component. This is the step, gripper explode right here. This is an SVG file and if I were to open that up by itself, this is what that SVG looks like. Just an exploded view 2-D drawing with some links in here, and I’ll show you how we actually create this link.
When I click on that, what’s going to happen is it’s going open up that SVG file. Now, the problem is and this where I think everybody gets stuck at the beginning of creating linking SVG files is, “How do we link to something that doesn’t exist yet?” So, we’re putting together this document, right? I put together this cover page, we’ll get to this guy later I go and I take this gripper head here and I explode it apart. I have my text and some buttons that navigate forward and backward. So, this is when we hit ‘Forward’ so it’s gonna go here, right?
But we have these buttons to go forward and backward for this assembly instruction but we have nothing to link to, right? ‘Cause those files don’t exist yet to link to them. There are a few rules to follow but once you get it done it’s fairly simple. What I like to do is, I like to create the full structure, put the buttons in there, just don’t link them to anything yet. And so I say, “Okay, here’s the exploded view”.
I’ll cover this in more detail here and not a different assembly but or a subassembly. Here are the parts we’re going to assemble. Go to the next step, those parts assembled, these are the next parts we’re going to assemble. Next step and so forth, until we get the assembly completed. Okay now, the critical part here is, you want to name your views. If you don’t name them, it makes linking later on, especially if you go, you know, home for the weekend and come back on Monday, it makes linking really difficult to do because you don’t know what to link to.
If you don’t name these views and you export them, those files aren’t gonna have any intelligence to them and it’s gonna be hard to find out what they are without opening them. So if I said, “Okay, this is ‘Top level gripper’, here’s the exploded view, here’s step 1, step 2, step 3.” By the way, you just double click, it’s like a single click, wait and click again, just like any standard Windows file. Also if you click and hit F2, then you can modify that. You just type it in, so you just keyed in what the name is.
SVG Files
Once you have everything named and all your stuff’s put together, now you want to save these all out as SVG files. And this, it’s a two-step process, we saved out as SVG files and then, later on, we’ll be overriding this as SVG files with new files. The only reason why we’re saving it as SVG files is so we have something to link to. So, to do that, you go to your ‘Workshops’, you go to your ‘Tech Illustration’, in the ‘Tech Illustration’, and we have a few other videos that cover this in more detail about line widths and how you actually want that to look.
You define how you want to look here and then if you want your lines, your shadows, and colored regions. I’m gonna say I also want ‘Colored Regions’, so we’ll select that. Now, if I go to ‘Multiple’, you’ll see views. So you’ll see how if I activate that, you’ll see it says file name, view name, so it’s going to take my file name, which is the main project and it’s going to take my view names, which is, however, I need them here and it’s going to export all of these is SVG files named with that structure. As long as I keep this project named the same, as long as I keep these files in the same, then when I export they would overwrite all the old ones in this process.
We don’t really have to worry about that because we’re going to be saving each one out individually once we actually modify them, but just as a heads up care. But all you have to do is save as a link to open up the folder you want to save into. Hit Save. And then with that selected it will save out every single one of this, at least it should.
I have seen a little bug, that’s easy to fix. I noticed that when you first try to export a batch of STGs, nothing happens. However, once you export one, just export one, then all of a sudden it like triggers Composer to enable the batch export. So if you’re doing this for the first time it says batch and nothing happens. Just uncheck that. Save one out, then check it, and then it works.
Okay, so with that said, this is how all of these files were created here. So, see all of these STGs. So I just basically set up the structure, saved up the SVG and now I have something to link to them. So now when we go to go to, for instance, this guy here, if I say go back, there’s a button here, it’s just a text block.
Click on it. In the properties here, there is a link. And if I go to this link, you’ll see that it’s linking to the top level gripper. This guy here is called top-level gripper. So if I hit those three dots and I say, well, what do I want to navigate to when and navigate to the folder? I see the top level gripper.
That’s why this is important to name or will it be hard to find what file I want to link to, but right here I can look at the views. I can see that one step back is this guy one step forward is this guy right now I’m editing the going back for Lincoln and I can say that that is going to be top-level grippers like cook on that. I say, okay, now this is where things get a little bit.
It’s a pretty good trick. So by default, you’ll see that it’s linking to that director. I mean it’s, it’s a file, C drive. I am on my desktop and an SVG false. So now if I were to move that SVG file off my desktop, then all of a sudden this link would break, right? This is by default, it’s a direct link.
Website Files
If I basically am creating a website into a folder, I’m going to send that to my web guy and say, hey, can you put this on the Internet? He puts on the internet. It’s no longer going to be linking to my desktop. Then if I don’t modify this, whoever views that the link is going to be broken because it’s linking back to my personal desktop, which of course isn’t public domain. So if I fix that, you have to go into this field and it’s a little tedious but you want to delete everything but the file name.
File Names
So see that’s a pretty long file name. That backsplash right before the file name, I’m just going to hit backspace and delete all of that. You can do like a selection, you know, highlight, deleted. But you know, by just doing the manual deleted. I feel like I have a little bit more control over it to make sure that I’m deleting just what I need. So I’ve deleted everything but the file name, by the way, if you go into the file, copy and copy that file and paste it, you can make that work as well.
This is just a for sure way to get it. So I deleted everything but the filename hit enter now enters important. I’ve noticed that if you go onto something else, it might not actually taking the change that you just typed in. And also if you hit enter it looks for that file and if they can’t find it they’ll go back to the full file path. Hitting enter, it’s a verification.
Make sure that actually, it is finding that file in that folder. But it is relative like, so right now I have everything saved in the same folder and as long as I moved that whole folder together, then there’s no problem. And then I just update this view and I’m done. So I’ll cover that again on the separate assembly and then the same thing goes for going forward. So when I go to step one and you see in the link, that’s just the file right there, step one. And how I did that is that I linked to it and I went back in and I deleted the things that enter and everything’s good and you just update the view. It’s another critical part. And I even do this sometimes so I’m going through like don’t update my view after I make a big change like that. And you think everything is good. You can even say about the SPG.
SPG is good. And then I go onto the next page and then I come back here and that link is broken because I didn’t update the due after I make my change. So the thing to watch out for them now. We got through the assembling. Let’s actually get into building this thing. So let me show, let me show the publication.
And that’s important too. So I go back to my folder where everything is and you see I have everything dumped in this folder. I have an animation and I have a pdf. I got this file which will visualize cloud. We’ll get to that a little bit. I have like this guy, which is just a Jpeg, right? So if I want to link to the shape, hair gets in here now by putting everything in the same folder, everything those relatives links, all retained once we upload website.
If there are any sub-directories, don’t even worry about them because these guys are their data files that have been developed that automatically had been created from these other files. And when you did the relative link, it opens up these files, these files referenced those false. Everything works as long as it’s, as long as it’s underneath the same umbrella.
So I’m going to open up the top level gripper and it’s an SVG file, SVG files open up in kind of the PSA started on a different monitor here. Let me just drag it over. They open up in your browser. So by default in SVG is by default, it will open up your browser. That’s because these files are made to go online. They’re made to the access for multiple people. And that is really the purpose of them.
So you just put out there in the world will have anybody you know it, regardless if it’s a cell phone, your iPhone or an Android device or a pc or a Mac, it doesn’t matter any device that’s, you know, has a browser, can, can view this as the purpose of it. If it’s on your computer, you can also edit it with things like adobe illustrator and was a good one.
There’s a lot of different uses for these files. They’re just vector files. Now I look at this and I have a couple of links here and if I click on this link that takes me to that first step, I say step one, that goes to the next one and you’ll see it, it’s navigating to the desktop, but the links actually aren’t to my desktop. That just so happens to be where the files currently residing. And so it’s all in the same folder.
Once I upload that to the Internet, then when I go here it will say like your company dot Com backslash, whenever it’s in done. That is the way it will work. And we’ll say, okay, here are the components we’re going to assemble, go to the next step, they’re assembled, now we’re going to assemble these components that are assembled, there’s the next step.
Those are assembled, here’s my top level, or here’s my subassembly that’s ready to go. I go back, here’s the top level assembly. Of course, I can take this one step further and do like a top-level assembly installation as well, like I have those pieces going. Now the next part I’m going to do is I’m going to create this piece right there. I’ll create an assembly structuring of it on the fly.
And also in the sort of one last thing here. So if I hit this button, this is going to play an animation. So this is what I’m saying, that these are just links and if anything’s in this folder you can link to it, you can put that on your website and you could build this out in and be as creative as and, and you know, covers many different publications as you need.
Video
This is a video. This video is created in Composer. Composer has a full animation timeline and you can do animation such as this and also, of course, it has procedural animations for assembling and things like that. It’s basically building a website and we’re going to have more buttons here. We’re going to go through and add more content as well.
Okay, so let’s go ahead and close that down. Let’s go back to Composer then. Let’s show how this is done. I got a view of the subassembly, which is that guy right there. You’ll see that translate. Once I go here, you can see this component. Everything else isolates or they get isolated out and add some color coding. Only thing I did here was isolated those components, color code them. You select the component, right? You color code it here, added some balloons, building materials popped up from the adding those balloons and then I just edited the text here to point or to call out what these components are with the right ball ID. Also, these buttons would just from the previous steps. And right now I think they are blank. You see there’s just nothing in there.
I need to add an event link to these components here. Now, of course, this file here doesn’t exist yet. We need to save it out as an SVG. The file that goes forward doesn’t exist yet and they filed. That goes backward. So they go back, actually, it’s going to link back to the top level gripper. So to do that again, we just go link, hit those three little dots. I go to the top level of Gripper, just make sure it pops in the field here.
I’m going to say okay, and then just a little highlight there, but we’re going to hit the delete button and his final project and there is the name of the file right there. Hit enter. Enter the name of the state, so I was able to find that there are good to go. Now I want to update that view and you’ll see. I’ll update the view after I modify anything.
That really just solidifies that I want to save that changeup just in case something happens. So with that, now I want to go to step one now. If I want to create a link on the main page, the top of the gripper to this. When somebody comes here and then click on this yellow image right here. I want you to navigate to this guy here, but you’ll see this one is view 17, so I need to name it.
Let’s go back and let’s call this a name. Let’s call it Servo. Where they call this civil assembly, one. We’ll just call it server number one, just something so we can reference it later. It doesn’t really matter what that is because we can always change it later or link to whatever we want. So we control the links so it’s not like that has to be named a certain name.
All right, so top-level gripper. Come back here, got our yellow block, who now we want to link. We want to point that to that guy there, which doesn’t exist yet. So this is what I’m saying. You got these sketches like I want to link to something but it doesn’t exist yet. So this is why there is a procedure that we put together to really follow to get this to work.
So take this guy now I’m going to uncheck views. I’m going to do a save as now in this folder on the server one. Now the reason why I have to do this is that I didn’t create all the steps at first. I traded just that first top-level assembly, that first subassembly and I exported those as the batch export for all the SVG files. Now I’m adding additional ones, so that’s why I have to save these ones out manually.
If I would have done everything at the beginning, say does SDGs, we’d be done and wouldn’t have to do this but you know, the world doesn’t always work that way and some kind of bunches here. So let’s go back here. Got that guy there is selected and I hit the three little dots.
When I come here we have server one server sermon, but what will use it? So there we go. So that’s the SVG on LinkedIn too. And of course I want to come in here and I went to delete everything but the name of the file, something like that. Hit enter.
And there we go. Okay, now I want to update this. So I’m going to update this to you and then I’m going to save this you back out because now this view is different than the one that I have saved offline. I’ve made a change to it. So I say save as. And because this is the name of the top-level gripper, I can find that here and it hit safe and yes, replace it. Now let’s go test it.
So right now we just created a LinkedIn pair in that website, just like that. So saved out, saved up. This guy’s an SVG. I modified this, appointed this, and I think I even made this go back to the previous fall, which is that top level.
Now, if I rename this to take away the hashtag, and it’s up to its view. By the way, you can go in here and you can click this button right here for design mode and we can test these links before we save them up. It looks like it is having an issue with that link, let’s save through. I’ll give this one last shot and then we’ll move on because, you know, that’s what happens when you go live here.
Alright, so I’ll save that, that should link up and it should work. So, you know, if you follow these procedures, even though if it doesn’t work live here, it’s gonna work for you because this is the way you’re supposed to do it. And I just gotta figure out what’s going on with mine. Alright, so now I click that and there we go.
I’m not sure what’s going on in there but at least it linked up. Don’t use the hashtag in the naming structure. It messed it up. I’m sure there’s an HTML reason behind that I just don’t know about. Now if I go and say, go back. Now I go back here, I should have a step one. Click on that.
SVG
Once everything is set up, like the template, you’ll see how easy it is to create the steps. And let’s say, I wanna say this is an SVG but I kinds wanna hide stuff. Because I said, “What is the first step?”The first step is I’m gonna take this bracket, I’m going to put on this servo and I need those four screws. So let’s go ahead and take these guys, hide them, take these components and hide them. By the way, I’m just using H in the keyboard to hide them. Something like that and the bill of materials going to update with whatever I have on screen. Here’s step one. Now I’m going to save this as, as service step one.
And you can either copy that and paste it here or you can type it in. I’ll usually copy and paste but I forgot to do that so I’ll just keep it her just like that. Now, once that’s done, go back to this one essay for the step one, but I’m going to link that to the Servo step one, which is right there and then I’m going to delete everything but the file name, which is that rate there. Now the very last step.
Now, I want to save this out as a server one just over the server one and then that will complete the link for everything that we have together right now. So now I go to the top level gripper and we go to this guy here. Now, if I could say go back, she’ll come back here. We’re here. Let’s say step one, it just shows you what is next. And then once I create this, step two, I go to step two, step two, we’d have these guys, this guy assembled there, this guy’s assembled here, the other part shown.
And then step three would be those guys work together. So it’s just one step at a time. It’s good to put all the steps together and just create the lease at the end so you’re not going back and forth, back and forth. But either way works. I just would prefer doing it all at the same time. So now that we have the basics down, let’s show how we integrate. Visualize into this. So this button here for the Composer animation.
3D PDF
This is just a gripper, component, the group or subassembly that very first one opened up and saved as a PDF. By the way, when you do a file save as pdf, there’s a little checkbox there that says Create 3D PDF that isn’t checked. We’ll print the 3D file.
But once that is, I mean this is a 3D model and it’s, it’s really nice just to have in your assembly instructions. You’ve got this 3D model, so you have your step by step assembly instructions, but it’s all SVG. You can actually rotate it. You’re like, can I just want to see the backside of this model so you can run a solar IQ, save at a 3D PDF, add that to your assembly and just like that, people can zoom in, look at different things.
It’s a little limited because we’re not using model-based definition right now. But we can incorporate model-based definitions. And have dimensions and annotations and notes and little turtles and full tables and everything like that. So really, but this is just a simplified version which I really like.
It just went simple cut and dry, 3D model and you get what you needed. We can link to here and so if I said how we do this author, let’s do an image to D, but also typically do is just place a place, a button, place a 2D image, go into the properties here. This is the map texture path. It’s this three little dots and then we can navigate this to a folder just to pull in and I can see I have a pdf. It’s not quite a 3D PDF icon, but it will work.
Now, once you have an image in here, if you hold shift and grab this corner or any four quarters and move it, it will scale the button to the size of an oriented aspect ratio of that image. So whatever the aspect ratio of the images, that’s what you have here. We’ll go ahead and update that. Now I just want to loop this button, does something, and now if I say the exact same process can three dots, we have our M 3D PDF, which is right there, and we’ll just go through and we delete anything that isn’t that file name.
It’s a 3D PDF. I’ll stop right there. Gripper, 360 PDF. Hit, Enter and update it. Let’s save this up. Let’s, let’s do one more button and then we’ll save it all at once. So we don’t do this again and again. We’ll just repeat that process again. So here’s the 2D text panel. We go to the texture map path, a math path hit that. The next one is going to be this other button here for a 3D icon. These are just images of the Google by the way. You can do this with text, with color blocks, with components, with balloons. Anything you can select, you can create links to or links with and link that to something else.
Play the Animation
We’re gonna play the animation, here is the 3D PDF and here is the 3D rotatable visualize photorealistic model. And of course, we need to link this to something so let’s link this to the final project, it’s gonna be this open HTML. I’m going to go to Visualize here in just a minute and show how we actually create that. And we’ll say, “Okay.” And then again, it’s this process of deleting all this stuff here.
Now I know everybody is thinking, “Well, it should be nice if you didn’t have to delete all this. There was just a little box that says relative link.” I agree with you. Well, we’ll make that happen. But as of right now, you’re gonna do it manually. So now if we go here, we update that. First, I just want to save the file, just in case. It’s good to do that from time to time.
Now I’m gonna take this tech illustration, I’m gonna save as a top-level gripper which is right there. Let’s give that a second for the process and we’re just about done. All right, I think that’s it, so here’s the top-level gripper. I have the build material on the way here. You have the button, we can make it work. Here is the 360 out of Visualize which is a photorealistic 3D model.
And again, this model here, you don’t have to have any special device or special plugins or add-ons or anything to view this. This is a 3D rotatable image that you can view on any device that Android, Mac, iOS, and PC. This is a JavaScript, so this is a bunch of JPEG images that are knitted together.
So basically if your device can read JavaScript JPEG images which anything can, then you can view this 3D model and you can make it as smooth as you want, how many images you want at the highest quality imaginable. So it’s a really, really cool. I’ll play and I’ll show you how this is done. It’s pretty slick.
Let’s back up here. And then that 3D PDF is kind of hiding behind the build materials here. But I don’t want to publish that again. I think I just had the panel for the build materials. I’m sure if you’ve ever had this happen to you, the bottom table I have it checked, uncheck that bottom table, resave it out and it won’t be there. But we’ll skip that step out if it’s necessary.
But I had my bottom table still checked and that’s why it showed up. On that 3D PDF, it would just link you to that one I already showed, the rotatable one from SOLIDWORKS. Okay, so on to the fun stuff here, so this is Visualize. And if you haven’t seen Visualize before, it’s a drag-and-drop application for the environment NS all the different materials and stuff. This is the gripper with Visualize materials added to it.
From here, you can save this out as VR content, as static images, or as an animation. By the way, if you do have any SOLIDWORKS motion animations, those will import directly into Visualize Pro, and you can render them out in photorealism which is really really slick. Even with that gravity and everything applied to it with motion, all of that will still animate in Visualize. It’s a really slick program for getting real nice photorealistic images just like that.
I go to say appearances will do like metal or maybe some of these paints. It’s just a drag-and-drop, so start dragging and dropping these-these colors onto your model. It really is that easy to go through and start coloring. That is pretty cool, to start just coloring it and adding your textures to it. And then there are the environments.
HDRI Environments
These are all HDRI environments and these images here will automatically map lighting which is really nice. You can also do custom lightings as Visualize Pro, of course. But this in Suburbia here. I’ll just take a second for it to load that environment. You can see the reflections in anything that’s shiny and it’s gonna be pulling that lighting off of the environment. So whenever there’s the sunlight coming through the trees there, it’s going to be casting that onto the materials, something like that. So really, really slick output in just easy to easy to manipulate in the software here, you go to tools, render to once you’re happy with what you’re seeing on screen.
Now, if you just say a JPEG image, just a standard render, like I printed this up to the dust of it would take a few minutes, I will skip this process, but it was at that same rendering that I had in the power, which I’ll show again here. You basically say, I want this size, I want this resolution to pass us. And you can render that or sending some secure or just a render it out.
That gives you a static image. Now, if you want that 360 rotatable model, all you have to do is you go to render passes an image and output mode. And it’s an interactive image. So there are a few options here. There is render, and then, of course, all cameras, I’ll condense if you have configs and cameras, you can match render those which is really sweet.
The panoramic and the interactive image, these are unquote outputs. And so the panoramic is like if you’re going to put yourself in the middle of a room and you’re going to look around and you see all the things in the walls and you know, you look at the sink or whatever it is inside that room. And then the interactive image is the one that I’ve already rendered out that has the basically puts it on a pedestal.
You can rotate it around and take a look at from all different angles. Now the interactive image is going to be a lot longer term than a static image. Let’s say a static image takes 10 minutes depending on if it’s like 4K or 700 on a decent machine. And then you see here that I have eight orbits.
This is like a spirit when you’re going to go around it, the eight different times. How many images per orbit? So that’s 36, that’s 36 times eight for that, that rendering that. So that’s how many images that’s actually creating. And when I go to the images here, they can see the images for the rotation. If I’m just stumbling through the images here, these are just jpeg images.
But it has to render out each one of these. So that’s why it’s gonna take a little bit longer. This one I did it took 16 hours to around. It’s not an incredible amount of time, but it’s not 10 minutes to save out that project. Once you have it, then it adds a lot to, a lot to your publication as you can say, here’s their rotatable, 3D PDF, and here is the interactive image.
Conclusion
Here are all the steps to put this together and everything you need to actually assemble this product. And the best thing about this whole output is it’s available on any device so you don’t have to have anything special to, to view this content, which is something that isn’t easy to say in most cases. But in this case, we will totally say that, hey, if you develop your publication this way, the step by step assembly instruction, you put that out on the internet or even if you’re using it internally. Any device on the shop floor, any device your customer has, any device, your inspectors using innovation, you’re like onsite operator or the guy who’s actually repairing the equipment, whatever it is he has, he will able to view all this content. I”m happy with the way that this is coming together.
With Stahlberg speaking output, the 3D PDF with the additional model-based definitions in for that, we could include the key my data, notes, tables, and things like that. Composer does all the setup. So that’s going to be the coloring, the isolation of components, a textbox renaming of parts and doing a ballooning build material in the laying that out in a step by step format. We can link to exterior files. Just remember to take that string and fleet the file location and just leave the file itself, everything the same folder. So, when it’s moved to the internet or wherever you’re gonna move it, it will all bring together. So, Composer has a full animation timeline. You can animate in there and publish out as a video.
Then, link that to your final deliverable as well. And then this whole project here was the vector, SVG final for the final document And SVG, that’s the background behind all this because, standard vector graphics, any device can view it. And that’s where you’re gonna be able to create your step by step assembly instruction. Or step by step, whatever this manual is for. And then view that when in the device. Visualize is the cherry on the top. So, that’s the photo-realistic images and interactive 3D content for the web. Here’s what it actually looks like. It’s a really powerful tool and that about wraps it up here.
If you’re interested in learning more about creating an assembly manual with SOLIDWORKS Composer or SOLIDWORKS Visualize, our experts in your area would be happy to go into more detail about your needs so GET STARTED TODAY!


