The SOLIDWORKS Flow Simulation engineering database usually has everything we need to run simulations. However, there are rare times when the database is lacking, and you may be required to model a fluid yourself. Luckily, it is quite straightforward to create and use user-defined fluids and run simulations with them. Here are five steps to creating a user-defined fluid in SOLIDWORKS Flow Simulation!
Step One | Finding the Fluid Properties
Before we even open SOLIDWORKS, we need to find the properties of the fluid that we want to run simulations with. For this example, I will be finding and using the properties of olive oil. Note that for gases, compressible liquids and non-Newtonian fluids, you will need some different properties. However, the principles discussed here are going to apply to every type of fluid. Also, it is important to keep in mind the units that SOLIDWORKS expects; the default (SI) units are listed with the properties below, but they can be changed in the engineering database options menu.
For defining a liquid, you will need the following properties:
- Density – kg/m^3
- Dynamic (Absolute) Viscosity – Pa⋅s
- Specific Heat Capacity – J/(Kg⋅K)
- Thermal Conductivity – W/(m⋅K)
One of the strengths of SOLIDWORKS Flow Simulation is its support for temperature dependent properties. You can input properties at several specific temperature values or as static values. Be aware that for temperature dependent properties, the default temperature units are Kelvin. Now, there is the issue of where to find these properties. While a google search can be a good start (I would recommend searching for the name of the fluid that you want followed by fluid properties), results are often unreliable or of dubious origin. If the fluid is well-researched, the Engineering Toolbox will likely have all the properties that you need. If this fails, you may need to look in the appendix of a fluid dynamics textbook, the manufacturer’s data sheet or even look in research publications to find the properties that you are looking for.
For this example, I found several research papers on the various fluid dynamic properties of olive oil and used their data for the following steps.
Step Two | How to Arrange and Keep your Data
Once you have found the properties you need, it may be required to arrange them in a way that is easier to input into SOLIDWORKS. It is often necessary to convert the units to standard SI units (or the ones of your choosing). Even if you have found all the properties in the correct units, I would still recommend saving them in a file outside of SOLIDWORKS as a backup because a SOLIDWORKS version update can purge your default database. One of the best ways to save the material data is in a spreadsheet. Spreadsheets are also ideal for creating statistical models of fluids and then creating tables to be able to input them into the engineering database.
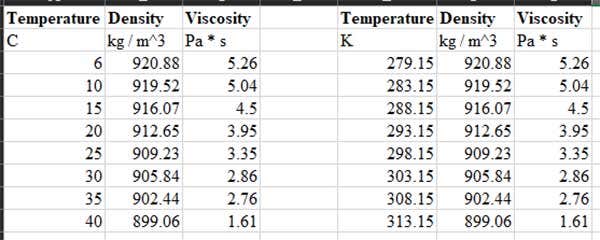
Below, I have copied and pasted density and viscosity of olive oil from a journal article I found into an Excel spreadsheet. In the right set of columns, I converted the property values from imperial to SI. Note that I’ve placed the temperature column on the far left and order of the other fluid property columns. Arranging them like I have will make inputting them into the database easier.
I found the specific heat capacity and thermal conductivities for olive oil from different publications and made similar spreadsheets to the one above.
Step Three | Creating a User-Defined Fluid in the Engineering Database
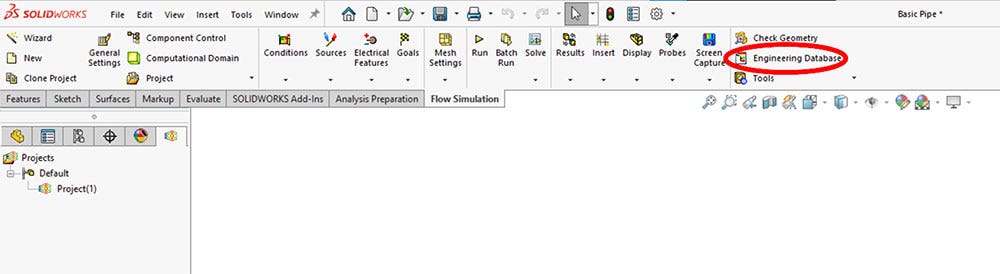
After all this prep-work, we are finally ready to open SOLIDWORKS. To give the software the properties that we just found and compiled, you will need to open the Engineering Database on the Flow Simulation tab of the command manager.
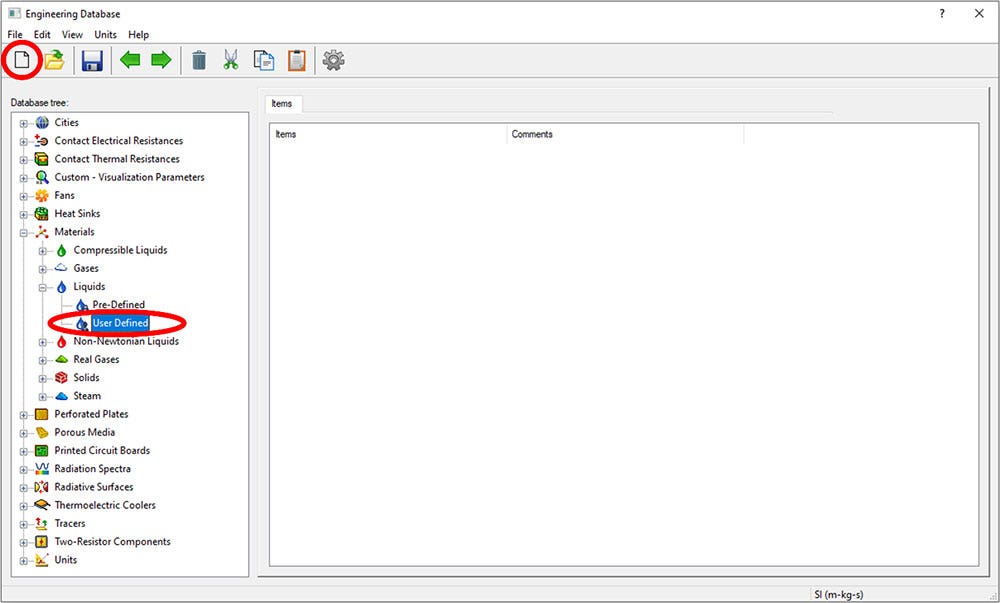
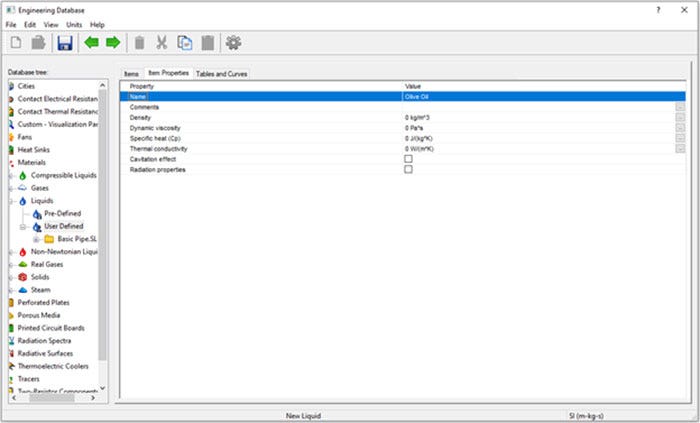
From here, you will need to navigate to the type of entry that you want to create in the database tree. In our case it is going to be liquids. Note that for each class of item, there are the pre-defined entries, those which SOLIDWORKS already has for us, and user-defined ones. You will need to navigate to the user-defined section in order to create a new entry. From there you can select new item from the toolbar and a new liquid is created.
Step Four | Inputting your Data into the Engineering Database
Once you have created a new fluid, you are automatically taken to the item properties tab for that fluid. You will need a name for the fluid, and a non-zero value for each of the properties that SOLIDWORKS requires. The Database will not let you close until a value is inputted for each property. If you need to close out of the engineering database before you have finished entering values, put in an arbitrary placeholder value so you can close the window and edit later.
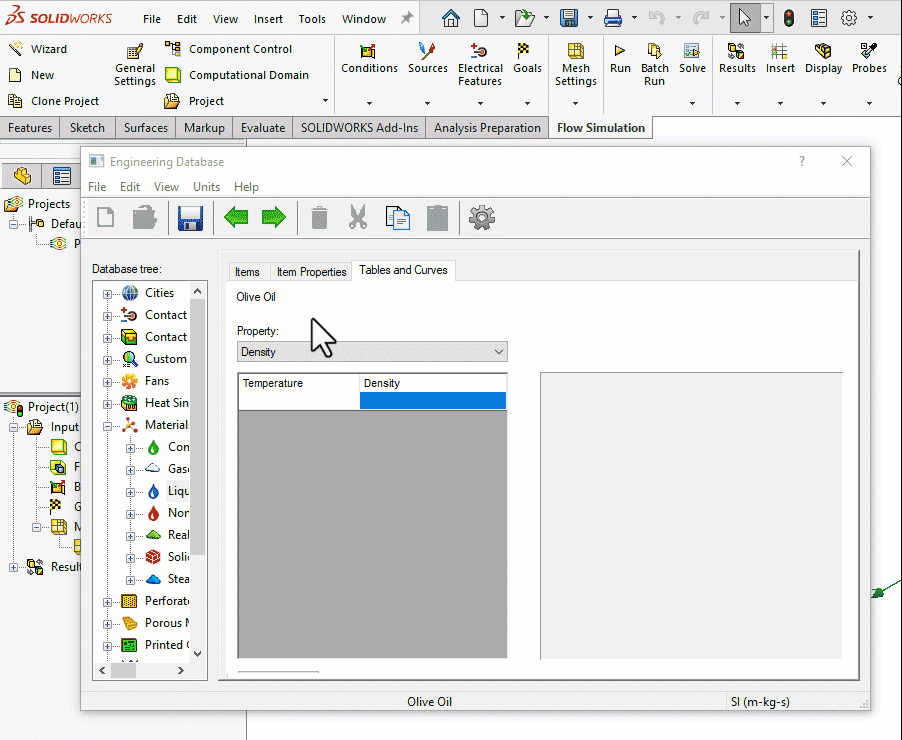
As mentioned earlier, you can input temperature-independent values for each property or as a function of temperature. To input temperature dependent values, you need to go to the tables and curves tab. In the dropdown menu, select the property you want to input, then simply copy and paste from your spreadsheet into the table.
A trick that I like to use if I have several properties all at the same temperature values, is to hide the column of the property that I have just inputted then copy the next set of values, as below:
This is easier than ctrl-selecting two separated columns or needing to have a temperature column for each fluid property. Note that this does not work if there is a missing value at a given temperature point in the middle of the data. However, this is relatively straightforward to remedy in your spreadsheet. All you would need to do to is create a new column for the temperature for that specific property and remove the temperature cells with missing properties.
For example, I found the values for specific heat capacity and thermal conductivity in different papers and measured at different temperatures than those of the density and viscosity. All I need to do is copy and paste this value into the engineering database. The temperature values do not need to be the same for each property.
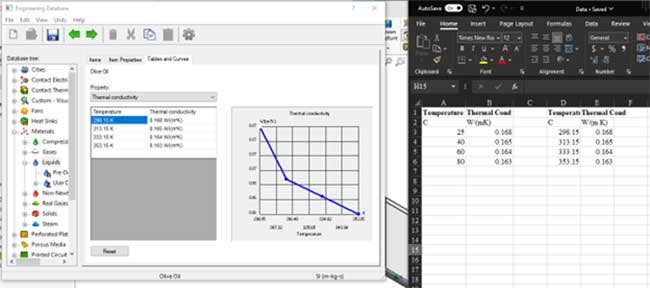
One thing to keep in mind is that SOLIDWORKS linearly interpolates between the points for each property. If you need finer precision, you need to find a larger set of data, one with more temperatures. If you cannot find a larger dataset, you may be able to interpolate with a different method (cubic, spline etc.) in your spreadsheet and use those values to get a smoother property curve.
Step Five | Using the Fluid
Once you have input all the properties from your spreadsheet, you can save the fluid and close the engineering database window. You can go back into the database and edit a fluid or even export it to be used by another user. All user-defined materials are stored as .xml files in “C:ProgramDataCOSMOS ApplicationsFlow Simulation [YEAR]” by default. This can be changed under Flow Simulations -> Tools -> Options -> General to a shared drive or to a folder that will not be overwritten with a version change.
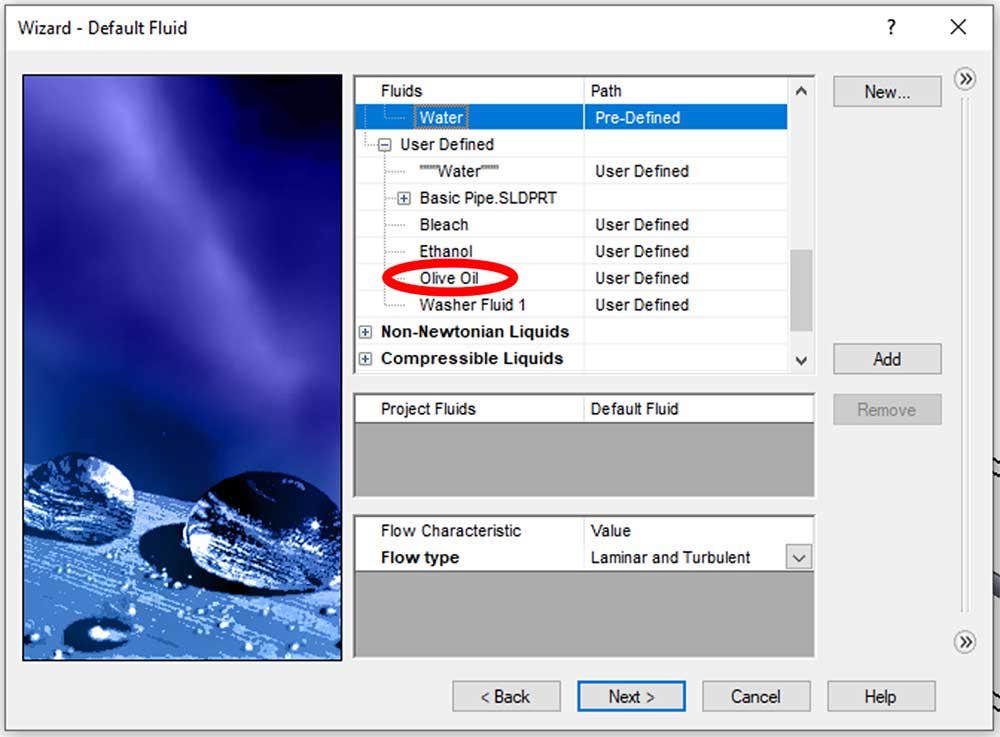
Once you have saved the user-defined fluid, you can use it as you would any other fluid in SOLIDWORKS Flow Simulation. You can add it to a simulation from the wizard tool or add it to an already existing project in its general settings.
Conclusion
While it can seem a bit daunting at first, creating a user-defined fluid in SOLIDWORKS Flow Simulation is relatively straightforward if you follow these five steps. Often the most challenging part is finding the properties of the fluid you want and converting them into the appropriate units (again, spreadsheets are your friend). Once you have the properties, it is very easy to input them into SOLIDWORKS and run your simulation.
For more information, check out our YouTube channel or contact us at Hawk Ridge Systems today. Thanks for reading!