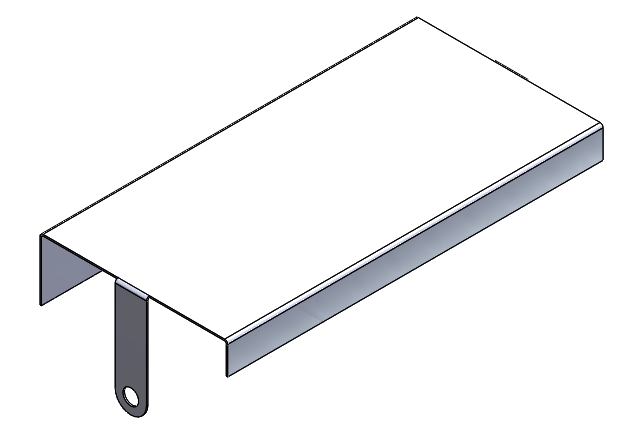
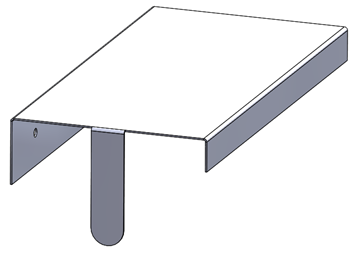
When you come to a sheet metal part with an odd shaped or partial edge flange
you might realize that the usual select and size approach it not going to
work. You are stuck trying to decide if you should just use a normal
rectangular edge flange and then cut away the excess and drill a hole or
attempt to use that mysterious Edit Flange Profile button, if you have been
alert enough to notice it by now. What is the difference? As you can see in
the example part below, the resulting geometry is the same and they will both
give you the same flat pattern. Why should you use one over the other?
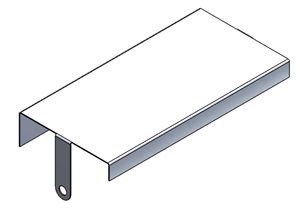
Edited Flange Profile
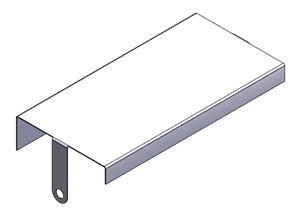 Cuts & Hole Wizard
To make sure we are all on the same page, let’s take a look at how I got to
this point from both approaches.
Method 1: Normal Edge Flange and Cut
I am going to assume you can figure out how to get the Base Flange and first
set of Edge Flanges, so we will fast forward to the point where we need to add
the unique flange. First, I am going to select the edge I want to apply the
flange to and select the Edge Flange command from my Sheet
Metal Command Manager. (Yes, you can select the edge after you invoke the
command but why wait? Time is precious!) Next, I need to click in the
direction and approximate size for my new flange. Finally, I dial in my exact
desired dimension and now, we have the oversized start of our flange.
Next up is the cut in order to trim it down to the size I am really after. I
make a sketch on the face of the flange and convert the top and bottom edges,
draw in a couple lines and an arc to designate the areas I want removed.

With that sketch, all you need to do is perform a
Cut Extrude to the vertex of the bend and your part is
looking better already.
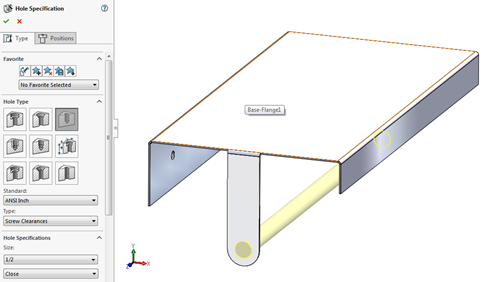
The last feature we need for this approach is a hole, let’s bring on that
wizard. By clicking Features > Hole Wizard, I set the size
to my specifications and place it concentric with the arc accordingly.
So there you have it, three steps later and we have made our boss so very
proud of the little designer we have become. Now let’s explore the option you
will probably use going forward.
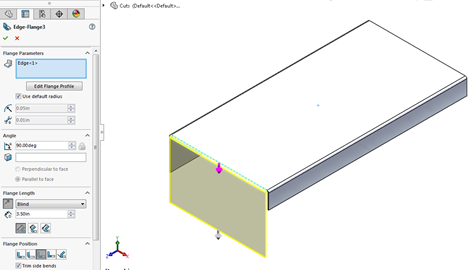
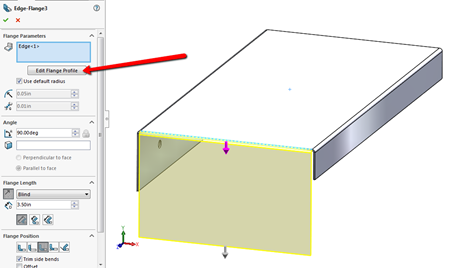
Method 2: Edit Flange Profile
Again, starting with our Base and Edge Flanges, we are going to use the same
first step as above. Select the edge and click on the Edge Flange command. Go
ahead and make that second click to place the flange in the appropriate
direction. Now, we are going to deviate from our first method. Before you give
your flange a real dimension, go ahead and click on the Edit Flange Profile
option. [Cue Twilight Zone Theme Song]
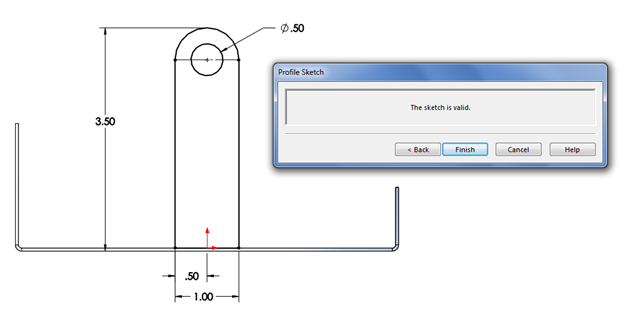
You should now be looking at a plane old boring rectangular sketch; in 2015
and newer that is, all previous versions would show a single line to define
the length of the edge flange. You are probably thinking, “Okay, now I just
modify the sketch,” and you would be correct. The Edit Flange Profile option
gives us the chance to sketch in the real profile of our edge flange and skip
all that rectangle with cuts non-sense. We modify the sketch to look like the
inverse of our sketch in the previous method, and we can even go so far as to
include the hole right inside our profile. That’s right, it’s a contour within
a contour. With the Edit Flange Profile option, really all you need is some
sort of closed contour that uses a portion of the edge it will be bent from.
Then you can get as creative as you want with the design or internal contours.
The profile sketch pop-up will let you know if what you have sketched is going
to work for an Edge Flange.
With the click of the Finish button, we have the same
geometry as before in a third of the steps.
Try all you want, and run all the utilities you can, these two parts will be
geometrically identical. Flatten them, they will have the same the exact same
flat pattern. Why should you learn this way of doing your design instead of
the old faithful cut? Time! Why waste time doing extra steps to add the cut
and hole when you can do it all from the Edge Flange command?
You CSWP types are probably thinking, “Hey, I can do the cut and the hole in a
single multi-contour cut, so are you really saving me time?” Thank you for
asking, and yes, I still am. Not only do you get to skip the cut step itself
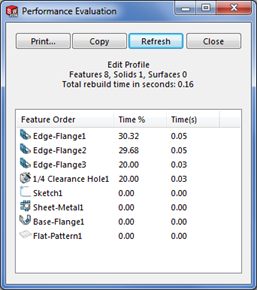
saving design time, but I am also saving you rebuild time. Go to your
Evaluate tab > Performance Evaluation.
Sure enough, the Cut Extrude accounts for 33.48% of the rebuild time.

With Cut
 Without Cut
Sure, that only adds up to 0.08 seconds which is less than a blink, but this
is only one simple part. Let’s say this part is 1 of 1000 in a larger
assembly. Do you really want to spend over a minute each time that assembly
rebuilds thinking, “He told me so”? If you don’t just design simple paper
towel racks, your designs probably have more than one such tab on it. Now, we
might be talking even more time to think about your actions.
Ultimately, the choice is yours as to how you would build this part. Both ways
produce a valid part that manufacturing will be able to build to your
specification. However, it is clear that simplifying your tree by using the
Edit Flange Profile over an extra
Cut Extrude not only makes you look more proficient, it makes
your designs more efficient.


