Hi everyone. Scott Woods here from Hawk Ridge Systems. I’m the product manager for technical communications suite and that covers SOLIDWORKS composer, visualize, inspection, and model-based based definitions, MBD. Today’s view, What’s New for SOLIDWORKS tech comms we’re going to be covering the highlights.

Video Transcript
Starting off here is model-based definitions and what I’d like to show here is just the highlights. If you guys are unfamiliar with what model-based definition is for SOLIDWORKS MBD, it’s an add-in to SOLIDWORKS. So, it doesn’t work outside of SOLIDWORKS. It does work natively within SOLIDWORKS, and uses the existing DimXpert data as a foundation to create all of the annotation views and then combine that into either a PDF or an eDrawings template that you can then distribute. We can also view all the state, of course, natively, directly in SOLIDWORKS without actually publishing it out.
Sheet Metal Support
So, there is that way of using it as well. The big one today is sheet metal support, and this is huge. This is something that you guys have been asking for. It’s really good to see SOLIDWORKS, actually taking those requests and putting them into action. I’m really proud to introduce a lot of these things that we’ve been waiting for a little while. The first one here is sheet metal support. Let’s go ahead and just show that. Before, we literally had no sheet metal support and no definitions. It wasn’t compatible.
PMI Data
Check out the PMI data on here. I’ll be talking a bit about PMI data today. One big part of another component this package which is composer will actually import this data. Now, things like model-based definitions, inspection, and composer, they work really well together because of all of that data. It just goes across between the different options. So, we’ve got that data. Now, what I’m going to do is I’m going to go ahead and jump over to the tree here, and we see that this is sheet metal. We got this flat pattern. If I were to click on that and just say that we’re going to insert the bed notes, just like that because I’m going to create a model based definitions bend table, which we just couldn’t do before.
Here we got our bed notes, so we’ve seen notes, down, up. Here’s our flat face here, and now we go ahead and we want to insert that table. So now we’ve got this new table. I’m in the model-based definitions. There’s our table and now we can go ahead and say we want a bend table. We’ll say, you know, define how you want that laid out. We go and to place it and then we can go ahead and just place it how we want. Now we have bend table with bend notes inside the model-based definition. This is a big one if you have been waiting and holding back on model-based definitions because we couldn’t do bend notes. A lot of the sheet metal capabilities wasn’t in there and now we have it. And then, of course, we can add this 3D views like capturing that view and save that as a PDF and the eDrawings and it’s just really slick that we can do that.
Now, the other part I’d like to show here, and I’ll just switch up the model, just something a little bit more. Just something we can get some annotations on, like this guy here. It has quite a few of this um, GD&T on here and then we have various views with different angles and some notes. It’s a really good model just to show all those little caveats of model-based definitions. And so what you get with model-based definitions is the independent 3D views. I’ll be able to break those out with separate PMI on each. The first one doesn’t have any data and the right one has this additional data. But the What’s New for model-based definitions here is that when I say Publish to 3D PDF and I click on that, I get this. Before it would just say, “Oh, Choose Your Template.” and say all your settings. And you go to save it out. Well, now we get this preview here. Let me actually choose a different template here.
What I’m gonna do here is I’m just gonna re-open SOLIDWORKS and let’s jump in and we’ll just re-open that part. But what I want to do is I wanna choose my model-based definitions template and then using that template, I will define some rules to it. Say, I’m gonna pass for protecting it and I want to basically lock it down and protect that data so you can send it outside your company without worrying about losing any information. I’m just going to hook up there but we’re back on track. So we got our– our 3D views.
And now when I say model-based definitions, and I say let’s go ahead and publish that. This is what I was looking for. This was supposed to pop up last time. And then I say Browse. You can have templates in different locations and you can just point to those templates. That’s what I’m doing right here, I’m just pointing to an existing template that I have that I would like to use. And then that’ll be added to our list of templates. Because there is a template editor with model-based definitions that we can use to fully modify the template and then use it.
As soon as I say, “Okay”, it’s gonna give me a preview. And this is the What’s New for 2019 here, where previously it wouldn’t do that. It wouldn’t tell me exactly what it’s gonna look like. I had to kinda guess what it was going to look like before I actually published it. And now I have a live feed saying, “Hey, this is actually what it’s gonna look like before you spend the time to push it out as a PDF.” There’s a lot of benefits there, just for time savings. Let’s go ahead and say the thumbnail views I want in here, I’m gonna add these guys there just by selecting them and then I get the live preview update showing me these different views just like that.
STEP 242
This is not new, this came out a couple years ago. You just might not be aware of this. I’m going to talk a little bit about what a STEP 242 is. Did you know that a PDF file can have attachments? I can say Attach Files and I can go and I can select another drawing, a video, anything I want. And I can actually use a PDF file kinda like a ZIP file and I can attach files into it. I can do the same thing here. So, if I want to, I can attach things, or I could say Create and Attach a STEP 242. What that’s gonna do is it’s going to take my model, it’s going to convert it into a STEP file and STEP 242 supports PMI data. Any of the Dimensions, the Annotations, the Notes, all that stuff will actually be part of that STEP file. Right now it is basically visual data but, this is the first step toward going full 3D. It’s not quite there yet but we’re one step ahead of the game here. We’re prepared for that moment to come when machines and everything else catches up. So, it’s a really cool, really cool publication there.
Add BREP Data
Accuracy, this is new in 2019. So you can choose to add the BREP data to your PDF or you can choose to just add graphical data. If you do add BREP data, what that means is actually adding model data to the PDF. So that can be a little bit concerning if you’re gonna be sending the file overseas and you’re worried about reverse engineering and things like that. Now if you say Show Only Graphical Data, there’s no BREP model data in the PDF and so you can’t actually extract a 3D model out of it. It’s just you view it on screen, you can print it, that’s all you can do. You can’t measure or anything like that. It’s also gonna make the footprint of the PDF a bit smaller.
Not a huge amount, but it is going to reduce that. It’s gonna increase performance if you are dealing with a large PDF or something like that, you’ve got to email it. There are really good benefits there as well. And then the last part I’m gonna show here is the ability to kinda lock it down. You see the following features to 3D PDF, you can disable printing, disable editing, disable copying. People can’t even make a copy of the file. They can’t print it. You can password protect it. This really goes to that next level of security to make sure that your data doesn’t get into the wrong hands.
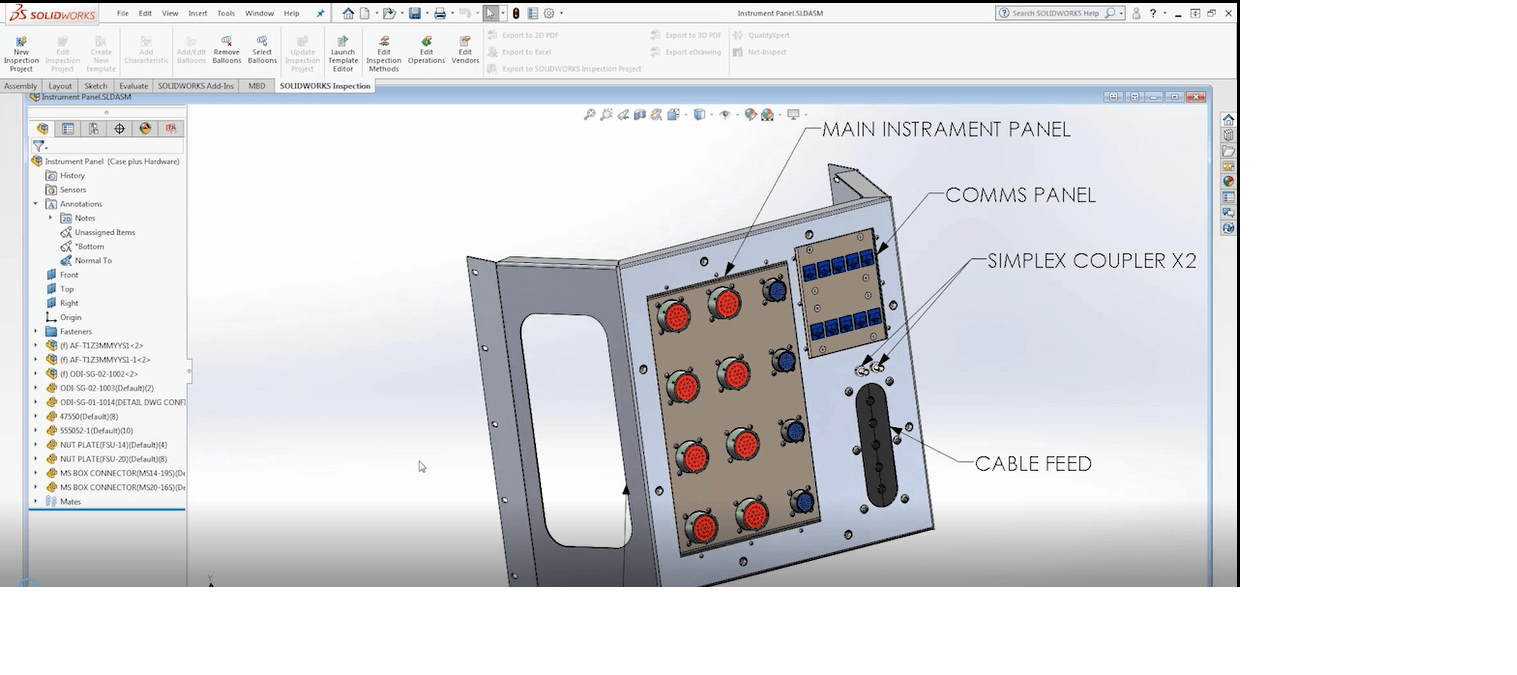
SOLIDWORKS Inspection
Let’s go down to the inspection. Now I’m switching gears a little bit. I’m going from our model-based definitions software to our inspection software. And if you’re unfamiliar with inspection, when you purchase inspection, you get two versions of the software, that come together. They’re not separated by cost or anything like that, I should say. You get both a stand-alone application. This is an application you can install in any machine.
Optical Character Recognition (OCR)
It has lower system requirements that it doesn’t need an engineering station to install because it’s just reading PDF. So, much less when it comes to performance needed. And you don’t need to have SOLIDWORKS installed in that machine and you don’t even have to own SOLIDWORKS. So even if you didn’t own SOLIDWORKS, you can still take this application and you can install on the machine. And what it does is that it reads PDF files and uses what’s called OCR, and that’s Optical Character Recognition. It looks up the text, defines it, and prints the inspection report after that.
Additionally, you also get an add-in for SOLIDWORKS. So, if you are running SOLIDWORKS, if it has an add-in, installs an add-in to SOLIDWORKS, that allows you to work directly with the SOLIDWORKS drawings, which is really beneficial because all of your information is in the drawing. So there as custom properties and as metadata and you can utilize that to then automate the entire inspection process. If you’re going to be using CMN reading that back in, you can export from the add-in to the stand-alone, reading your CMN data and automate that final process as well. It’s a pretty slick process.
Let’s talk a little bit about the stand alone. And really I just wanna talk about how it is now fully integrated with PDM. This is a big one. It’s like, “Let’s integrate it with PDM.” So, of course, that makes total logical sense. The stand-alone before was just the files, PDF, and etc. Now, it has full integration support. And as like a little extra bonus with that, it automatically populates your data card with your custom properties. So, that’s really neat as well.
Let me go and show what I’m talking about. Here is SOLIDWORKS Inspection. I currently don’t have an inspection project loaded but let’s just jump in the vault and pull one out. If I say file, open project, you’re gonna see that I can navigate into the vault. I can check it out. I can check it in, I can check it out and get the latest copy and things like that. Everything that you would expect from PDM, we can now do. It’s gonna open it up. Let’s go to the properties here. It’s actually these properties right here. So you see like the part named part number party vision. And then we can do custom properties as well. And the data card, just like any other PDM data card, you can edit it and you can add-in those custom properties, that just the field for it, and you can automatically populate that data card.
The whole point of that is so you have this data that resides in a PDF and it’s trapped there. You can’t get it out. Again, there are ways to pull the data from the excel file, but in the PDF, you can’t. This just gives you another vehicle for that information. Now, in PDM, in the data card, we can have this data and we can reference that from outside sources or just, I don’t wanna open up with the project, you should have the data card and get instant information. With that, if I now go to source PDM, I got a brand new tab for this and let’s make a change to the drawing. Let’s use this guy here so if I go to dimension and let’s go ahead and lock that down there. And I’m going to go ahead and dimension that guy there. I just like to show that with these kind of dimensions that you can actually use OCR on the dimensions here and I can say oh that’s that there and click this here and say that is that there and there we go so we got our plus and minus three and four and it does the upper and lower limit.
Now we’ve modified this inspection report and you’ll see this is finished, we go and export it and all that good stuff, I will do that from SOLIDWORKS but then we’re like, “Okay, I’ve modified, I’ve fixed this report, it has what’s needed and know I can check it back into the ball.” It’s going to ask me to save it, of course, but if I go ahead and check in, see as I would like to save it and then here, so we go and check-in and there we go and now it’s all revision controlled this way and then go ahead and do that.
In my opinion, that’s a huge step in the right direction for inspection. We want to be able to record all that revision data and now we can. Now let’s jump into the add-in for inspection. Back into SOLIDWORKS because I had that little hiccup there, I lost the project I had open so let me go ahead and reopen it up here. I had it open from the Vault but I’ll just pull it direct. Let’s take the part, I guess I could open up both of the same time but this works too, all right let me get the drawing.
Inspection Add-In
How the inspection add-in works is you just enable the add-in and then we have this new tab, it’s just SOLIDWORKS Inspection. I’m ready to do my inspection report on this drawing here. We have the custom template properties and whole table extraction. If you’re not currently using inspection, this probably doesn’t make a whole lot of sense but let me explain to it because both of these I’ve had requested multiple times and then we relay that back to SOLIDWORKS and they made it happen, which is really cool in my opinion that we actually made some stuff happen.
We go back to the report here, I have a whole table before that we just couldn’t inspect it, it wouldn’t see it, we’d have to bring it into the add-in and kind of do it’s kind of a sideways method and now it just works and works well. I go to the new inspection project. I use my template there, this here is the new area so we’ve always had the properties here so we could always see like the part name. Let’s choose the custom property, we’d use the drawing title you know revision. There’s the revision for the part and so forth so you can just go ahead and you can use the metadata, the custom properties in SOLIDWORKS to populate all of this data.
What we didn’t have before is this custom property field here and I know a lot of you have been asking for this and so it’s very beneficial that we can add this to the template so it can be part of your standard process. I can add this data to the data card and add it directly in but basically, there’s a huge list here of different things you can choose from so you can say, “What’s the vendor number and I can go ahead and reference a value here. I can just type in whatever it is. You can also go in here and you can just type in whatever you want to like I don’t know just test just as an example, you know, I’m just showing that we can type in whatever you want.
You can be totally custom or you can choose from the drop-down and then this could be part of your standard project so this is really big here. This is all the same here and if I go to the next page, I have additional little checkbox here for call-outs. We’re not just going to auto-exclude so they are each in their own individual bill of characteristic number. I’ve noticed from past experiences with our customers as typically what is needed, but you can have the option to control them.
By the way, if you’ve never used Inspection, you just say “Hey, I want to include everything or I want to just whatever is marked for inspection reference or basic dimensions so we can choose what we want if you wanted the GD&T, if you want to do the notes etc. These are just checkboxes, this is an automated process within the add-in to get your inspection process completed and quick so I’m going to go ahead and just say next here’s my tolerances, the checkbox and so all that’s processing. This add-in is very powerful. It has a lot of good tools. The standalone does have additional features and if you’re running a CMM and you want to then take that CMM data, PC DMS data, or whatever it is you wanna push back in and automate the actual measurements, that has to be done in the standalone currently. So we would take this project we just made, we’d export this to inspection, and open up the standalone and do that.
We got the whole table. We got our balloons, here’s our billed characteristics here and I’ll just take a little preview here. This is new as well. Before the bill of characteristics, in the add-in, it didn’t look like this. It would list them up and now it listed out as you would see it in Excel, so it is much more like standard what you would expect. There’s whole call-outs and then various other measurements there. Now, I would export this, so I’m gonna go in export the Excel file and you need the AS9102 and I’m just gonna put them in the desktop.
We’re gonna export both the Excel file and the 2D PDF. Let’s export that file as well so it’s just if I can locate that real quick. We have our balloon PDF and then we have our Excel file to compare that and, of course, if you wanted to automate the results with the CMM that would be done in the Standalone application and just reading in the file then it connects it. It does a pretty good job. If we do this manually, you just type in, you know what the actual measurement was and if it’s out of tolerance, it’s gonna be red and if it’s within tolerance, let’s say this 5-9-8 gonna be green something like that.
SOLIDWORKS Visualize
Now we’re taking a little bit of a switch up here. I’m doing a little switch up here for SOLIDWORKS visualize. If you’re unfamiliar with SOLIDWORKS Visualize, it’s important to identify the differences between SOLIDWORKS Visualize and SOLIDWORKS Composer. Visualize is our photo-realistic ray-traced render. It creates animations, photo-renderings, and it creates VR content. It is very graphics card-heavy. The whole point of it is that it uses Nvidia CUDA technology including the new RTX cards and the GTX series and Quadra. It uses that graphics card to-to produce the graphic-graphical data and it does a great job at that.
It has 10X faster rendering. What that is, is it’s an artificial intelligence denoiser that you’ve run and it denoises the model and it does a really good job. We’ll show that real-time here and then we have the ability to import MDL and PBR materials. If you had a concern in the past or currently, of importing the Nvidia type of materials, we can do that now. Before it just wasn’t compatible, but now, we can use those materials in our renderings. You can’t modify them. You can’t change them but you can use them. If they already exist, you can use them, so that’s a huge benefit there. And then, we’ll talk about Physics. I don’t wanna talk about that too much right now, we’ll get back to that. It has a lot of potentials. It is brand new, but we’ll show that live as well. So let’s jump over to Visualize. With Visualize, if you buy Visualize Pro you get what’s called Boost and it’s an additional application, it’s a server software. You can install on another computer and another server. What it does is it allows you to basically steal the power of that other machine while you’re working in Visualize and also of course during working and then also rendering. Instead of using power from one machine, you can use the power from two, three, four however many you want. Each one takes an additional Boost license but you can node those together and you can use all that power. It’s really, really cool, I wish that all applications have this capability but it is pretty unique to Visualize.
Denoiser
I’m connected to another machine, I just want to use that because I want to show the denoiser live and the best things way to do that is to connect to any other computer. It’s not super fast, it’s a Dell 3600, it’s an older machine, but it has two GTX 1070 cards in a 270 TI cards and that’s what’s running the power here. Let’s show the denoiser so first of all, let’s connect. Let’s take one second now we’re connected to the server so now if I were to zoom in and try to get a good look at this here. What I’m doing here because I said my top passes to a 150.
If you have ever done any renderings, you know renderings typically start at like 400 passes, four to 500 passes and then if you want a high-quality rendering, you might do a thousand or 1500 maybe even 2000 passes, basically, every pass of the software cleans up the model more and more. You’ll see right now, I did 150 passes which typically would even be considered for marketing or any kind of publications. 150 passes aren’t enough for quality but this looks really good at a 150 and it’s the new denoiser have turned on right now.
So you see here and we go ahead and show this one last– one– what the second time here so if I rotate it, just that refreshes the passes right now I have the denoiser turned off so for 150 passes, I wouldn’t consider this prime time, you see that the noise here looks like artifacts like the pixelation going on, that’s just because you know, to remove that, I’d probably want 500 passes, a thousand passes and it would remove that, now if I turn on the new denoiser, you’ll see it’s the same amount of time so it doesn’t take any more time to render but in that same amount of passes, you’ll see already at 50 passes, it’s looking really nice already and we get a 100– I don’t even think we even needed a 150 probably could have stopped at a 100 and now you’ll see that cleaned up, so let me show that again, so I’ll just kind of pan it see all the all the noise and soon as I let go and see the passes and it smoothes it out like that and it’s already at 40, it’s looking pretty good. Now if I were to turn off the denoiser, you’ll see that it takes it much longer to denoise the model to really clean it up and make it look photorealistic but 100, 150, I probably would want to push that pass at least past 500. It’s 10 times faster and from my testing, that’s very, very accurate.
Physics
Okay so that’s the denoiser, now the last part of Visualize here is the physics so bear with me I’m still learning physics. It is brand-new so there’s not a lot of documentation for anything right now. It will show this. So what it is it’s really initially meant for the automotive industry. It’s brand-new so this is what it’s available right away, and it’s available to everybody right now so it allows you to take a vehicle, define its wheels, define its calipers, define its speed and it’s weight, and it’s suspension. It is geared toward the automotive industry right now and allows you to turn that down. But, I can see this evolving into some really cool things. It does have real-life physics so you define the ground, you define your object if you put the object above the ground and drop it, it will land on the ground, you can do a shake so there’s like, I have seen a couple examples of like cups with pencils in it. You can shake it and you can make the pencils fly out and things like that.
Let me go ahead and zoom out so we can see it then something like that. I just want to be able to see this guy moving. If you guys want to test this, you want to make sure that you’re on model select mode and you select the model. Once the model is selected, there’s a new physics tab so you go to physics and then you can define what you have.
If I said like a dynamic, or if I made a static model you can make objects like a cube and say that’s static. I’m moving into another object that’s dynamic. It’s going to move and then you can crash the model move into the cube. We’ll say that this is a car, there is a vehicle wizard and there is an automatic mode setup. That’s assuming that your car set up perfectly. The manual mode already have this set up here but you define the models you just select on the tree, you select it on the model here you define your models for the right wheel for the front right rear, rear left, front left. It’s pretty standard stuff and then you define your calipers that’s important too. I know that those aren’t going to spin with the tires but they’re going to turn with the tires.
Okay so with that we have our physics, our car defined what parts are going to be moving and they will say, okay what do we want to do? Do you want to use a controller so you can use a control and you can move it and you can drive it around kind of like a video game. I’m just saying you can have it drive straight. I’m not going to have a turn. I just want to have it turn and drive in a circle here. You can specify that. From what I can tell it only turns right. So the turn isn’t like turn right, turn left, it just turns from what I can tell it turns right so if you want to turn left, I’ll try to use the controller.
For the vehicle type, you can specify what kind of card is and so it has you know kind of it has predefined attributes that you can modify so the car behaves differently. Let’s make this it’s pretty heavy though. Let’s make it a sports car. You’ll see that the mass has changed, acceleration and torque and whatnot so all of this is completely controllable and you can get dialed in exactly what you’re looking for. With that said, let’s go ahead and hit go into physics and keep in mind this is going to be slow. This is real-time physics, but you can record this as a video and then you can you can see it in actual real-time. Right now, it’s going to be much lower than it should be because it’s running the calculations so this car now is going to go around a corner we can see the suspension going and it’s so far just doing a doughnut. It is really doing a doughnut. I mean it’s this is not an animation. This is not pre-canned this is not a video.
SOLIDWORKS Composer
This is actual physics live and I can take this and I can look at it from different angles while it’s doing its thing and it’s going to keep going. I know that not everyone makes cars, so we’ll figure out ways to apply this across multiple industries and I think it’s there. Last on the list here is Composer. I’ve been with Composer since the beginning and so I’m really excited to announce some cool stuff that we just got. We have full PDM integration which is outstanding. I know that a lot of people have asked for that. We’ve come up with interesting workflows to get around it and we’ve always made it work. So it’s not like we couldn’t do that before but now it’s integrated, now it’s seamless, it’s simple and it works. Then we have PMI support and that’s a huge one. We’ve been trying to get that for a long time. We have model-based definitions that use PMI from SOLIDWORKS.
PMI
Basically, SOLIDWORKS creates PMI. and it creates PMI data. Model-based definitions allow us to use that PMI data and create 3D PDFs. And I was like, “We got this data, let’s also build and bring that into Composer, and use that in our technical documentation into our assembly manuals. And just good data that was just throwing it out.” And I was like, “Let’s use that data. Why are we throwing it out? Why are we recreating it?”So now, we can pull that in. We don’t have to recreate it and that’s just huge.
We’re getting into other things like 3D library tools. And if we have a little bit of time, I’ll throw in a few animation techniques in there as well. So I have Composer opened right now. And, again, Composer is a technical communications tool to make assembly manuals, repair manuals, and operation manuals. It has a lot of different uses as like creating images or creating SPG files for websites and thing like that. So vector and raster content. But if I go and I, say, I want to open and I’m going to navigate into the vault here. I got a Composer file. Instead of just showing a current Composer file, let’s actually pull in this SOLIDWORKS.
It’s gonna take a minute but we are doing good on time so I’m gonna import the entire SOLIDWORKS assembly. I already have it checked out and merge it into a new document. I always like to do that and I wanna make sure this is the new option here. You wanna make sure this is checked that says, “Import PMI.” It says, “Overwrite color.” Don’t worry about that. You can always change the color after you import.
Let’s go and open it. And, again, this might take a minute, but I think it’s worth showing this live because it’s really, really cool how this works. Basically, what I’m doing here is I’m opening up a SOLIDWORKS assembly that has PMI applied to it. PMI is product material information and that is these annotations here and that can be dimensions, that can be notes and that can be annotations. There’s a lot of different things PMI means and Composer brings it in. You’re not just tied to notes. So if you have parts, you can pull that in as well. There’s no limitation there.
I have it in Composer and you see everything’s in 3D space. I can create views and I can change my rendering style. I can still do everything that I should be able to do in Composer. I can even move this. And let’s say that something didn’t quite attach or maybe for whatever reason. If I’d go into SOLIDWORKS and I change that leading style, I might be able to get that to work here but that’s that is the one limitation that I found now currently. And, again, this is a brand new feature so of course there is gonna be limitations out of the box initially.
You can’t change the kind of leaders or anything like that, you can’t change the text, it is permanent. That is controlled by SOLIDWORKS. You change it there and you’d update it and now it would update here. But I can change the color. You can also define color per view. So I can say, “Hey. In this step, that’s really important but in this next step we have this guy is the one that we wanna focus on.” And this one, I’m gonna gray it out ’cause we want it there, we just don’t want it to be really apparent or something like that and we wanna bring attention to that one right there. You can also specify that you know, per view, we have things that are hidden or shown. By the way, collaboration, that is anything two-dimensional. So that’s any of your 2D stuff that comes over into Composer. Composer’s both 3D and 2D. So we have our 3D assembly, which will come into play here in just a minute, where we’ll go into there and then we have our 2D basically, 2D tree, 2D assembly here and the PMI data is here. So this is all the PMI data that came in with Composer. If I go ahead and say, or payment with SOLIDWORKS into Composer and if I go and turn those off, I can create a view without those so you can define what is on and what’s off and what color it is and what position it is per view. That’s all in 3D space, so it’s a lot of really good uses there and of course a lot of potential for future uses and it kind of opens up doors for additional enhancements. Like that’d be nice to be able to adjust. The leaders or it’d be nice to just maybe modify that text a little better, you know, so it’s really going in the right direction.
3D Library
It’s something initially that I’m really happy with. Let’s talk about the 3D library. First, let’s talk about locking views and then we’ll get into the 3D library tools here. For the past couple of years, we’ve been able to create what we’ll call lock-in events on a view. But then you go into the model and you’re like, “I can still pan or I can still zoom.” So what do these actually do?
Well, these are assuming that you’re going to be using the player or you turn design mode off here and you can see how I can rotate but I can’t pan and I can’t zoom. So that’s what those do there. That’s not what’s new in 2018 and ’19, I think that was in ’17 when that came out. Now what I can do is I can take any view and I can right-click it and I can say lock views and to unlock it’s a right click on the lock of course.
What this now enables me to do is it doesn’t stop me from adjusting the view. But then I’m like, you know, that’s actually a really good thing because I want to be able to go in and I want to be able to zoom in and maybe pull another view office and if it was locked, I wouldn’t be able to do that. So right now I can zoom in, I can change something, I can create a new view, but what I can’t do is I can’t update this one has a lock on I can update this one, but this one I can’t. But that view now is locked in stone, which is great because let’s say that you change all the colors and re-position things that you’re neutral properties and you’re like this is my view that I want to control after I do an update, then you can lock it down and that view will never change, it will change if you update, if it’s tied to that update, but nobody can manually go in and change that view until it’s unlocked. So it’s a really really good addition there. Now the next thing I gonna talk about is the 3D Library.
But we’ll show it because it is just really neat and some of you might think it’s a good thing, but I’m kind of on the fence. If I go to the model browser here, I have all these 3D tools. If you’ve ever worked with me, you know that I prefer to use the image library, and taking like, you know, a screwdriver, hammer. I like to use the 2D panels just because they’re easy and you can do leaders and things like that and it’s just simple drag and drop. You’re dealing in 2D space instead of 3. So that’s kind of my always been my preferred method with these 3D tools, it has a little bit of complexity that maybe isn’t necessary, but maybe that’s what you want.
Let’s say I wanted to bring in a wrench, right? I take this wrench, I’ve taken it out, I drag it and I bring it in. So it’s the same thing as doing an open merging to the current document. I have my wrench. It turns on assembly selection mode. There’s the wrench there. If I turned it on, I can take it, I can move it around, just remember it is a 3D object in 3D space, so you know, you just have to have a little bit of control with it and so if I do like this here. I can go ahead and maybe put this. Say there was a bolt there or something like that and I can maybe bring it through and show it. Now you’re in 3D space so it might not be lined up, right? So you’ve got to have to kind of move it around. That’s the only thing that because it is 3D, you just have to have a little bit more control with it. But it is really cool. Looking at these tools, you got a screwdriver and there’s a bunch of bolts, etc. There are some really good models. You just drag and drop and you can use this in production.
It’s just a little bit harder to use than the 2D elements. I’d suggest if you’re brand new to Composer probably don’t look at this yet, but if you are an advanced user, you’ve been using it for a while and you have full control over the 3D space, then go ahead. Bring these in because they are neat, and they do present well in the final publication. So that wraps it up for what I had on the agenda.
If you would like to learn more about SOLIDWORKS 2019 or SOLIDWORKS Technical Communications, feel free to CONTACT US TODAY!


