Have you ever wanted to bring a large assembly into SOLIDWORKS Composer
without creating a link to the top-level assembly in SOLIDWORKS? It’s
possible! SOLIDWORKS Composer
allows multiple assembly files to be compiled into a single SOLIDWORKS
Composer document, and to do it, you need to use SOLIDWORKS Composer Projects.
Using Projects, each sub-assembly just below the top-level assembly can be
imported into a single Project and assembled together. This breaks the tie to
the top-level assembly, and allows smaller updates to be made to the
independent sub-assemblies without having to update the entire thing.
Bottom line? SOLIDWORKS Composer Projects add complexity to structure and
workflow. Using Projects gives you greater control over what gets updated, as
well as the ability to import multiple assemblies referencing multiple
configurations.
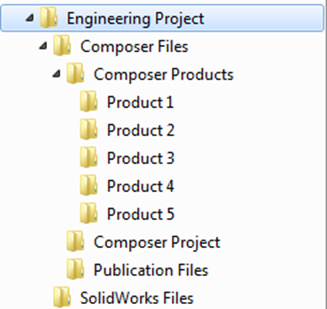
When using Projects, the best practice is to plan out your file structure for
file storage. There will be a Project “top level” file, your SOLIDWORKS files,
and a series of files created for each specific item that is being imported
into the Project. Each unique file being imported should have its own folder,
as there will be multiple files associated to it. The file structure below is
for reference. You should decide on a naming convention and structure before
beginning your new Project.
The process below describes in detail how to set up SOLIDWORKS Composer
Projects. Click on the pictures for a larger size and more detail.
STEP 1

Windows file permissions will not allow the file to be open in multiple
programs during Import. After import, the file can be open in both programs.
STEP 2
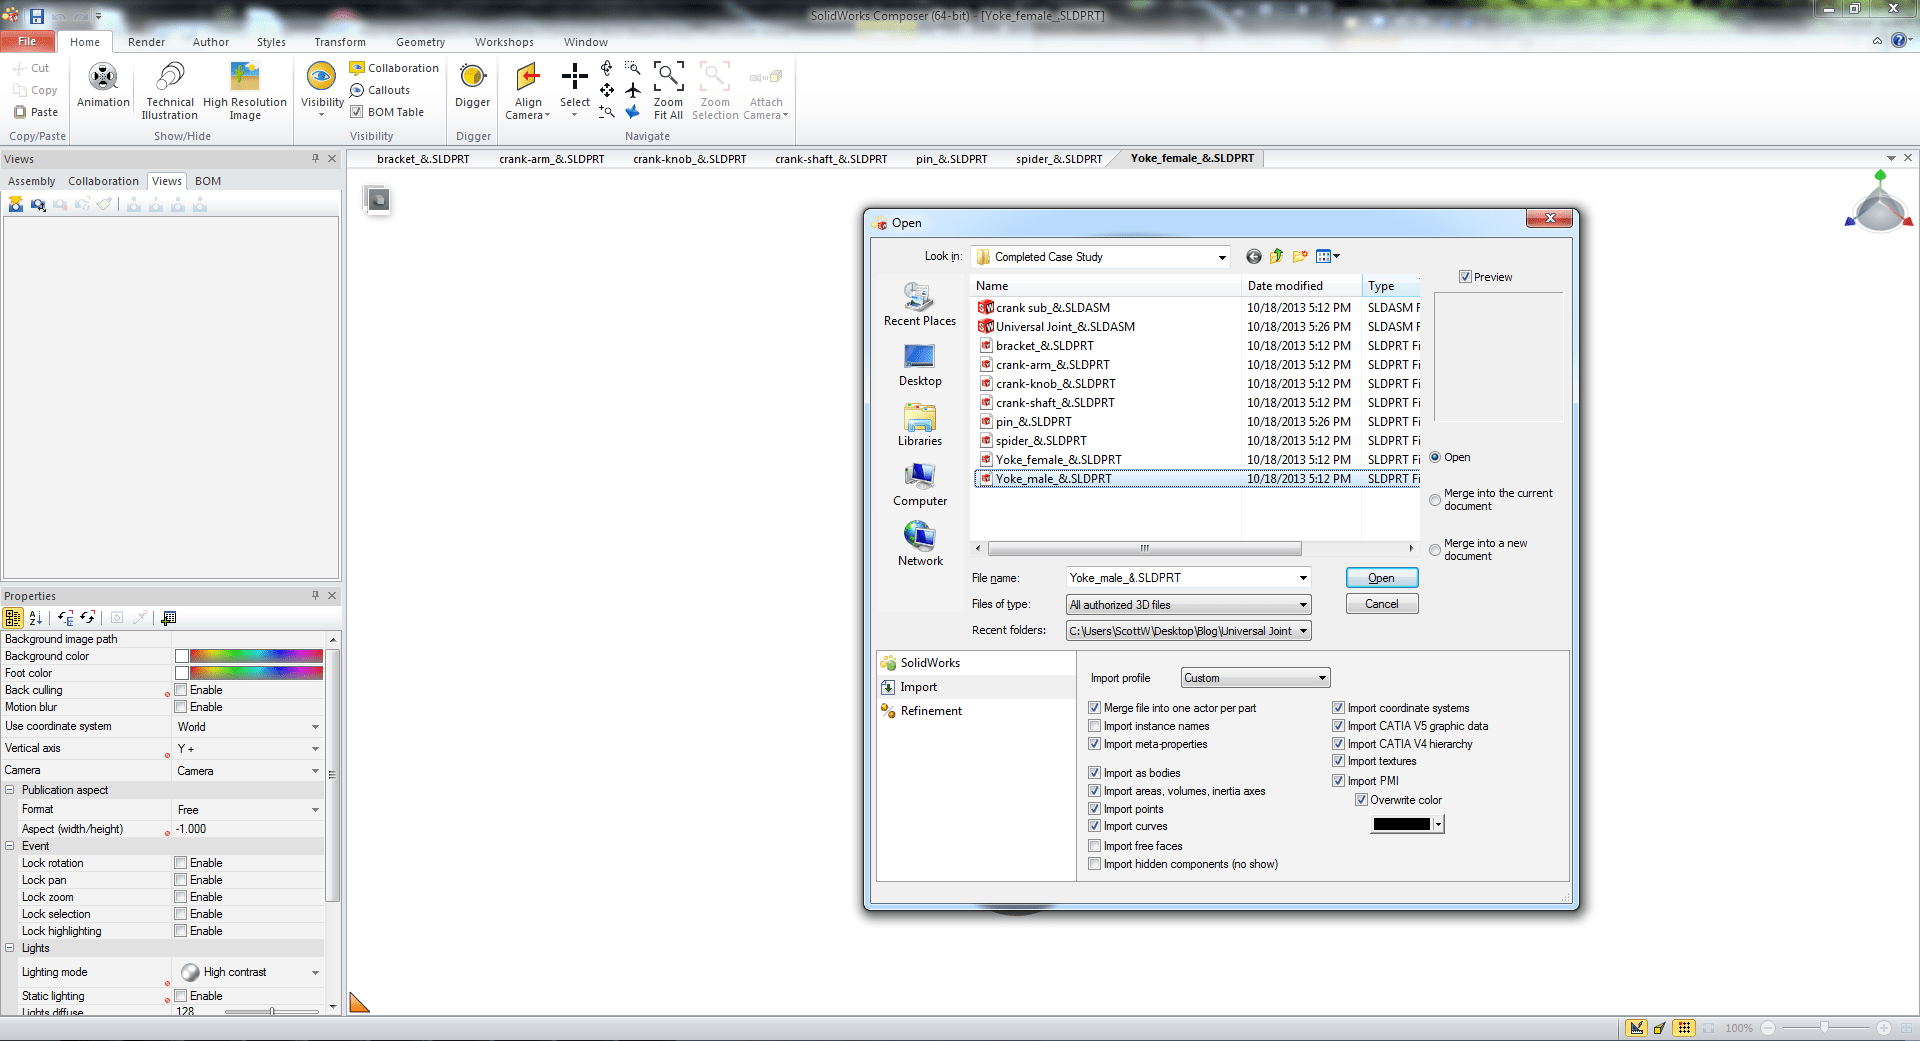
Open SOLIDWORKS Composer and import your SOLIDWORKS assembly.
- File > Open
-
Navigate to the first SOLIDWORKS part or assembly you wish to bring into
Composer and then select it – but don’t open it just yet
Note: This process needs to be repeated for each specific assembly,
individual part, or specific configuration you wish to update
independently in the final Project.
STEP 3
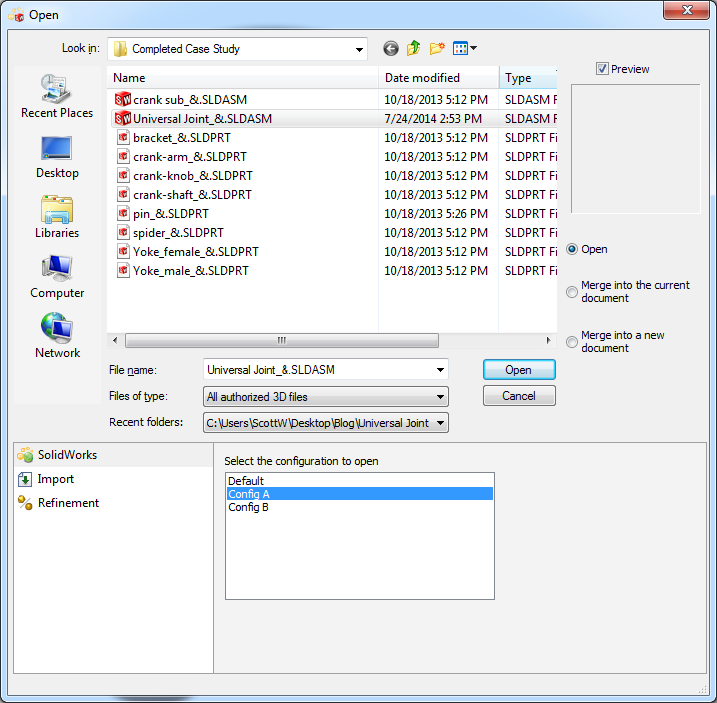
portion of the open pane. Select the particular configuration you wish to
import. Once you have the desired configuration selected, click on “open” to
load that specific configuration.
STEP 4
 Closer look
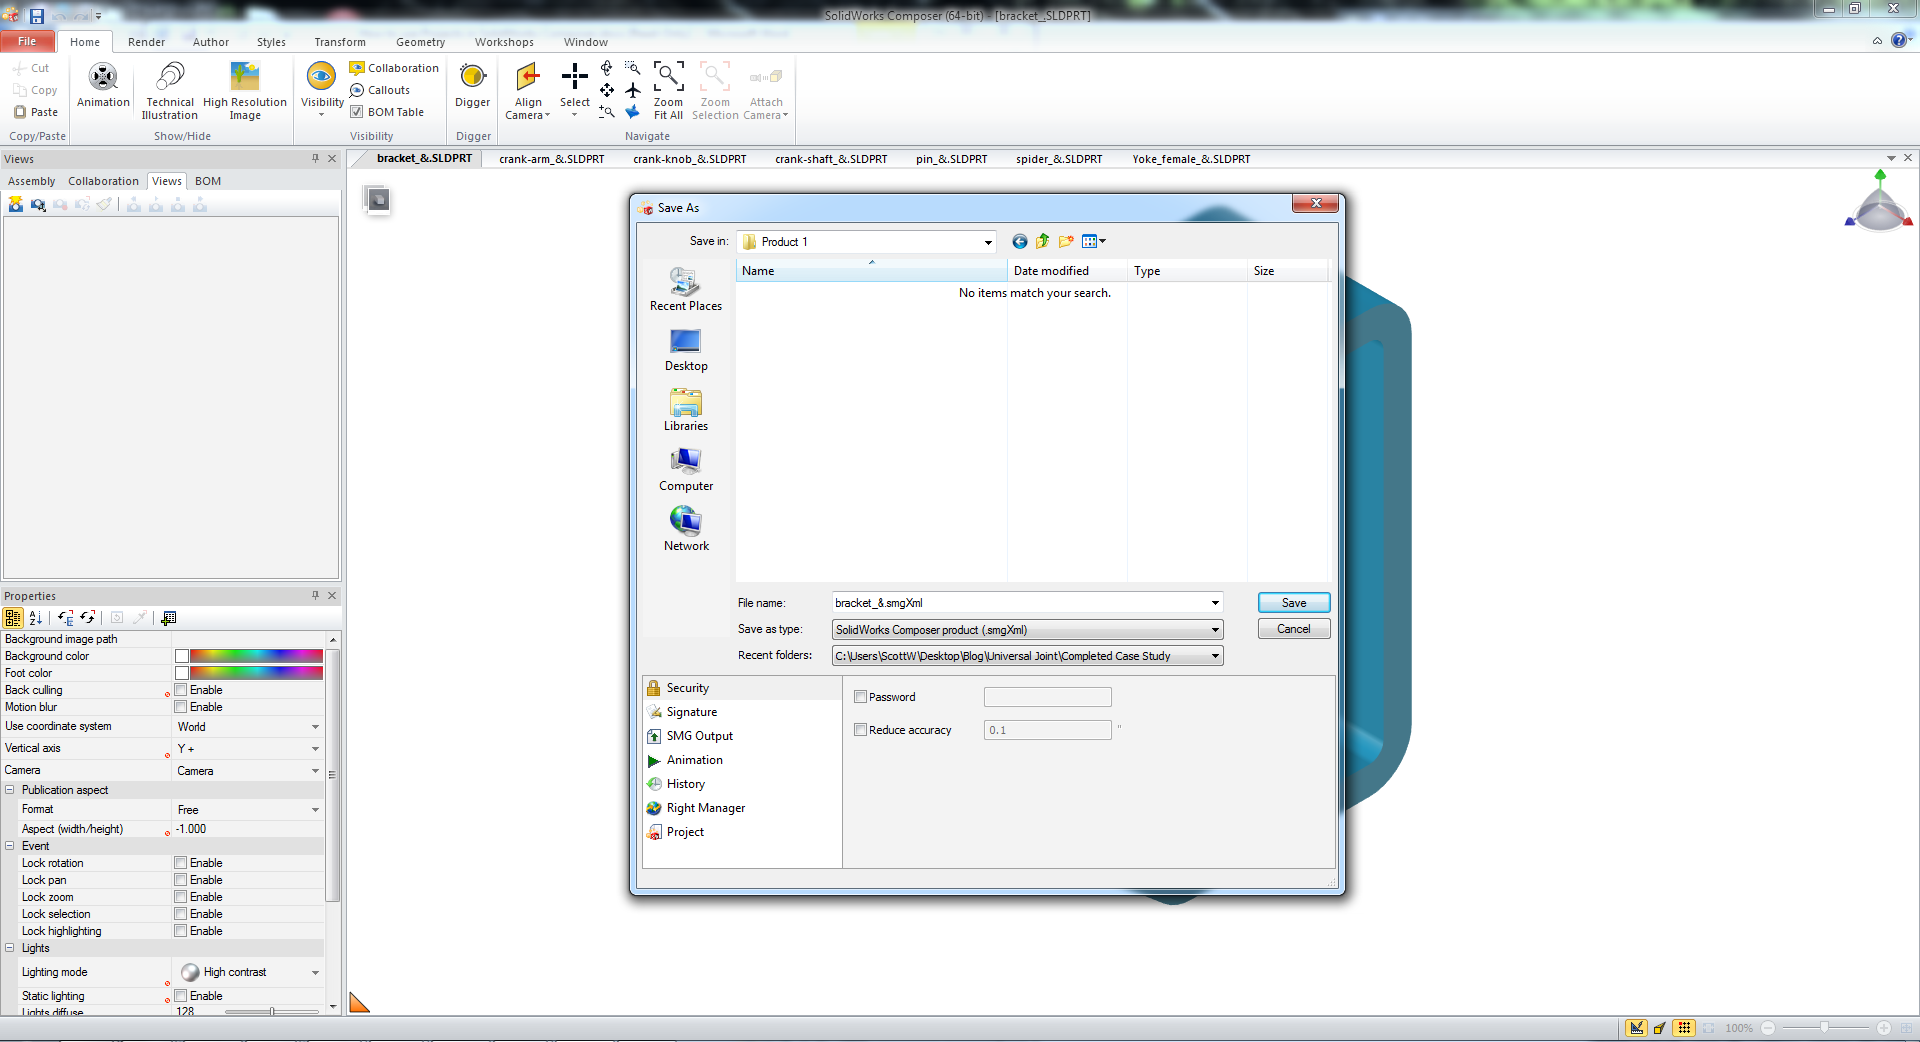
Composer will convert the SOLIDWORKS file into Composer. Once it finishes,
“save as” a SOLIDWORKS Composer Product. ( file type is *.smgxml)
- File > Save As > .SMGXML
- Save to the SOLIDWORKS Composer assembly directory
SOLIDWORKS Composer will automatically generate a few files into this
directory.
-
*.smgxml – An XML file containing the assembly structure. It denotes the
position of the actors, the properties of the viewport, and so on - *.smggeom – A binary file containing the assembly geometry
- *.smgView – An XML file containing view definitions
- *.smgSce – An XML file containing scenario (animation) definitions
- *.jpeg – JPG images that appear in the Views pane
We will repeat this process for each of our configurations or any specific
files. Each Configuration will need its own folder with the folder name
the same as the configuration for easy access later.
STEP 5
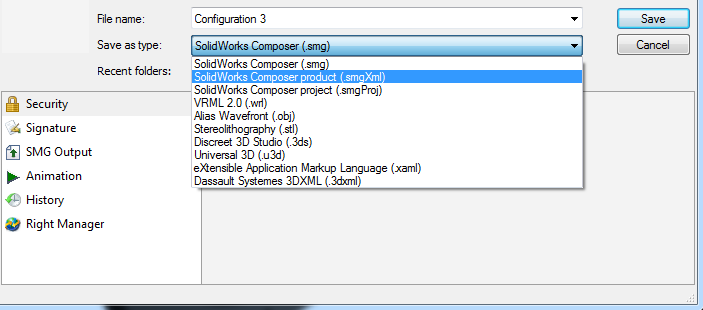
Save each part as a SOLIDWORKS Composer Product (*.smgxml). Once all files
have been converted to Products create a new SOLIDWORKS Composer Project.
Click File > New Project.
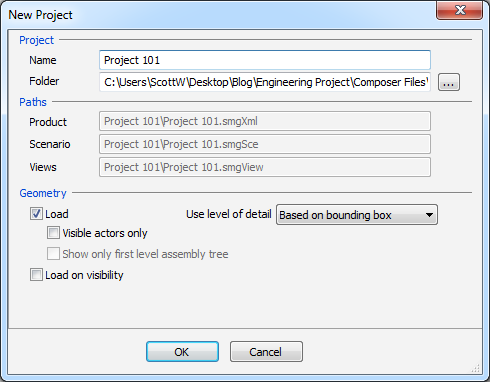
A Project is a multi-file format consisting of one or more SOLIDWORKS
Composer product files and a project (*.smgProj) file. The *.smgProj file
is an XML file that references the top-level *.smgXml, *.smgView, and
*.smgSce files that comprise the project.
Projects organize your SOLIDWORKS Composer files into folders and let you
share references. For example, two projects can share the same .smgXml,
.smgGeom, and .smgView files but have different .smgSce files. Projects
also let you import multiple subassemblies even when you do not have the
main assembly file. Click OK and a dialog box will open, asking to select
the first Product for the Project. At this time, multiple Products can be
selected by holding down [CTRL] and selecting each SMGXML.
SMGXML files – or Products – can be imported into the Project at any time.
STEP 6
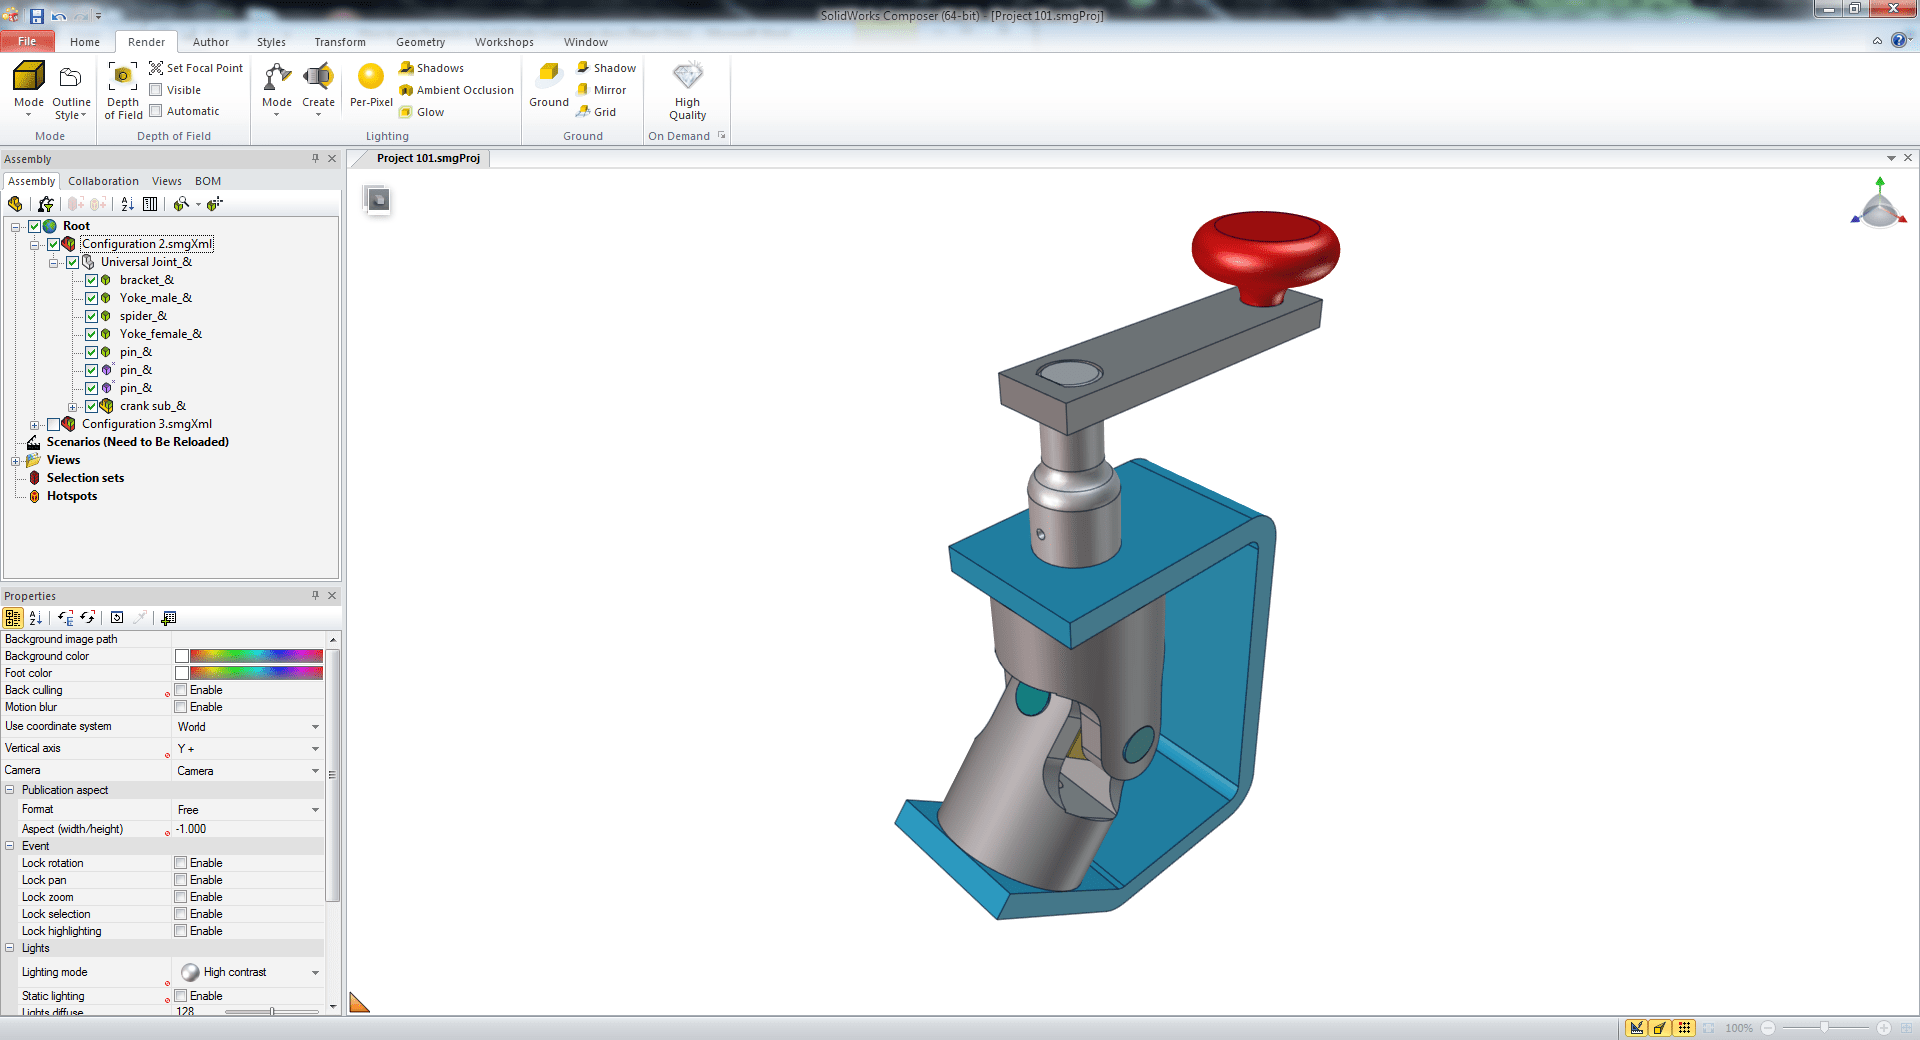
Once your Project is created, you can now add your SOLIDWORKS Composer
Products into the project and control which configuration you want to
display under the assembly tab.In the example on the left, the Project is
called ROOT and currently there are 2 assemblies (configuration 2 &
configuration 3) under ROOT. Notice that only configuration 2 is active
and displayed right now. There is also the option to go into each
configuration and select the each part individually.
STEP 7
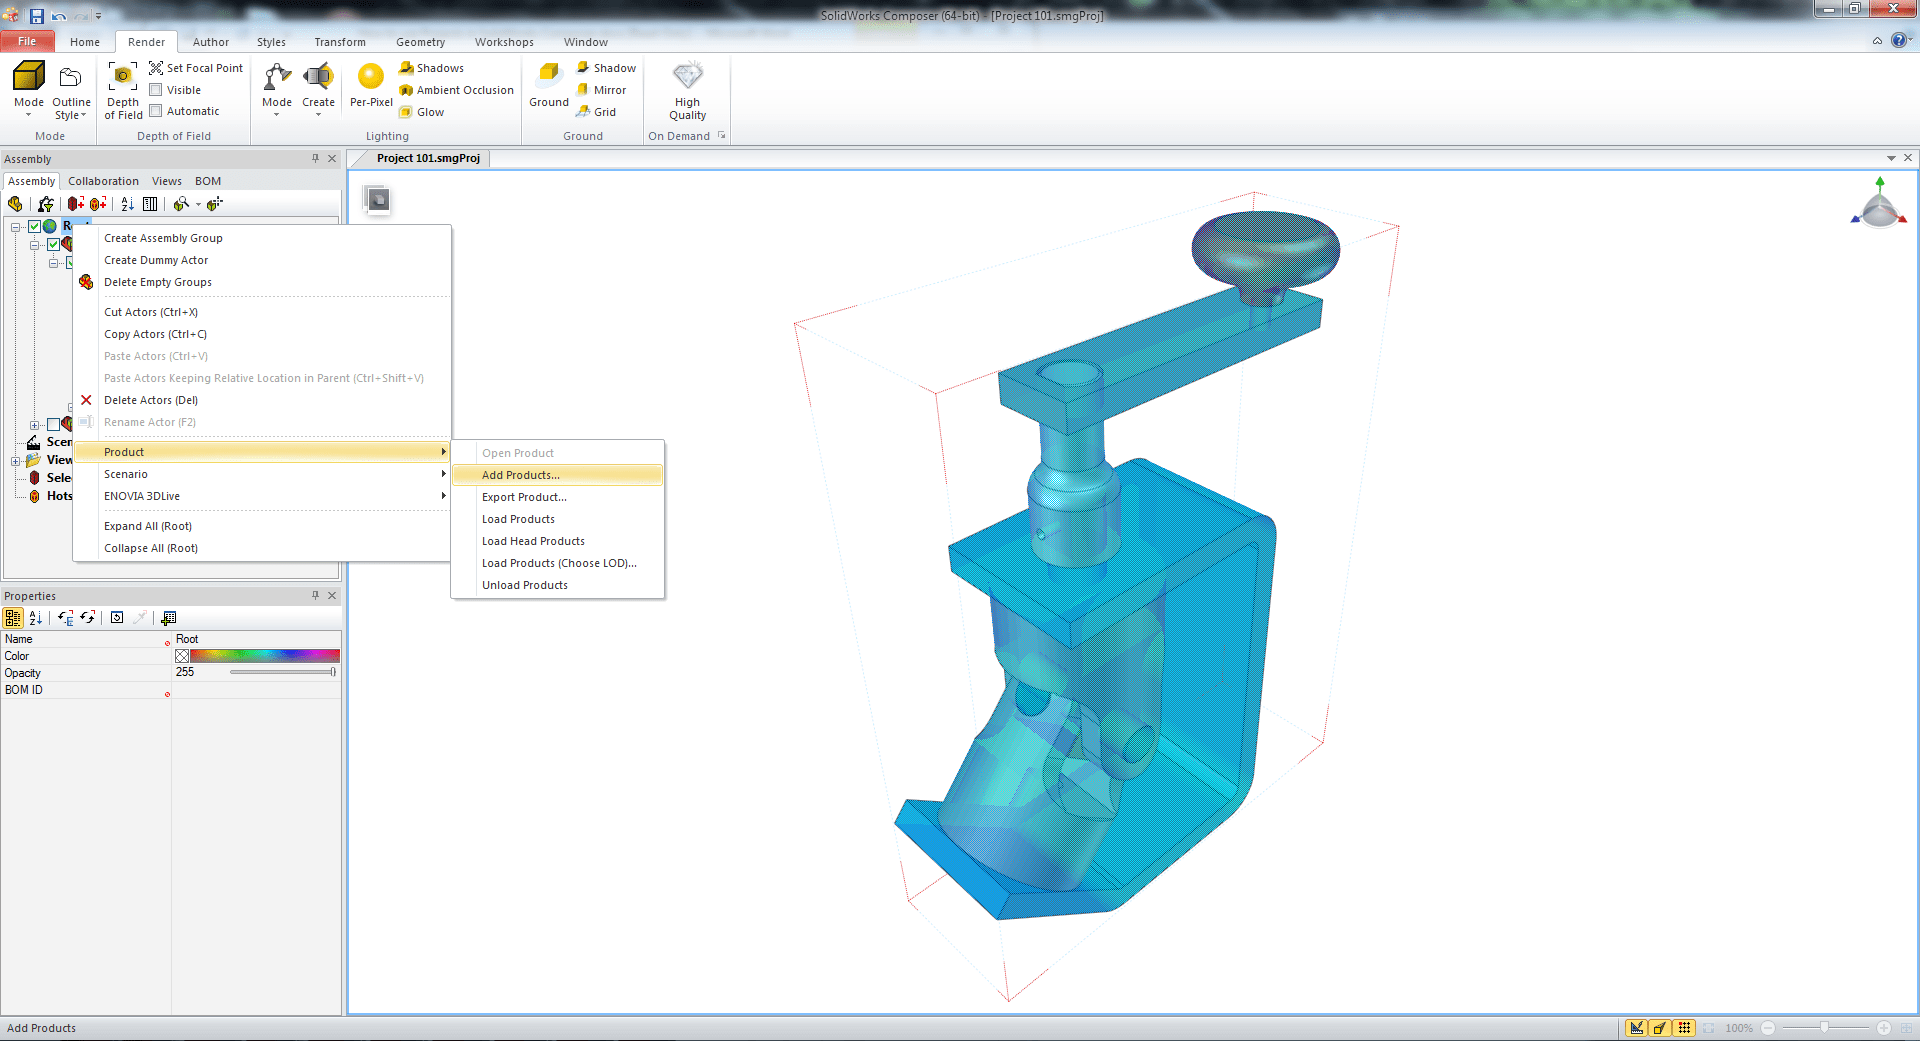
To add a Product: Right click on the top level project and scroll down to
Product > Add Products.At this point you will navigate to the *.smgxml
files that you have saved as for each configurations earlier.
- Select any Product .SMGXML to import into the Composer Project file
STEP 8
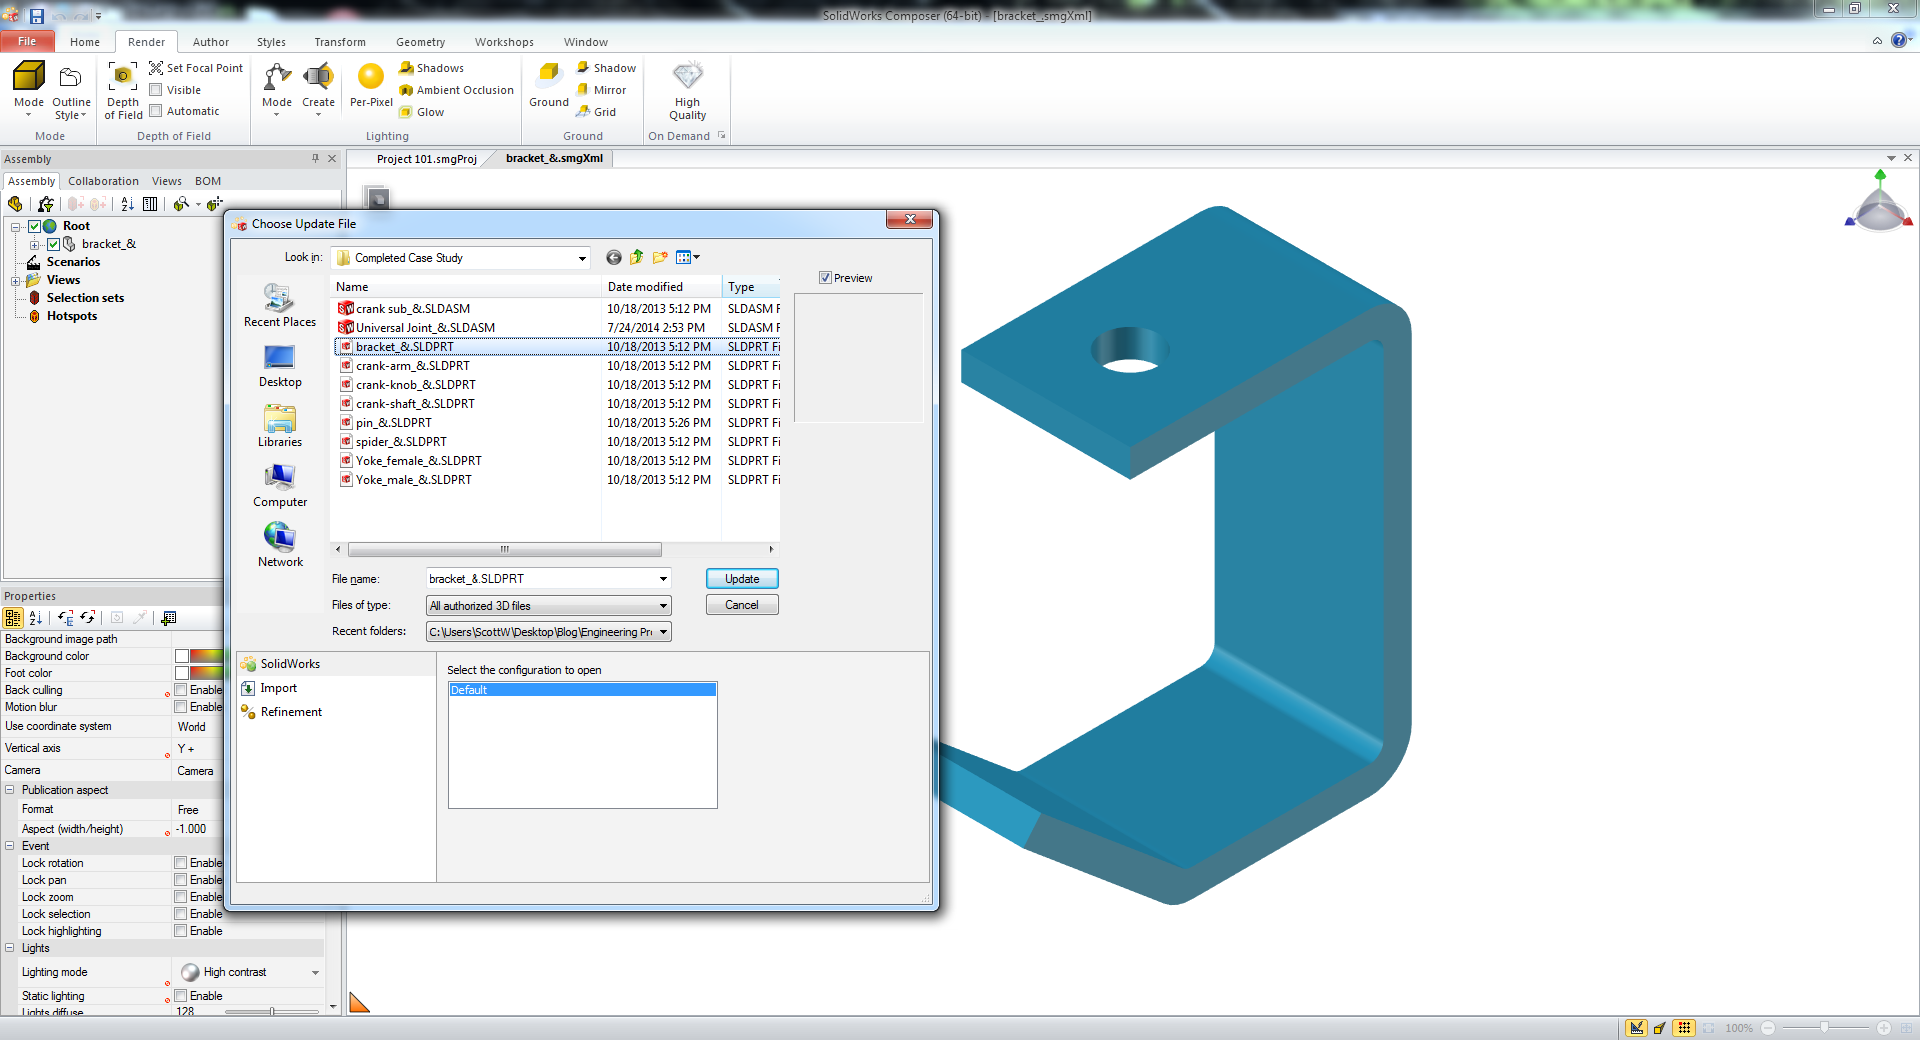
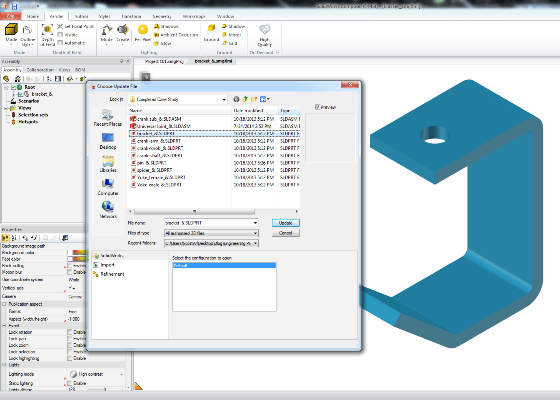
To update the Project you must update the Products. Think of the Top Level
Project as a container of links, linking to the Products. Once a Product
updates it will also update in the Project.
- Open a Composer Product file .SMGXML
-
Update by going to File > Update > select original SOLIDWORKS file
for update, pick the configuration and select update -
Close and reopen the Project; the updated Product will show now show in
the Project.
Note: Each Product has to be updated independently unless using Composer
SYNC Enterprise.


Thank you for posting this! I work with a lot of large assemblies (with subassemblies within subassemblies) and noticed that .SMG gets quite sluggish when animations are put into it. I was wondering when I create animations within a subassembly’s .SMGXL, will this animation show up/be referenced in the top assembly .smgproj?
If I wanted to update an actor of the top assembly, can I save a .SMG from SW of that new part, then update the top assembly project file using the .SMG or do I need to have the .SMGXL first, and update the subassembly .smgxl after that? Perhaps this will be easier to explain with the example below:
File Structure:
-Top Assy .SMGproj
-Subassembly 1 (SMGXL)
-subassembly 1a (SMGXL)
-subassembly 1b (SMGXL)
-Part A
-Part B
-Part B 2.0 (SW file)
If I made new animations/views in Subassembly 1b, will this be reflected in the Top assembly project file? If I want to update Part B2.0, can I save Part B2.0 as an .SMG and use this file to update Part B in Composer or do I need to make it a .SMGXL in Composer, exit out, and update Subassembly 1b.smgXL file?
Thanks for your help!
To answer your first question, each sub-assembly must be an .SMGXML in order to import into a Composer Project .SMGPROJ. Luckily for this scenario a Product “.SMGXML” acts the exact same way an .SMG does. Really they are one in the same, a Product is an .SMG but it’s unpacked. Think of it like a .ZIP file that you extract to a folder. The items in the folder are the same as the items inside the .ZIP.
Each one of your .SMGXML Product files can contain an animation and you can have an additional animation at the Project level. The .SMGXML files do not show up in the Project level, but they can be rendered out by r-clicking the Product in the Project tree and scrolling down to “Product > Open Product”. Once the Product “SMGXML” file is open you have access to its animation.
By breaking out the individual animations you keep the top level Project much smaller and should see a noticeable performance improvement. The Project level can have its own animation showing how the individual sub-assemblies come together and the individual sub assembly animations will be contained in their respective .SMGXML Product files.
To answer your second question about updating the Project once a change is made in SOLIDWORKS, that update will always be at the .SMGXML level. The Project level is simply a container to house all the .SMGXML Products. Each Product acts identically to an SMG file and is updated as such. Once updates are made to the Product close then re-open the Project and it will be updated as well.
It is important that you do not update the Project at the Project level. Composer should prevent you from doing this but certain actions can get you around the block. We do not recommend ever updating the Project level, think of it simply as a link to the other Product files.
An update to the Product SMGXML file can be performed with two separate operations. Both are acceptable and have the same outcome. Operation one, export the part or sub-assembly from SOLIDWORKS as an .SMG. Open the Product SMGXML and go to File > Update and chose the .SMG you saved from SOLIDWORKS for updating. Operation number two, open the Product SMGXML and go to File > Update and chose the SOLIDWORKS Part or Assembly that updated and click OK.
I cannot stress enough how important it is to have the default document import settings consistent from the time you originally import the models into composer to when you update them. Any changes can cause the update to fail or have undesired results.
Below is a link to a series of videos, the second link will take you to a video where we callout the recommended default property setting in order to get Projects to update correctly.
Look for section Advanced Training: Composer Projects
https://www.hawkridgesys.com/tutorials/solidworks-composer/
Please check out this video at 4:40 for an example of recommended settings
https://www.youtube.com/watch?v=uGWMWir1D70&list=PLPdRf85-kUEgrJm80MlVZ8cnY5b2kg7wZ&index=3
I hope this helps, please let me know if you have any questions.
Totally agree. I tell my clients from organizational world that it’s often important to clarify the problem in order to know what we want to be better. I do however ask them to stay away from what I call the “causality debate” as that simply slows down getting to know what they want to be better.